
3. Adding niceties
In the previous section, we created a Fastly service, added our domain and origin hostname, activated a Fastly service configuration, used the curl command line utility to verify that Fastly is caching our website, and created a secure preview domain name.
We could probably stop here if the domain didn't make a difference. But there's so much more to explore! Fastly can do a lot more than just cache our website.
In this section, we'll explore some of the edge features available to our Fastly service. For example, we'll configure Fastly to serve synthetic responses to certain types of requests, enable compression of our assets, and configure a streaming logging endpoint so we can see who's visiting our website.
Configuring synthetic responses
We can configure Fastly to serve synthetic responses when Fastly receives an error code from our origin or when the request matches a condition. This comes in especially handy for things like 404 pages and robots.txt files. Fastly provides several quick configurations for common responses, but you can also configure custom responses based on HTTP status codes or conditions. See our responses tutorial for more information. We'll discuss conditions later in this tutorial.
Let's configure synthetic responses for our 404 page and our robots.txt page. Click Edit configuration to clone the service and create a new draft version. Then, on the Content page, click the On switches next to 404 page and robots.txt, as shown below. You can edit the default responses before clicking Save.

Click Activate to activate the new version of the service configuration. Now, when we visit https://tacolabs.global.ssl.fastly.net/robots.txt, we see the content of our robots.txt synthetic response.
Enabling shielding
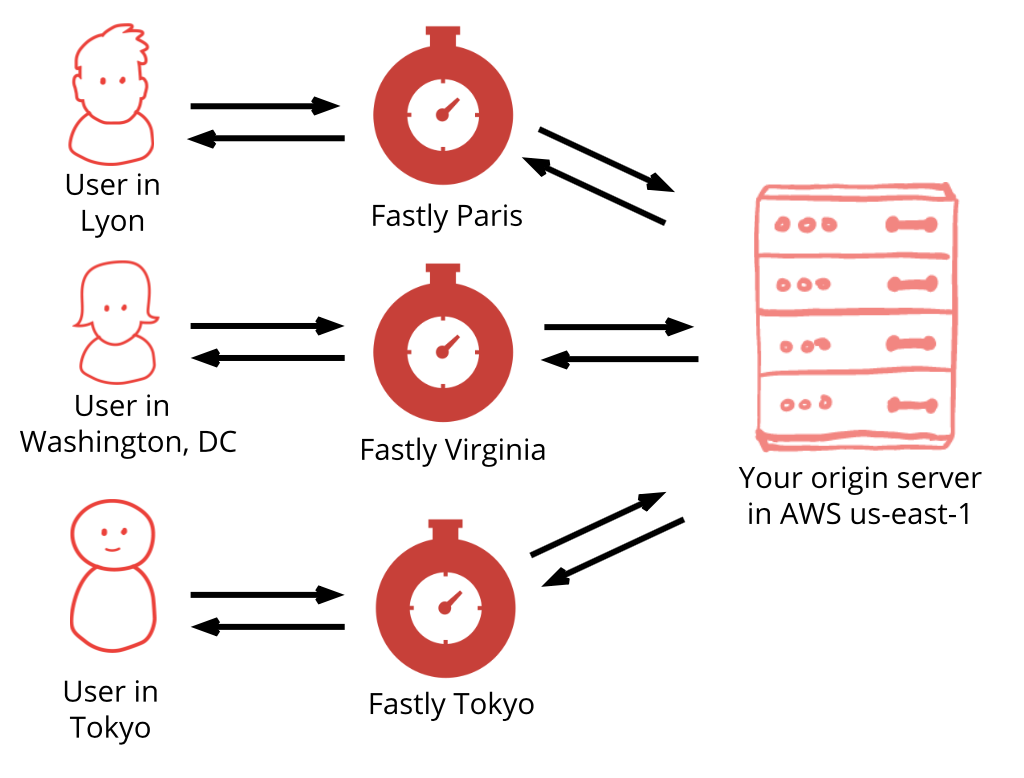
By default, Fastly POPs pull resources directly from your origin, as shown below. It can take a while for the cache to populate since every POP has to individually fetch the resources from your origin. The spike in traffic to your origin is temporary and will only last as long as it takes to populate the cache.
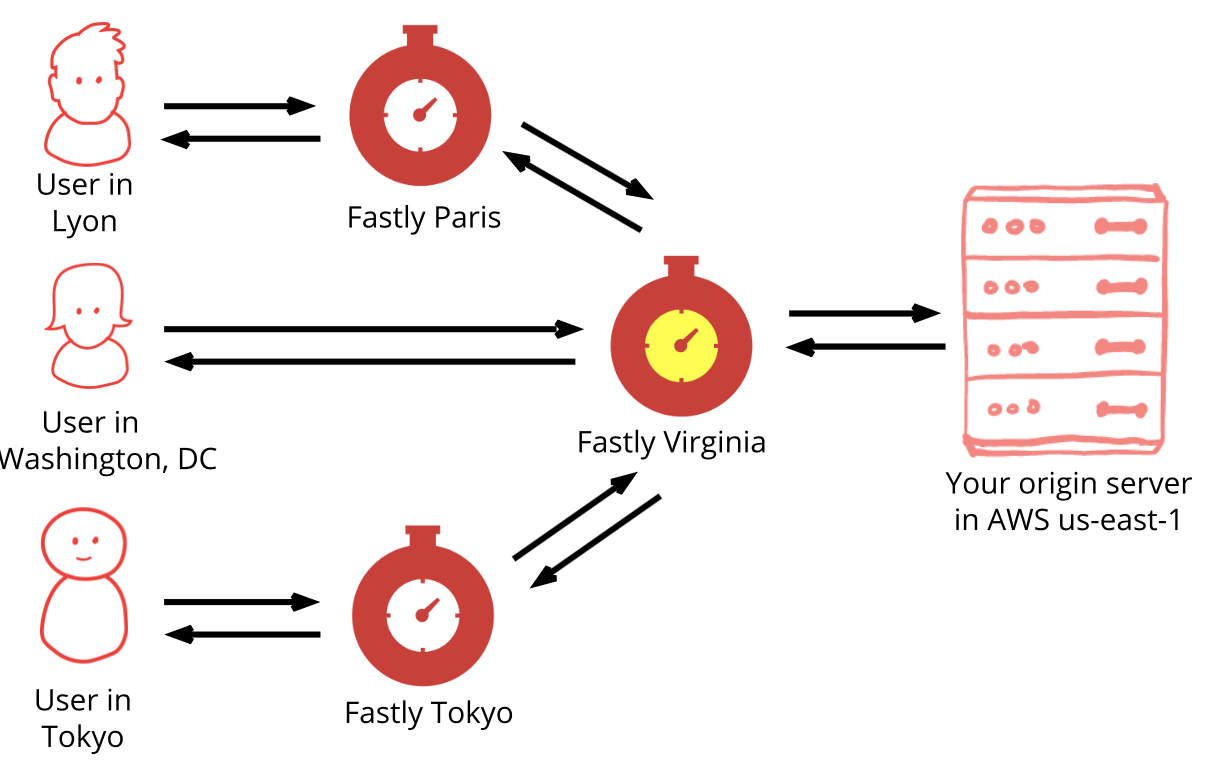
That method works, but Fastly provides a more efficient way of populating the cache. The shielding feature allows you to designate a single POP to handle all of the requests to your origin. Enabling shielding can reduce the load on your origin and reduce your web hosting expenses by ensuring that requests to your origin come from the shield POP, as shown below.
TIP: Be sure to read our shielding documentation before enabling this feature. Shielding can affect traffic, hit ratios, and performance.
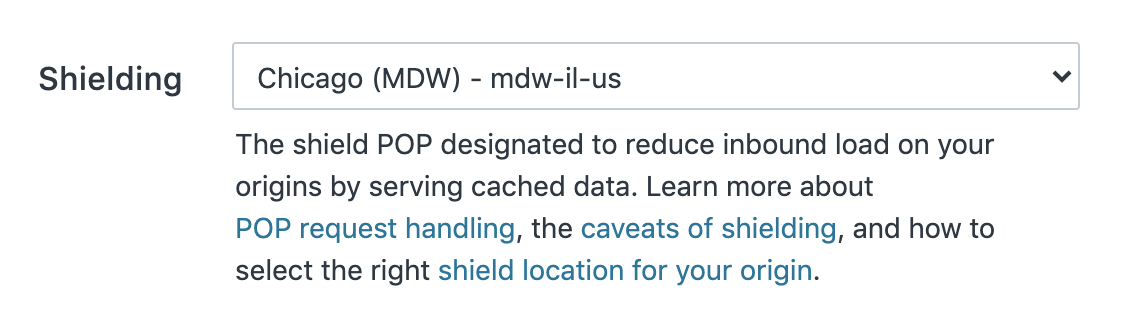
Let's enable shielding for Taco Labs. Click Edit configuration to clone our service and create a new draft version. Then, on the Origins page, click the name of our origin to edit the origin's settings. On the Edit this host page, select a shield POP, as shown below. In this case, we'll select Chicago (MDW) since this is the closest POP to our AWS region, us-east-2. Click Update to save the changes.
TIP: Generally speaking, we recommend selecting a POP close to your origin. This allows faster content delivery because Fastly optimizes requests between the shield POP and the edge POP (the one close to the user making the request). To help you choose a POP location close to your origin, we provide several lists for AWS and Google Cloud Services (GCS). See our documentation on choosing a shield location for more information.
Now we can activate! Click Activate to activate the new version of the service configuration.
Checking the headers
We've enabled shielding for our service, but how can we tell if it's working? Let's check the HTTP headers again. Open a terminal application and enter the following command:
$ curl -svo /dev/null -H "Fastly-Debug:1" https://tacolabs.global.ssl.fastly.netWe'll see the following in the output:
< X-Served-By: cache-mdw17347-MDW, cache-bur17582-BUR< X-Cache: MISS, MISS< X-Cache-Hits: 0, 0We know shielding is enabled because two cache nodes are displayed in the X-Served-By header. The X-Cache header (MISS, MISS) tells us that the object was not in cache at the shield or the edge node, so Fastly fetched the website from our origin. The next time we run the curl command or load the website, Fastly will load the website from cache.
TIP: For more information about the possible values of the
X-Cacheheader, see our shielding debugging documentation.
Using compression
Taco Labs is a static website, but its performance could still benefit from compression. You can reduce the size of assets by compressing them before they're sent to the visitor's web browser, effectively speeding up the delivery of the website. When we enable this feature in the Fastly web interface, Fastly will dynamically fetch content from our origin, compress it, and then cache it.
Let's click Edit configuration to clone our service and create a new draft version. Then, on the Content page, click the On switch next to Default compression policy, as shown below.

TIP: The default setting is good enough for most websites since it compresses most common file types. If you have specific file types you need compressed, you can set up an advanced compression policy.
Now we can click Activate to activate our service configuration.
Purging the website
We've enabled compression, but we can't yet test our website to see if it's being compressed. To understand why, recall that we recently enabled shielding. Since the shield POP has cached the uncompressed version of our website, the newly compressed version of our website won't be live yet. How can we tell the shield POP and all of the other cache nodes to remove the cached version of our website and fetch the new, compressed version of our website?
In a word, purging. We can tell Fastly to purge some or all of our website's content from cache by using one of the provided purging methods. Purging is something we'll need to do anytime we change content on our website. For example, if we updated the title of a blog post, we'd need to purge the URL of the blog post to see the new title. And if we updated the logo shown on every page of our website, we'd need to purge the URL of the image.
Purging can be expensive, so it's best to purge only the content that has changed and nothing else. We'll discuss more targeted purging options later in this tutorial. For now, since we've implemented a big change that potentially impacts all of our assets, we'll use purge all. This method will purge all of our website's content from Fastly's cache nodes.
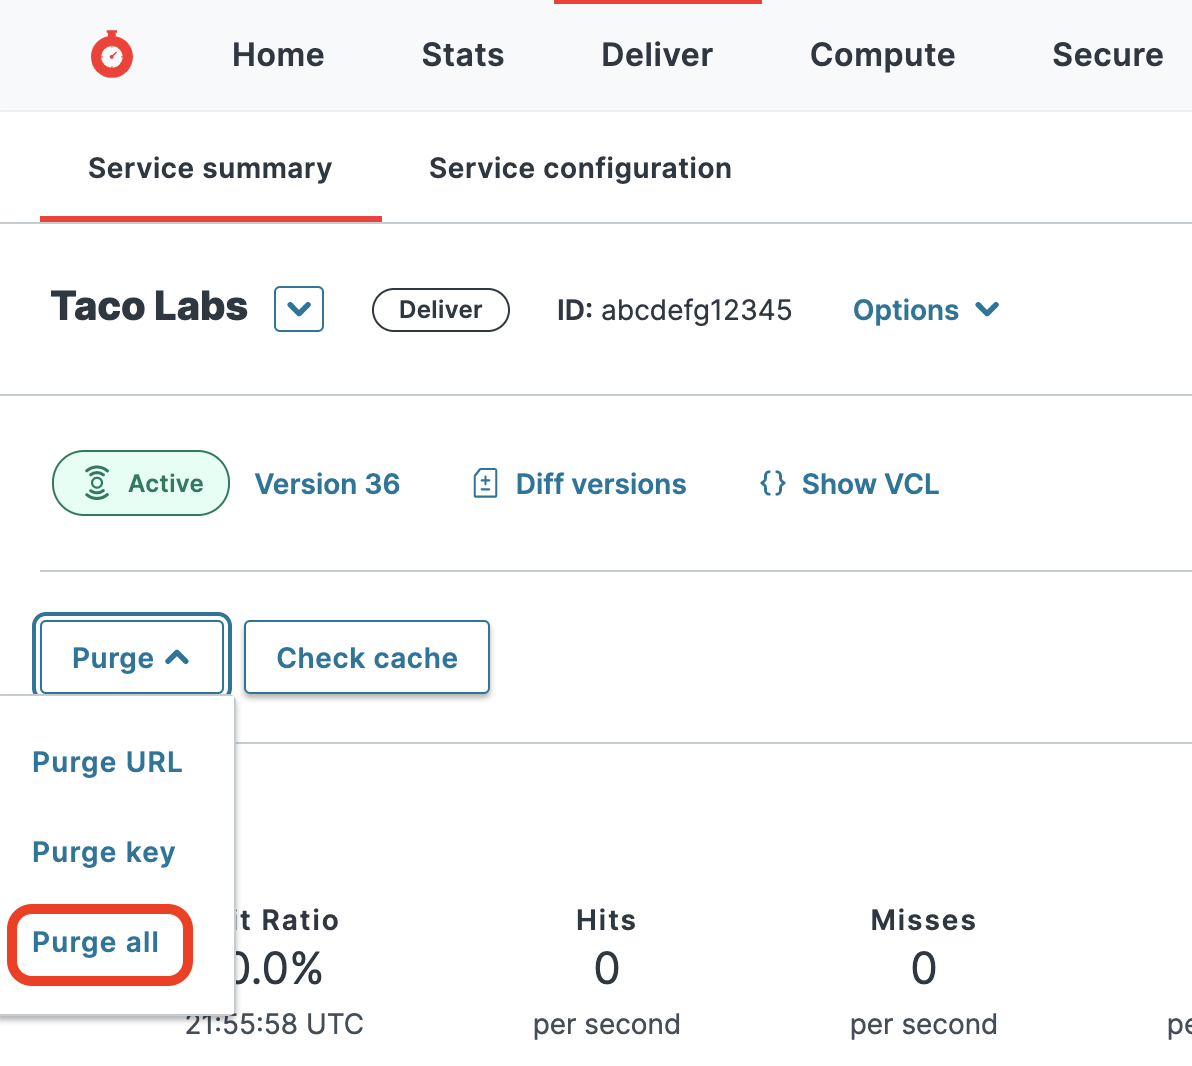
Let's purge all of our content now. Click Deliver at the top of the screen, and then Service summary. Then select Purge all from the Purge menu, as shown below.
Now that the previous uncompressed version of our website has been purged, we can test to see if our website is effectively using compression. We can use Google's PageSpeed Insights to check the status of compression. If the Enable text compression audit for our website passes, we know that compression is working. Mission accomplished!
Enabling logging
Logging events and traffic is an important part of monitoring your website or application. One side effect of using a CDN is that you'll need to change how you log traffic. After you start using Fastly, virtually all of the traffic to your origin will originate from Fastly. To collect visitor logs going forward, you'll need to use Fastly's real-time log streaming feature to set up a log streaming endpoint.
Fastly's real-time log streaming feature provides integrations for a number of third-party services. Our logging documentation provides a list of supported services. You can connect your Fastly service to one or more logging endpoints.
Understanding the two types of logging
For the purposes of this tutorial, we'll set up two logging endpoints: Amazon S3 and Papertrail. These services each work a bit differently. For Amazon S3, Fastly batches the logs and writes them hourly to files in the Amazon S3 bucket. It's a cost-effective way to store log files that aren't needed for real-time analysis.
Papertrail is built specifically for streaming log files — when paired with Fastly's real-time log streaming feature, it's like tailing a file that updates in real time. You can see the logs scrolling across the screen and use search features to find specific log entries.
Setting up Amazon S3 log streaming and troubleshooting issues
To set up an Amazon S3 log streaming endpoint, we'll create a new S3 bucket for our logs and follow the instructions in the Fastly documentation for setting up an Amazon S3 endpoint. It's as easy as filling out a form and activating the new service configuration.
Fastly provides several tools that you can use to troubleshoot issues with logging endpoints. First, log in to the Fastly web interface. If Fastly tried and failed to send logs to a logging endpoint, an error message will appear in the web interface, as shown below.
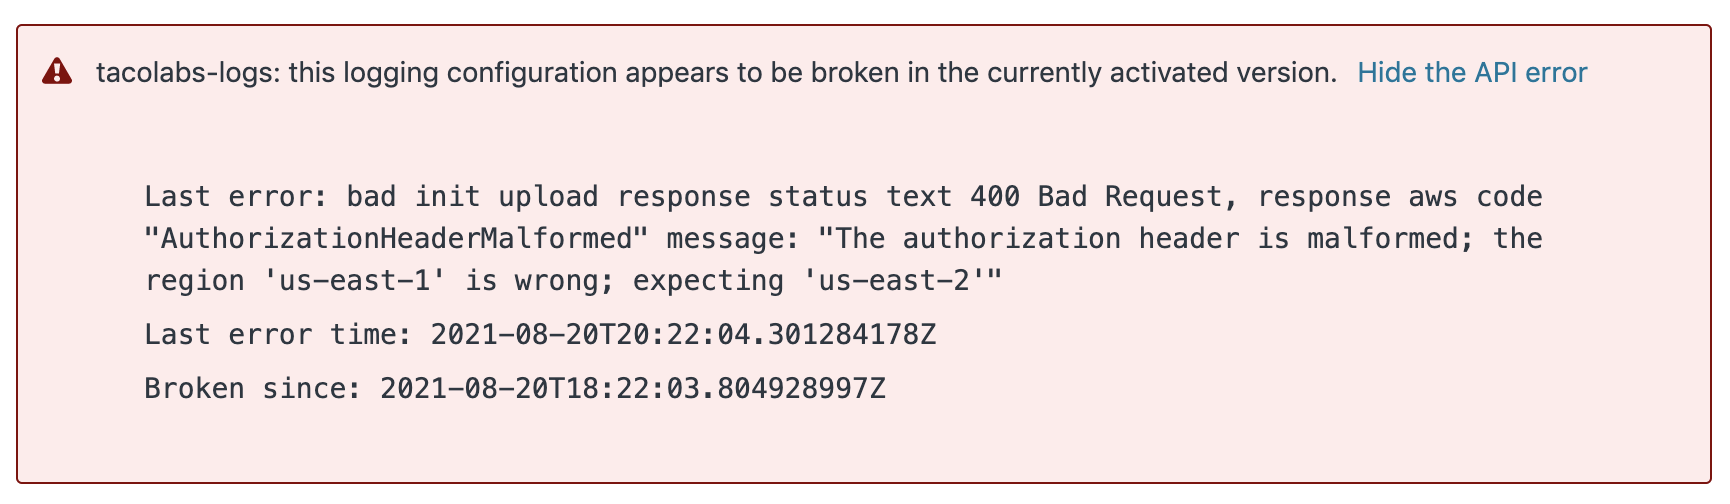
In this case, we forgot to change the default value in the Domain field (under Advanced options). The exact hostname will vary depending on the AWS region your S3 bucket is located in. Since we're using the us-east-2 region, we need to update the default hostname (s3.amazonaws.com) to s3.us-east-2.amazonaws.com. You can find the full list of AWS region codes on the AWS website.
Fastly writes the logs to our S3 bucket every hour, so it could take some time before the logs appear in the S3 bucket. Eventually, we'll see several new log files, as shown below. See our documentation on changing where log files are written to learn how to change the file names and control where the files are written.

We can use the AWS web interface to open the files. An excerpt of one of the files is shown below. Our documentation on streaming logs provides more information about the log formats and variables.
{ "timestamp":"2021-08-23T16:32:15", "client_ip":"73.127.172.124", "geo_country":"united states", "geo_city":"albuquerque", "url":"/tacos", "request_referer":"https://tacolabs.global.ssl.fastly.net/base-layers/", "request_user_agent":"Mozilla/5.0 (Macintosh; Intel Mac OS X 10_14_6) AppleWebKit/537.36 (KHTML, like Gecko) Chrome/92.0.4515.107 Safari/537.36", "fastly_is_edge":true, "response_state":"HIT", "response_status":302, "response_reason":"Moved Temporarily", "response_body_size":313, "request_method":"GET", "request_protocol":"HTTP/1.1", "fastly_server":"cache-phx12422-PHX", "host":"tacolabs.global.ssl.fastly.net" }{ "timestamp":"2021-08-23T16:32:15", "client_ip":"73.127.172.124", "geo_country":"united states", "geo_city":"albuquerque", "url":"/favicon.ico", "request_referer":"https://tacolabs.global.ssl.fastly.net/tacos/", "request_user_agent":"Mozilla/5.0 (Macintosh; Intel Mac OS X 10_14_6) AppleWebKit/537.36 (KHTML, like Gecko) Chrome/92.0.4515.107 Safari/537.36", "fastly_is_edge":true, "response_state":"PASS", "response_status":403, "response_reason":"Forbidden", "response_body_size":303, "request_method":"GET", "request_protocol":"HTTP/1.1", "fastly_server":"cache-phx12422-PHX", "host":"tacolabs.global.ssl.fastly.net" }Setting up Papertrail log streaming
Papertrail is a useful all-in-one service for people who are new to logging. Unlike S3, which holds your log files but doesn't do anything else with them, Papertrail is built exclusively for real-time logging and analysis. After you create a Papertrail account and set up a logging endpoint for Papertrail in the Fastly web interface, can you watch real-time log events scroll by in the Papertrail interface, as shown below.

Papertrail has features that make it easier to read logs. For example, you use Papertrail to group types of log entries, search through logs, and configure alerts for certain types of events.
You can also configure Papertrail to filter logs. By dropping the lines for successful requests for things like static assets (e.g., CSS files and images), you can reduce the chatter in the logs and focus on log lines for requests with 4xx and 5xx statuses. This makes it much easier to find issues.
