
3. Using Compute with Taco Labs
Recall that we created a static website called Taco Labs in Introduction to Fastly's CDN that we cached using a VCL service. In this section, we'll start migrating parts of our VCL service to a new serverless application hosted on the Compute platform. We'll use service chaining to configure our existing Fastly VCL service as the origin for our Compute service.
To be clear, there's no pressing need for us to migrate our existing VCL service to a new Compute service. Taco Labs is doing perfectly fine using a VCL service. However, placing a serverless application in front of our VCL service allows us to take advantage of the Compute platform to start performing more complex tasks at the edge.
As we progress through this section, you'll learn how to take the Fastly CDN features that we previously implemented in our VCL service and add them to your serverless application.
How service chaining works
Before we start building our new serverless application, let's talk about service chaining and how it will work with our particular website. In a nutshell, service chaining connects two Fastly services together by configuring one Fastly service to act as the origin for another Fastly service. For the purposes of this tutorial, we'll place our new Compute service in front of our VCL service.
When Fastly receives a request from a client, our serverless application will process the request, using our VCL service as an origin server, as shown below. When our VCL service receives a request from the Compute service, it will determine whether or not the requested objects are in cache. If the objects aren't in cache, our VCL service will fetch the objects from our S3 bucket and cache them.
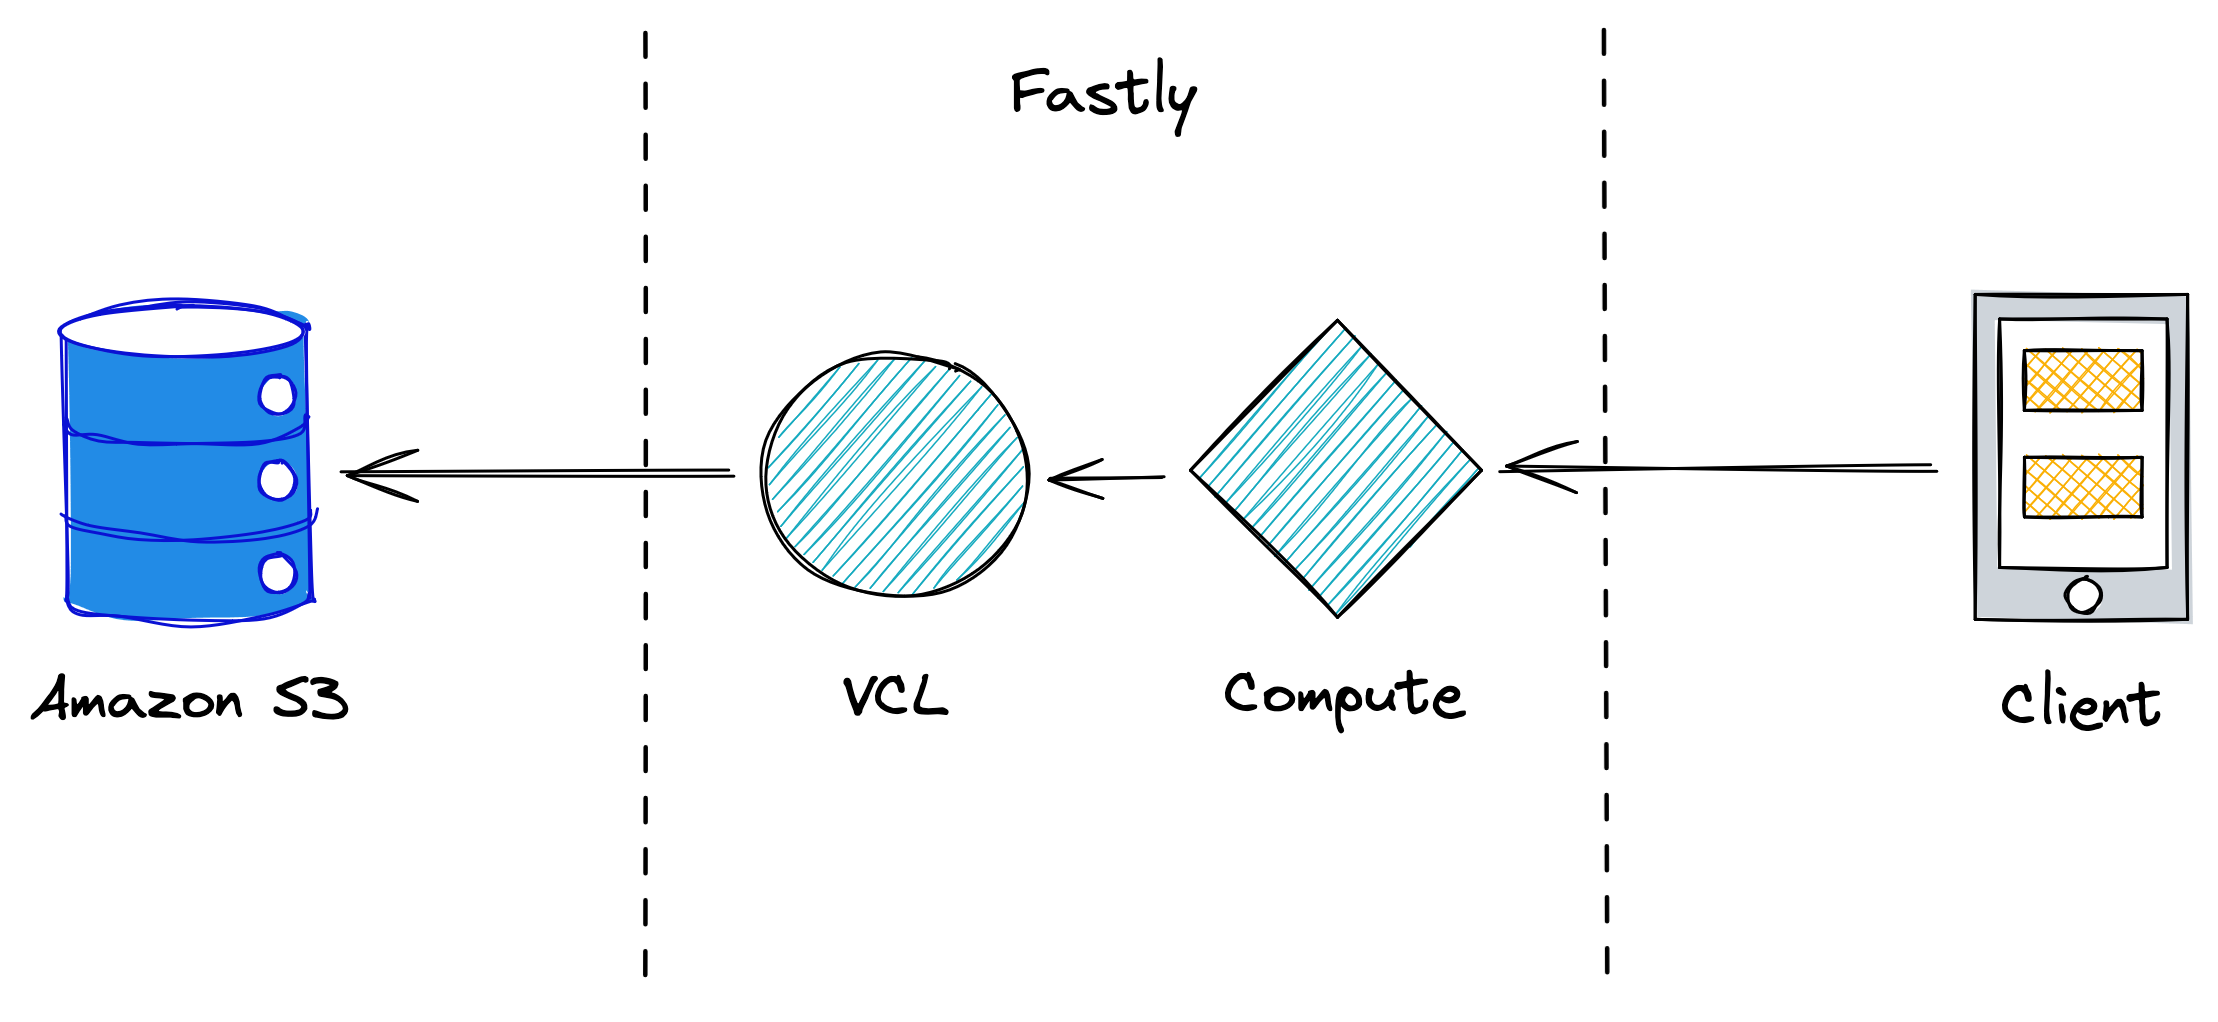
If you're wondering why we're chaining services instead of moving everything to our serverless application, it's because VCL services currently support more Fastly features than Compute applications. For example, Compute currently doesn't support shielding. In addition, there's no way to adjust cache rules for objects received from an origin before they are inserted into the cache within a Compute service.
By keeping a VCL service behind our serverless application, we can use the Compute platform to perform complex tasks at the edge while keeping shielding enabled and maintaining the ability to fine-tune our caching rules.
TIP: To learn more about service chaining, refer to our service chaining concept guide.
Creating a new serverless application
Let's create a new serverless application from scratch. As with our Hello world application, we'll make a new directory on our computer:
$ mkdir taco-labs-computeNext, we'll change directories so that we're inside the new directory in our terminal application. This is where the files for our serverless application will be stored.
$ cd taco-labs-computeNow we can create the new application by using the Fastly CLI.
$ fastly compute initThe Fastly CLI will walk you through the process of naming your application, adding a description, selecting a programming language, and choosing a starter kit. Follow the prompts. As with our Hello world application, we recommend selecting JavaScript for the language and Default starter for JavaScript for the starter kit.
Next, we'll build and deploy the application and using the Fastly CLI:
$ fastly compute publishIMPORTANT: We previously used the fastly compute serve command to preview our Hello world application. We won't be able to preview this new application on our computer since the development server can't transit the Fastly caching infrastructure, and that needs to happen when chaining services.
You'll create a new Compute service when deploying the application for the first time.
For the example in this tutorial, we'll call our service taco-labs-compute, and the URL for the service will be https://namely-modern-mosquito.edgecompute.app. Of course, you'll have a different URL for your own service. If you visit your service's URL, you'll see the default Compute welcome page.
Preparing our VCL service
Now we need to reconfigure our existing VCL service so we can use Compute with Taco Labs. This tutorial assumes that you've completed Introduction to Fastly's CDN and still have the Fastly service you created as part of that tutorial. You can use the same Fastly service and configuration as a starting point for this part of the tutorial, or you can duplicate the existing service to create a new one. Alternatively, if you don't have the original service or if you're in a hurry, you could just use our VCL service as an origin—we don't restrict access.
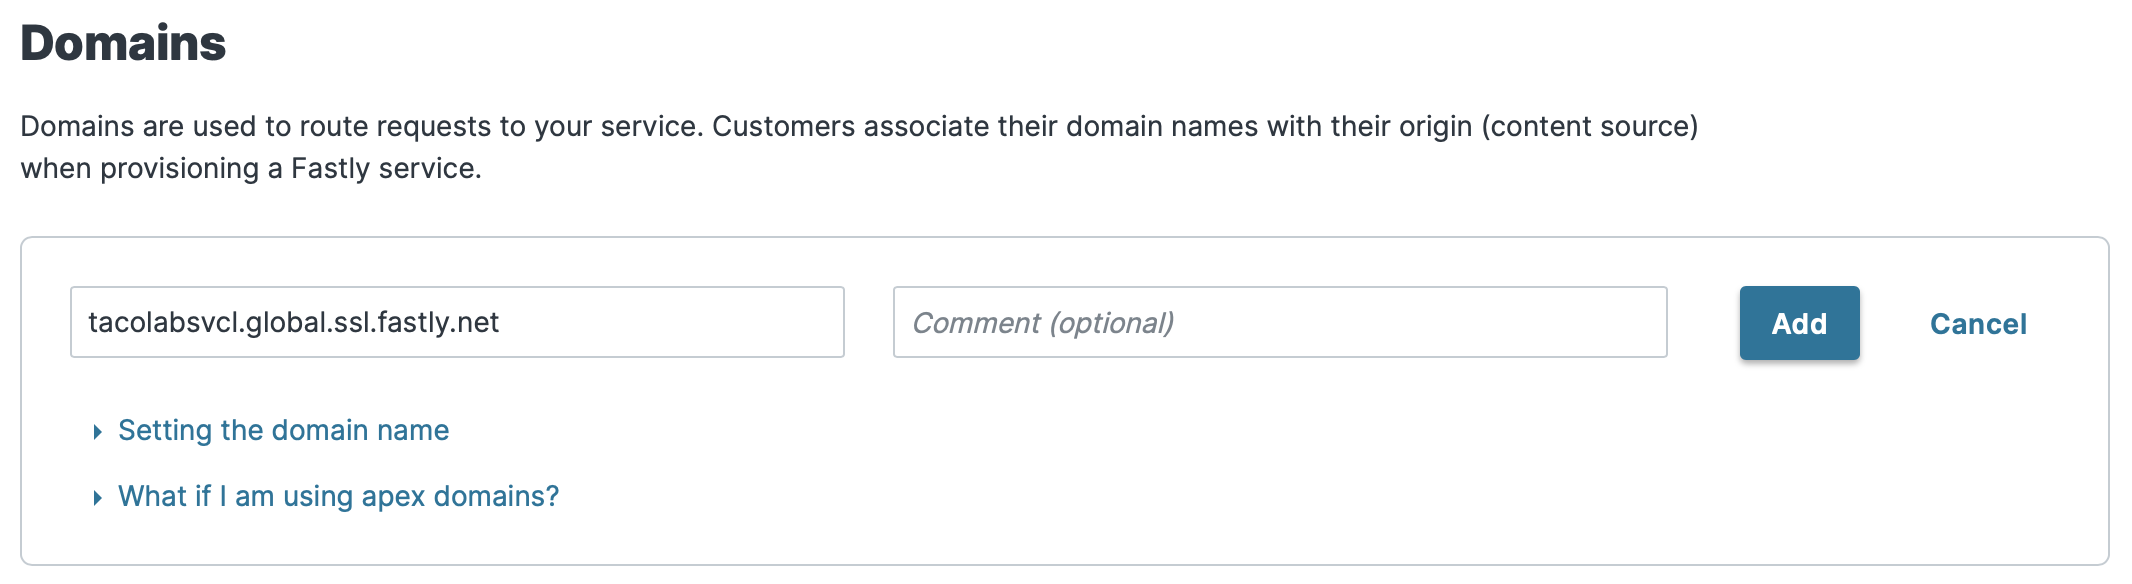
Remember, because we're chaining services, our VCL service will act as a backend for the Compute service while still sitting in front of our Amazon S3 bucket. Because the VCL service won't be customer-facing, we'll use the Fastly web interface to remove all of the domains from that service and add a new one: tacolabsvcl.global.ssl.fastly.net. We'll use this new URL as the origin hostname for our Compute service.
Log in to the Fastly web interface and click the Edit configuration button to clone the VCL service and create a new draft version. Then, on the Domains page, remove all of the domains and add a new one, as shown below. We'll use tacolabsvcl.global.ssl.fastly.net here, but you'll need to use a unique URL. Click Add to save the new URL.
Next, you'll need to disable the Force TLS and enable HSTS setting on the Settings page.
Click Activate to activate the new version of the service configuration. We can verify that our VCL service is still serving the Taco Labs website by using our web browser to open https://tacolabsvcl.global.ssl.fastly.net. Our VCL service is ready to act as the origin for our serverless application.
Adding the origin hostname and overriding the host header
Now that our VCL service is configured as an origin, we can update our Compute application. The first step is adding the VCL service's domain as the origin hostname for our Compute service. We'll do this by using the Fastly CLI. Enter the following command in your terminal application, replacing the URL for address and override-host with whatever URL you used as the domain for your VCL service:
$ fastly backend create --version=latest --autoclone --name=vcl-origin --address=tacolabsvcl.global.ssl.fastly.net --override-host=tacolabsvcl.global.ssl.fastly.netThat command clones your Compute service configuration, creates a new origin that uses your VCL service domain, and adds an override host header for the origin.
Next, we'll update our application to use the origin server. Using a text editor like VS Code, open the src/index.js file in the taco-labs-compute directory. Delete the existing content, copy and paste the following code into the file, and then save it.
/// <reference types="@fastly/js-compute" />
function handler(event) { return fetch(event.request, {   backend: "vcl-origin",   cacheOverride: new CacheOverride("pass") });}
addEventListener("fetch", event => event.respondWith(handler(event)));
The name of the backend specified on line five corresponds to the name we used in the command to add the backend to the Compute service configuration. If you named your backend something other than vcl-origin, be sure to update the name on line three.
As previously discussed, we won't be able to preview this particular Compute application locally. But if we were creating an application that we could preview locally, we'd update the fastly.toml file to include the backend information for local testing, like this:
[local_server] [local_server.backends] [local_server.backends.vcl-origin] url = "https://tacolabsvcl.global.ssl.fastly.net"Now we can publish our changes by entering the following command in our terminal application:
$ fastly compute publish --version latestThis command builds and deploys our serverless application. It also activates the draft version of our Compute service configuration that contains the new backend we added using the earlier terminal command.
Now if you visit the URL for your Compute service (ours is https://namely-modern-mosquito.edgecompute.app), you'll see the Taco Labs website, as shown below.
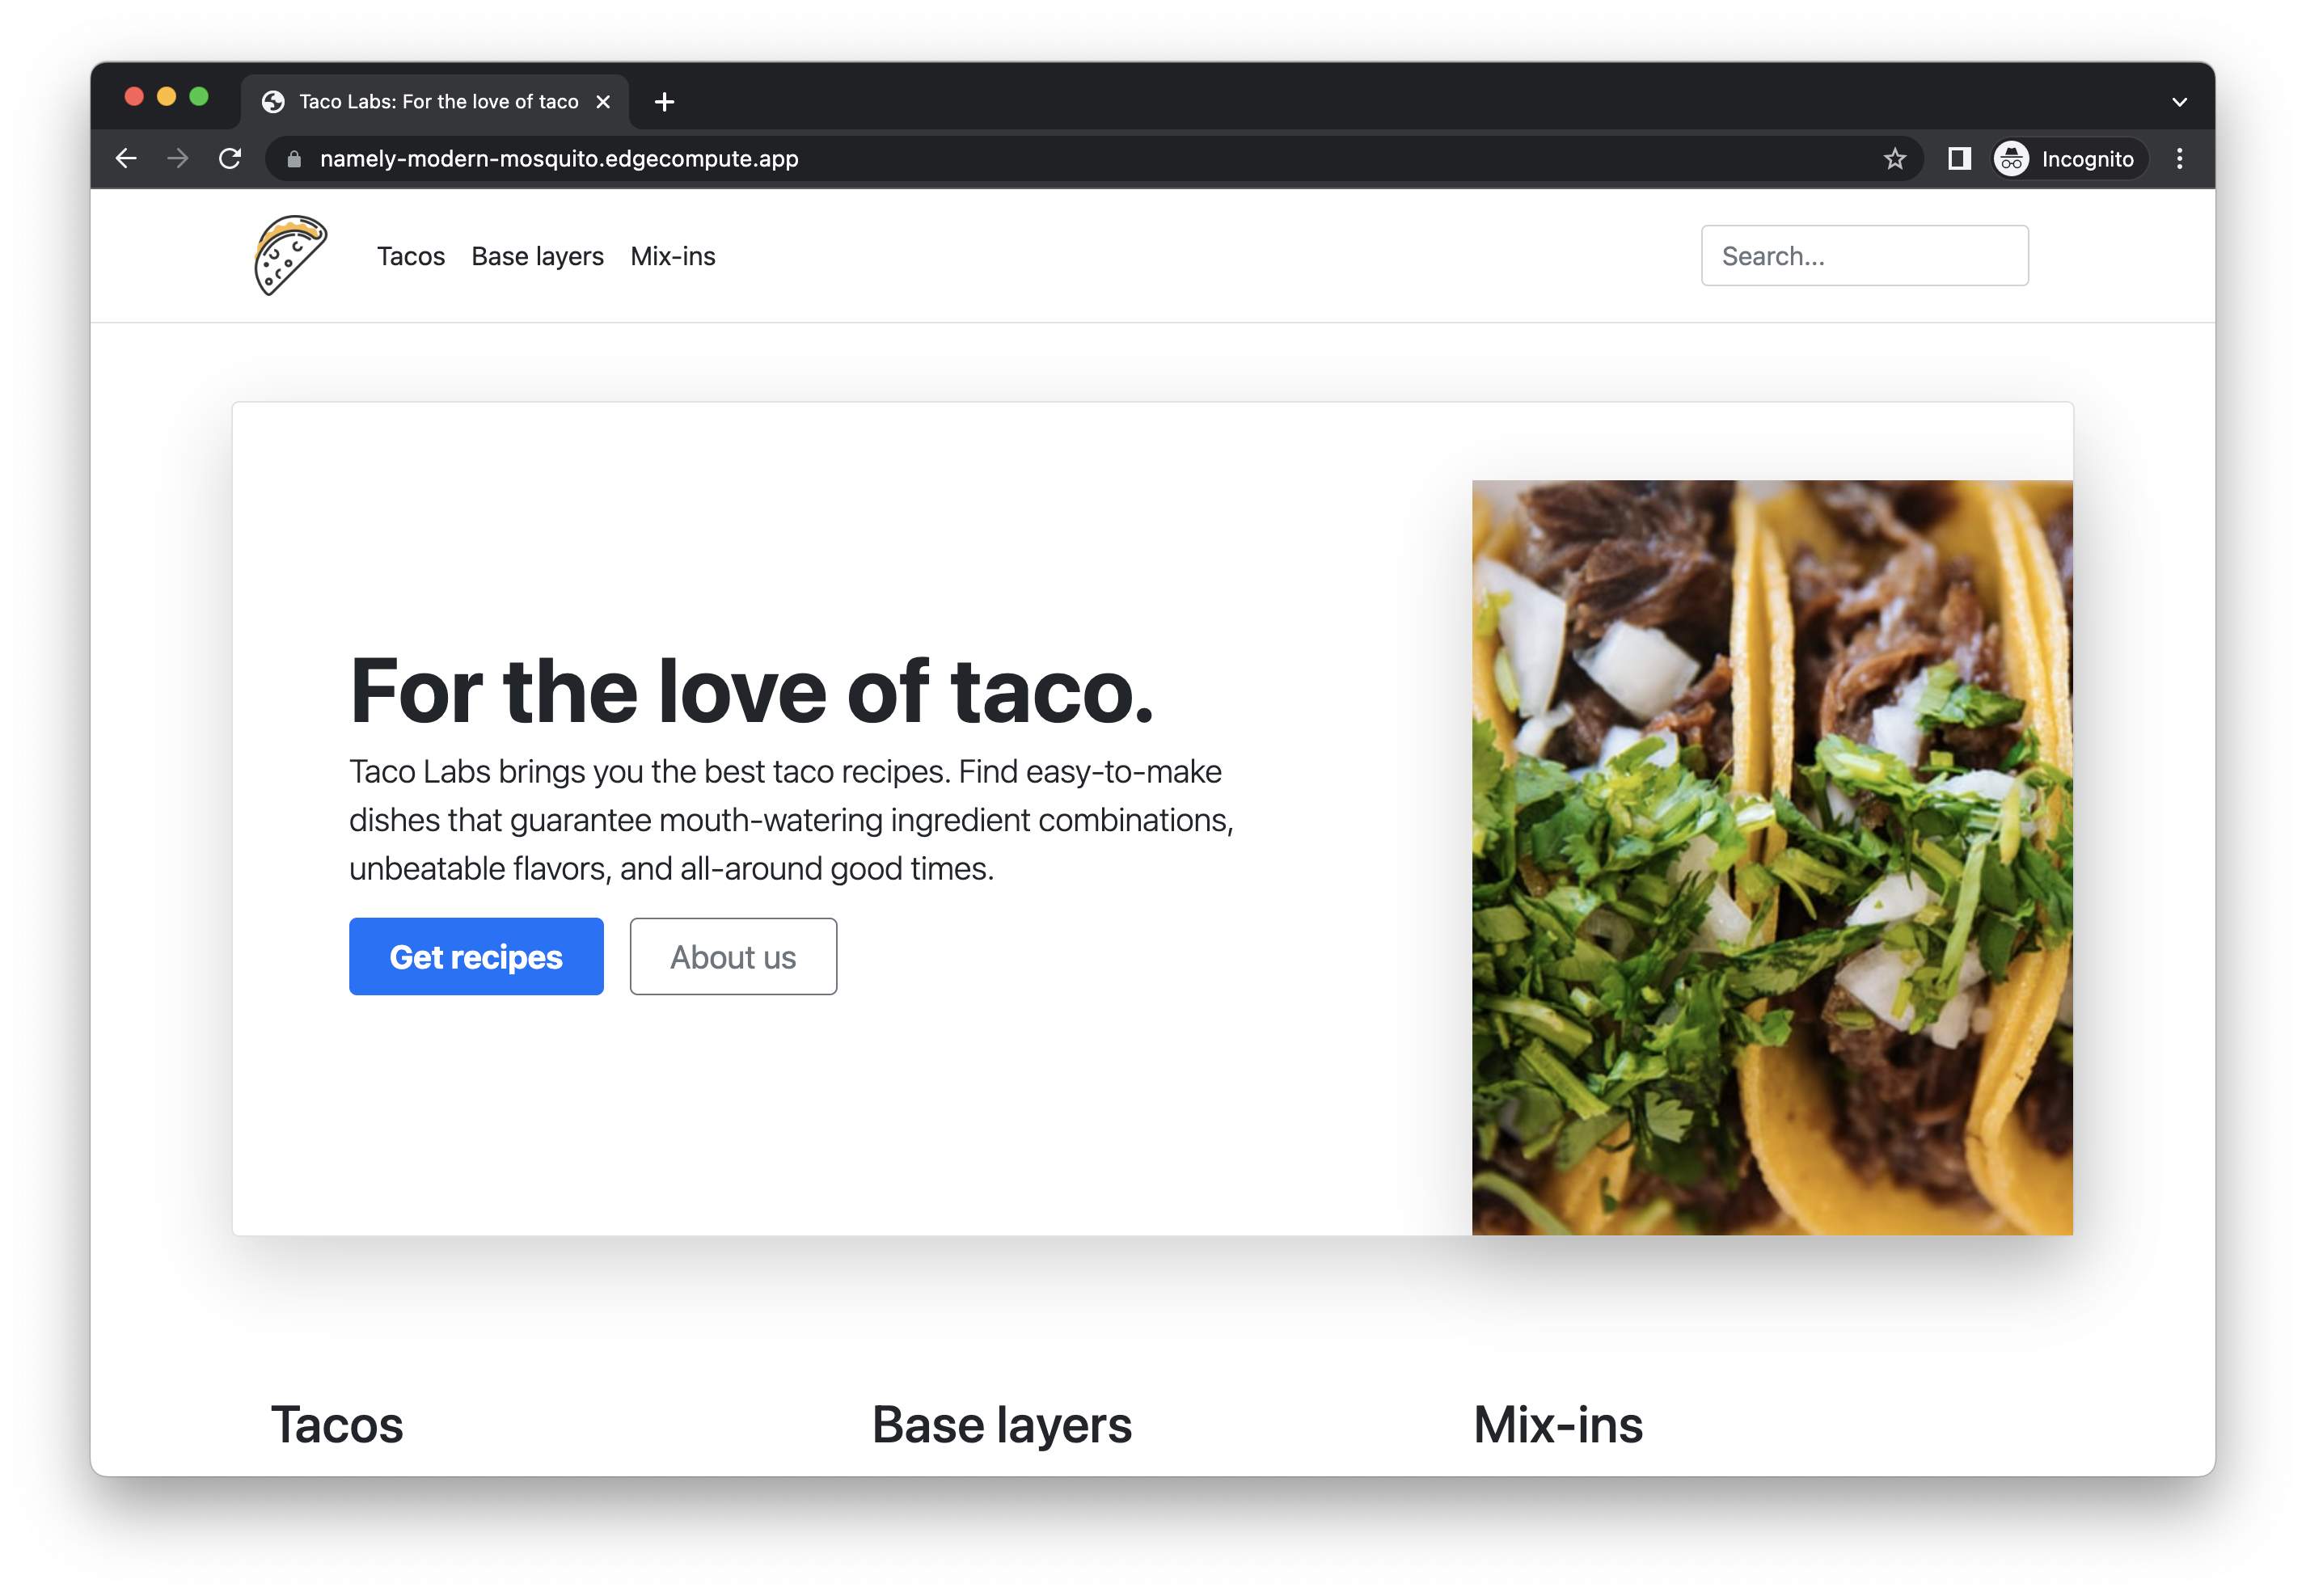
We've successfully chained our Compute service to our VCL service!
Viewing the Compute service in the Fastly web interface
So far, we've used the Fastly CLI for compiling, previewing, and deploying our serverless application, and for some Compute service configuration tasks, like adding a backend to our service configuration. However, in addition to the Fastly CLI, we can use the Fastly web interface to see a visual overview of our Compute service and change settings. Let's take a look.
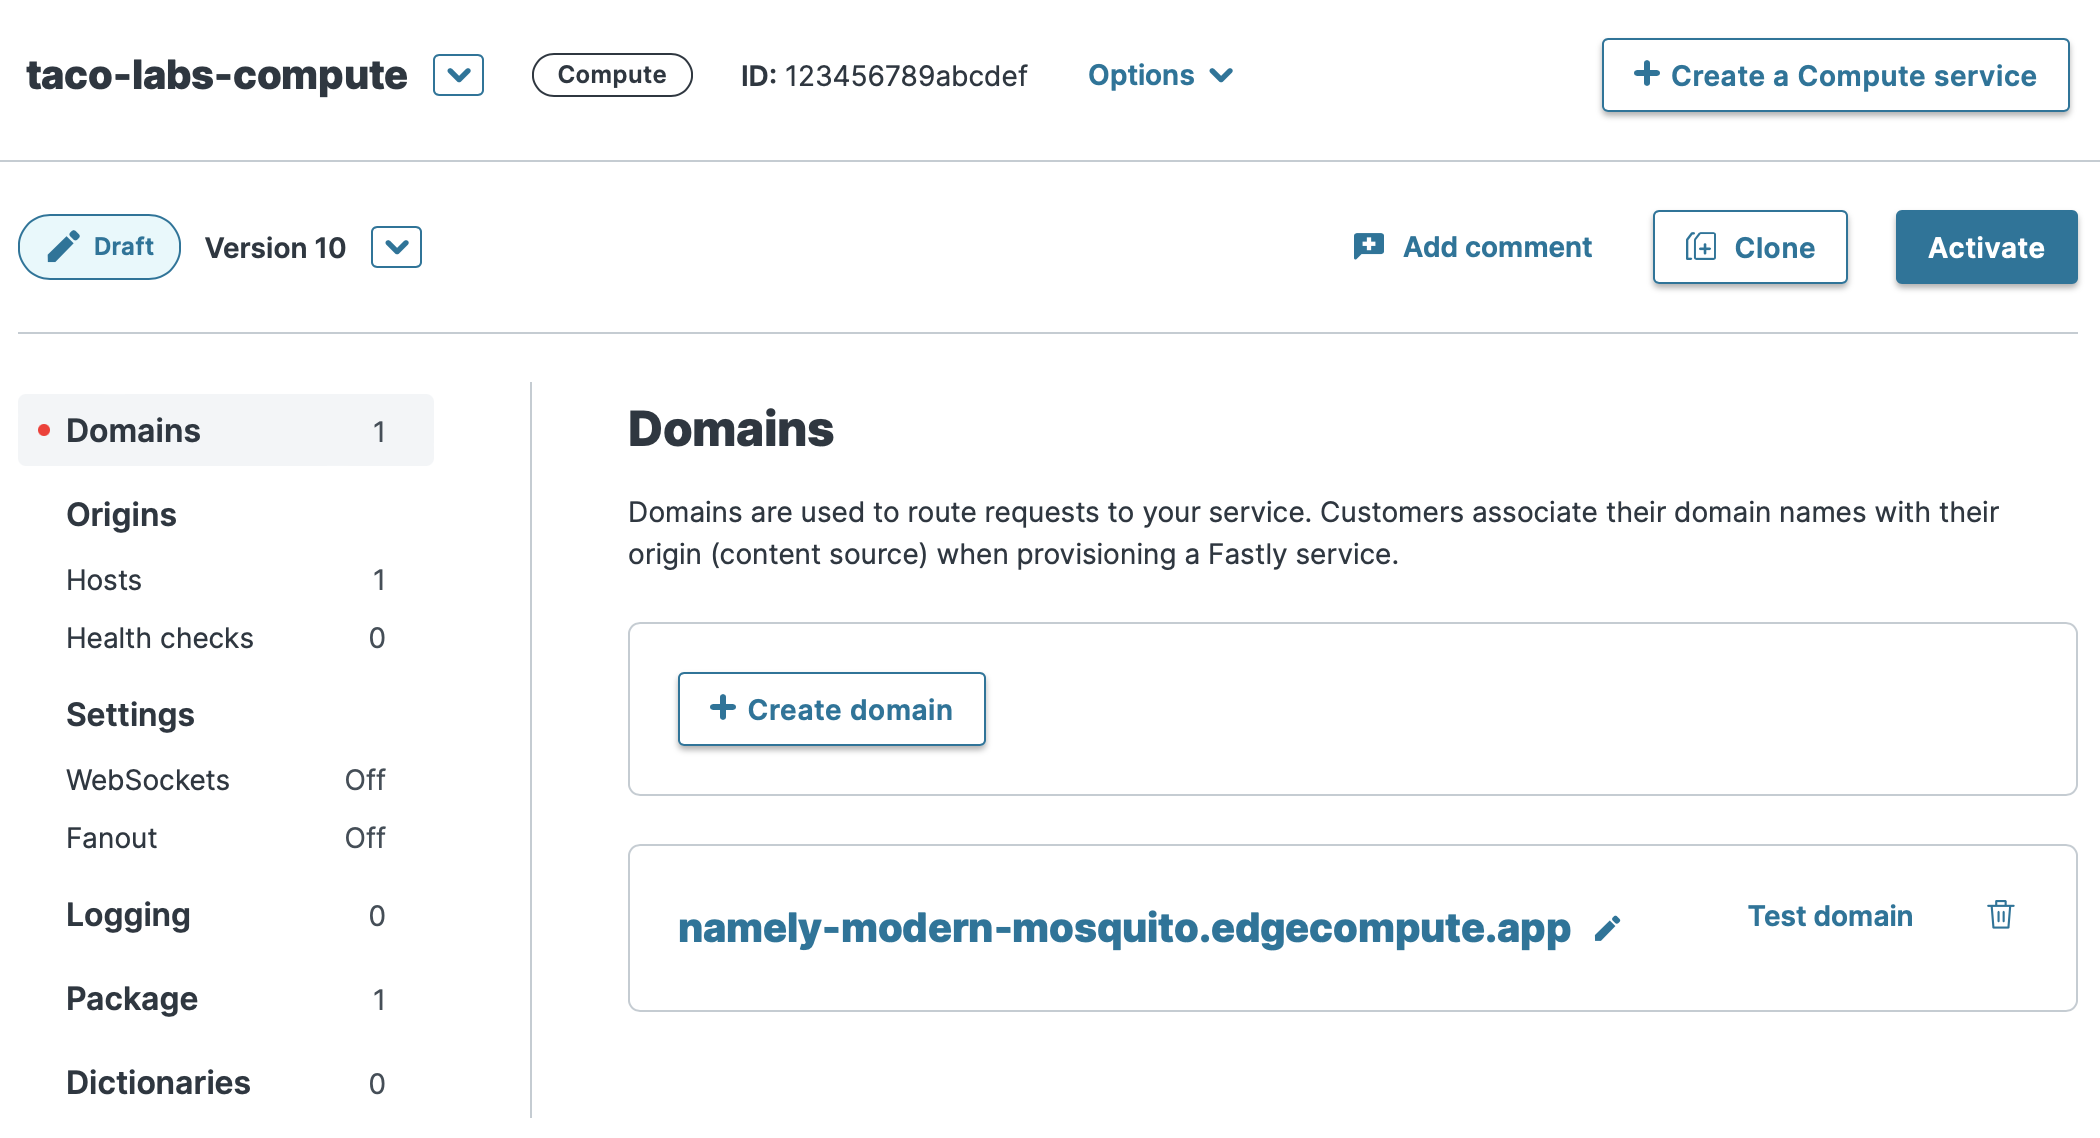
Log in to the Fastly web interface, find your service in the list on the Home page, and then click the name of the new Compute service to open it in the Compute page. Like VCL services, Compute services are versioned. You can use the Fastly web interface to add comments to a version, show differences between different versions, and roll back to a previous version of a Compute service configuration.
Click the Edit configuration button to clone the Compute service and create a new draft version. The settings for our Compute service appear, as shown below.
We can use the web interface to modify our Compute service configuration to add domains and origins, configure health checks and WebSockets, and set up logging endpoints. However, since most Compute service configuration changes can also be performed using the Fastly CLI, we'll continue using that for the duration of this tutorial.
