
- English
- 日本語
TLS quick start
Last updated 2024-05-10
Welcome! This guide helps new TLS users like you get started with Fastly TLS as quickly as possible using Certainly, Fastly's publicly-trusted certification authority. By setting up TLS for a domain you've added to a Fastly service, you can deliver your origin website to your users through the Fastly CDN.
Before you begin
Keep in mind the following:
- Be sure to review the TLS prerequisites and limitations.
- This guide assumes you have a Fastly account and a service with at least one domain added. If you don't, refer to our Start here guide to quickly get set up.
- This guide includes instructions for working with subdomains, not apex or second-level domains. To work with those types of domains, refer to our guide on using Fastly with apex domains.
1. Create a TLS certificate
We’ll use Fastly-managed TLS to create a TLS certificate, which means Fastly will procure the certificate for us and manage the certificate renewals. We'll have Fastly issue a certificate using Certainly.
TIP
Trial accounts include up to two TLS domains for free with Certainly, while paid accounts include five free domains using Certainly. If you want to bring your own certificates or use Fastly-managed TLS with another certification authority, refer to those specific guides.
- Log in to the Fastly control panel and select Security from the navigation sidebar. The Overview page appears displaying an overview of Fastly's security offerings.
Click Manage certificates.
If this is your first time setting up TLS, click Get started. If you have a TLS certificate in your account already, click Secure another domain instead.
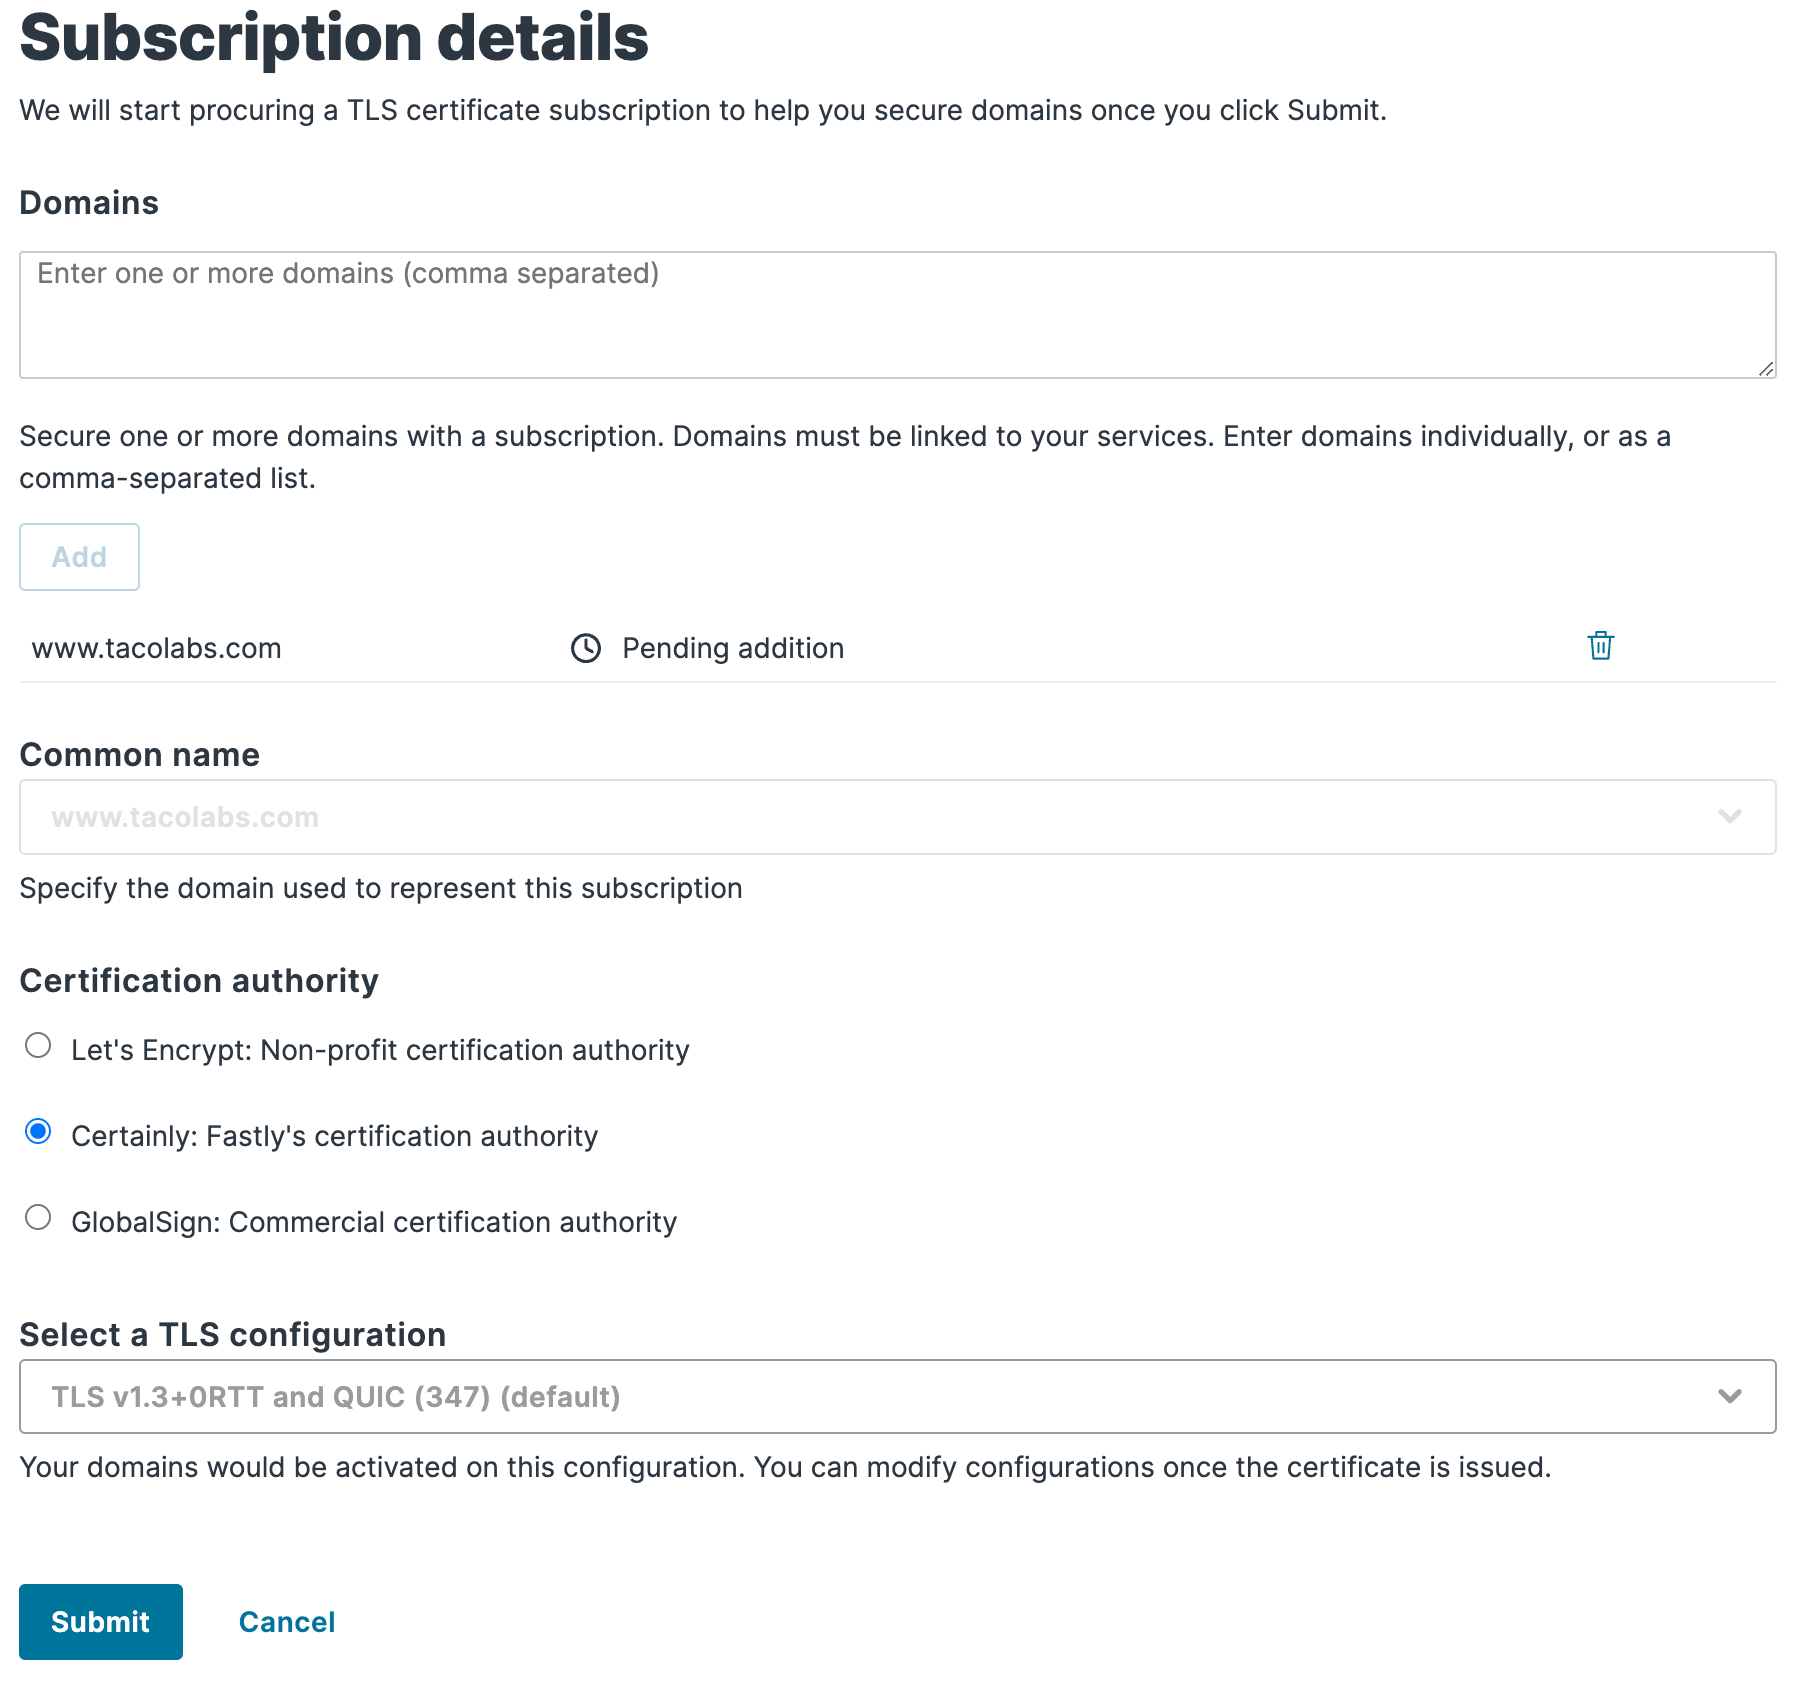
Enter the name of the domain you want to secure with HTTPS (e.g.,
www.tacolabs.com), and then click Add. Be sure this domain is present on one of your Fastly services.Fastly adds your domain as the Common name. Select Certainly as the certificate authority and keep the default TLS configuration, then click Submit.
2. Verify your domain
Once you click Submit, Fastly provides the necessary information to use to confirm you own the domain. You'll need access to the DNS records for your domain - in most cases this will be wherever you purchased the domain. While the exact process may vary, the instructions below should work for most providers.
Click the Verification options for the domain and expand the menu for ACME DNS challenge.
Note the CNAME address (
_acme-challengefollowed by your domain name), which is the address to point your DNS record to. The CNAME value is a string of characters followed byfastly-validations.com. You’ll need these later.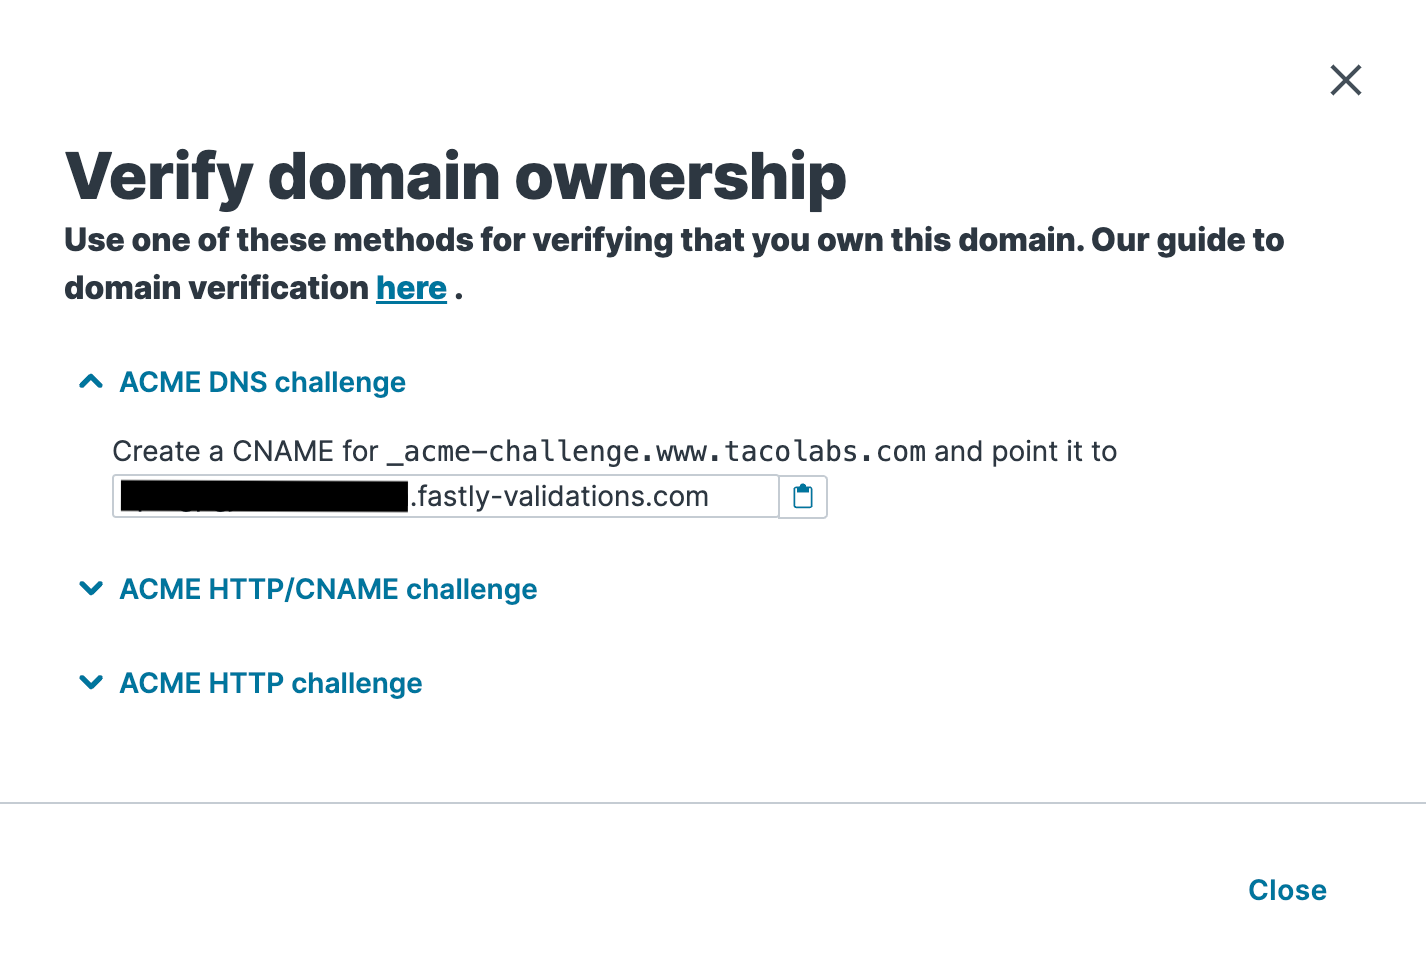
Access your DNS provider or domain registrar (wherever you registered or purchased the domain) and navigate to the Custom DNS settings.
Add a new CNAME record to verify the domain for the TLS certificate.
- Set the hostname to the CNAME address from the TLS info that’s something like
_acme-challengefollowed by your domain. - Set the address, sometimes called data or content, to the CNAME value which ends in
fastly-validations.com.
- Set the hostname to the CNAME address from the TLS info that’s something like
Save your new record then navigate back to your Fastly account. Fastly will work to verify your domain and issue the certificate, a process that typically takes 20 minutes to an hour, but can extend up to 72 hours.
3. Point your domain at Fastly
Now that the certificate has been issued, you'll add another CNAME record, this time to update your DNS records to point your domain at Fastly and begin serving traffic.
Locate the value for the CNAME record for your domain in Fastly by clicking See DNS details on the TLS domains page. The CNAME record value is a single letter followed by
.sni.global.fastly.net.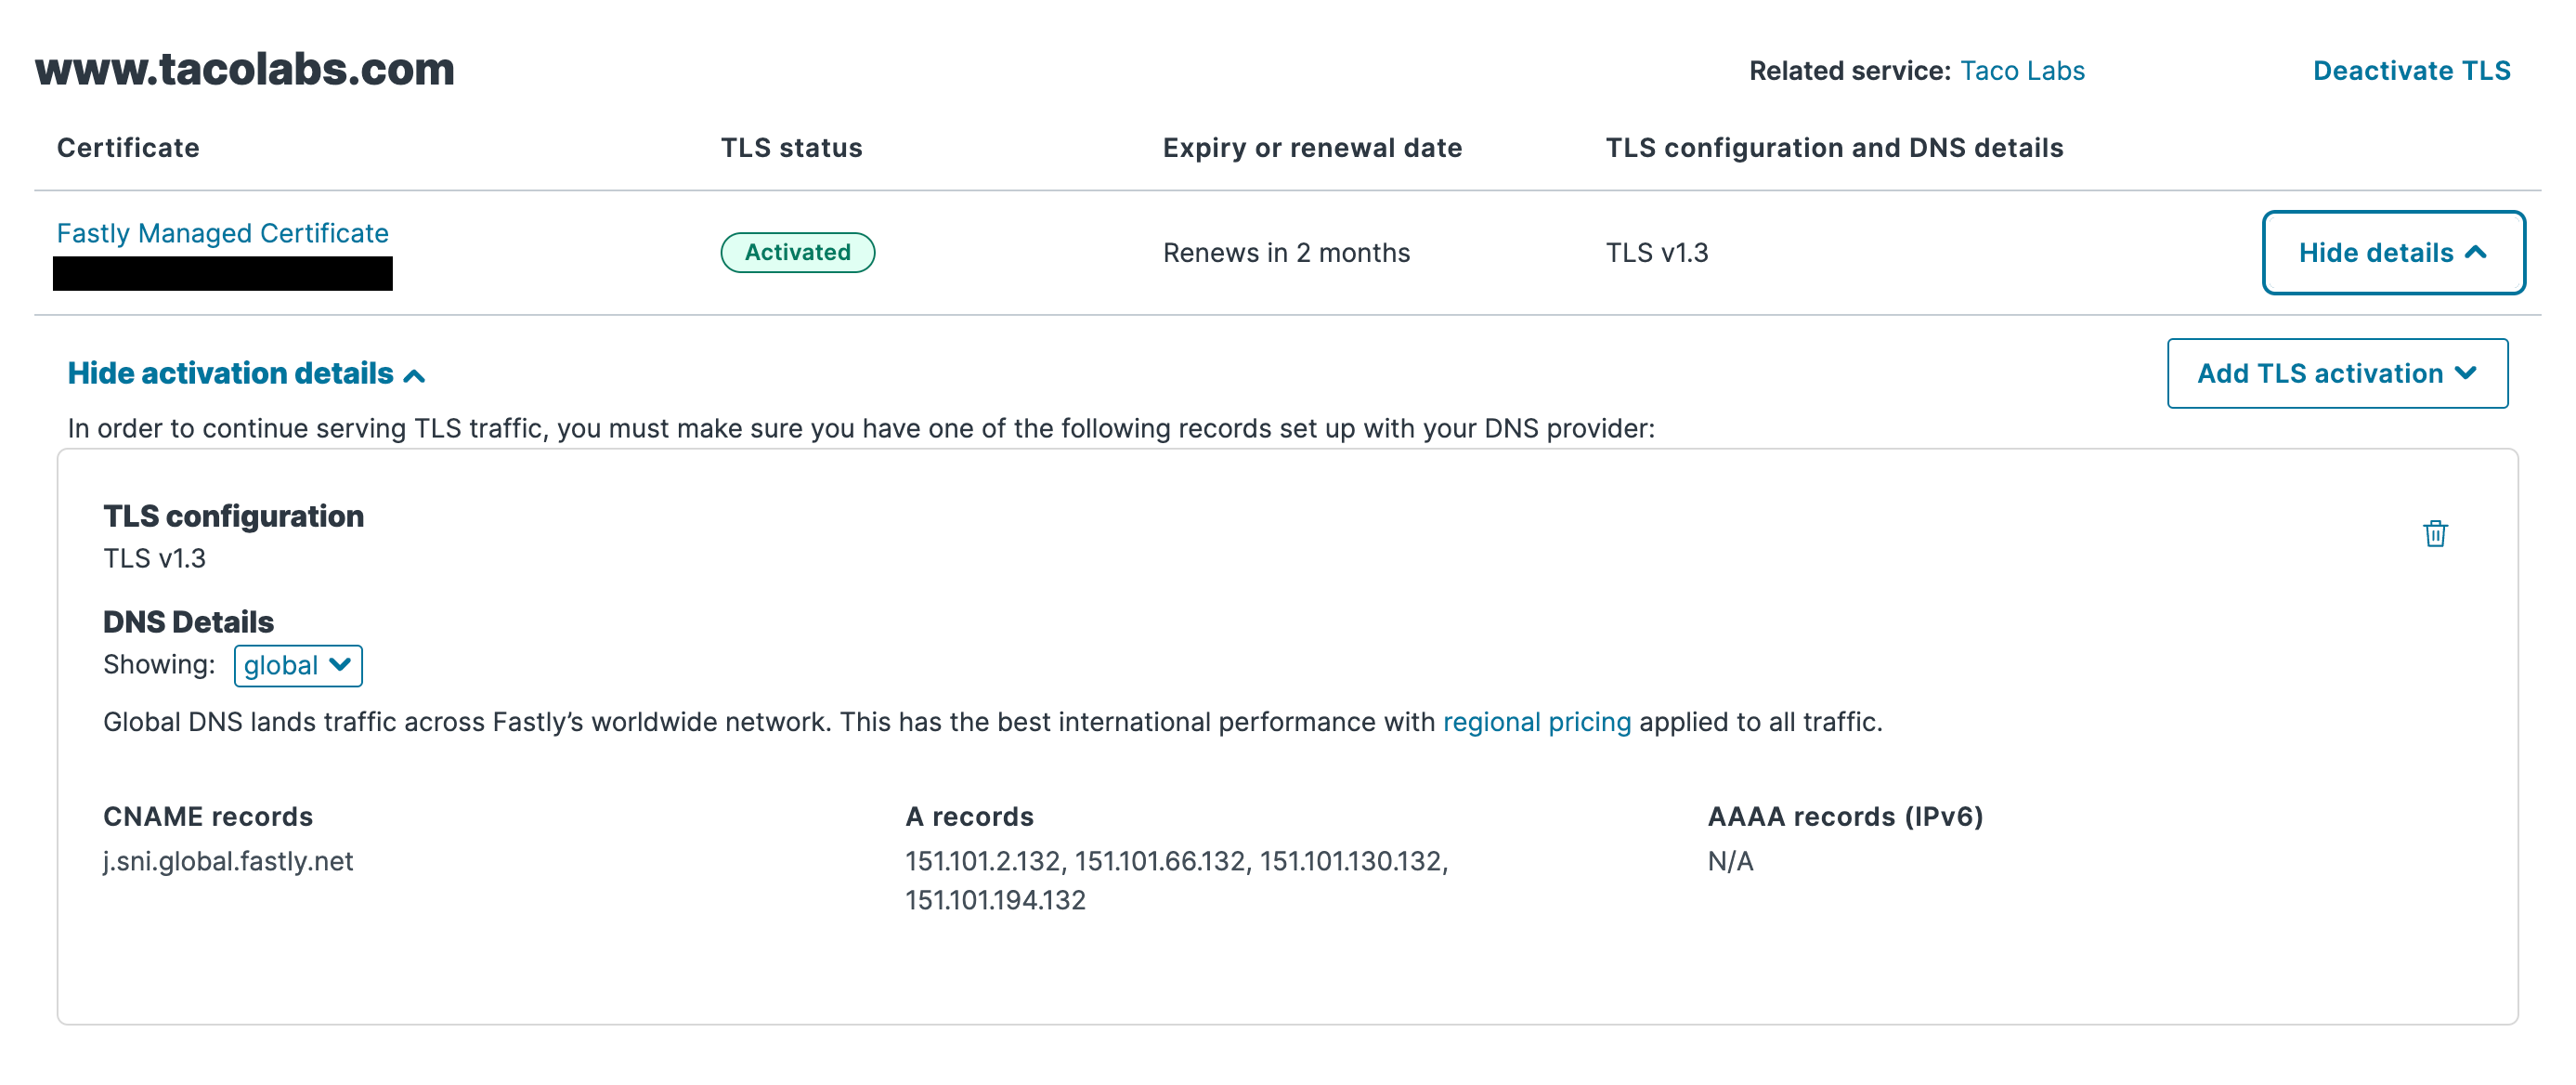
In this example, the Fastly web interface says that the value for our CNAME record is
j.sni.global.fastly.net. This value doesn't support IPv6 addresses, but you can prefacedualstackto enable IPv6 support (i.e.,dualstack.j.sni.global.fastly.net).Navigate back to your DNS records and add another CNAME record, this time for the domain you want to point at Fastly. If you have an existing DNS record for this domain, you'll need to edit or remove it.
Set the hostname to the domain you want to point at Fastly, for example,
www.tacolabs.com.TIP
If using an apex domain, refer to Using Fastly with apex domains for instruction.
Set the address to
dualstack.<letter>.sni.global.fastly.net(adjusting the single letter to match your certificate).
Give it some time for your changes to propagate. While most newly issued certificates take between 20 minutes to an hour to fully deploy across Fastly’s global network, it may take up to 72 hours depending on your DNS provider and Time To Live (TTL) value, which is in seconds. Once the changes propagate, you’ll see the origin site you pointed your Fastly service at when you visit the domain you registered! You can also use the following command to check the status:
$ dig www.tacolabs.com +shortdualstack.t.sni.global.fastly.net.151.101.198.1324. Certificate renewals
Fastly automatically handles TLS certificate renewals prior to expiration, assuming your CNAME records haven't been modified. Ten days before your certificates are due to expire, Fastly automatically runs a DNS check for certificate renewals. However, if your DNS records no longer point at Fastly or if a CAA record blocks Certainly, the certificate will lapse at the end of the 30-day period. For more information, refer to Certificate management and renewals.
Do not use this form to send sensitive information. If you need assistance, contact support. This form is protected by reCAPTCHA and the Google Privacy Policy and Terms of Service apply.
