
- English
- 日本語
Using conditions
Last updated 2018-10-02
Conditions use the Varnish Configuration Language (VCL) to define when a configuration object should be applied while processing requests to a cache server. Once you understand some basics about conditions, use this guide to learn about how to create conditions using the Fastly control panel and when to use them.
Where to find conditions
Conditions appear in two areas of Fastly's control panel:
- The Manage conditions page lists all conditions available to your configuration settings.
- Each configuration object displays conditions specifically attached to them.
Conditions on the Manage conditions page
The Manage conditions page provides an overview of all the conditions currently available to your service. You can see at a glance which conditions are mapped to configuration objects. It allows you to create new conditions and search for existing ones.
To view conditions on the Manage conditions page:
- Log in to the Fastly control panel.
- From the Home page, select the appropriate service. You can use the search box to search by ID, name, or domain.
- Click Edit configuration and then select the option to clone the active version.
- Click Conditions. A list of all conditions for your service appears.
For example, this service has one request condition available:
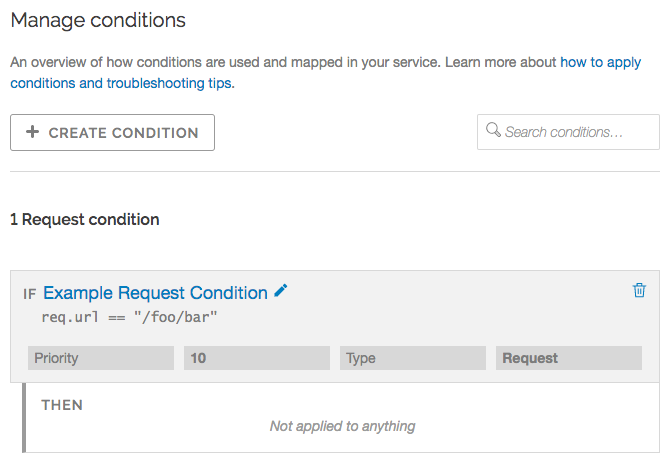
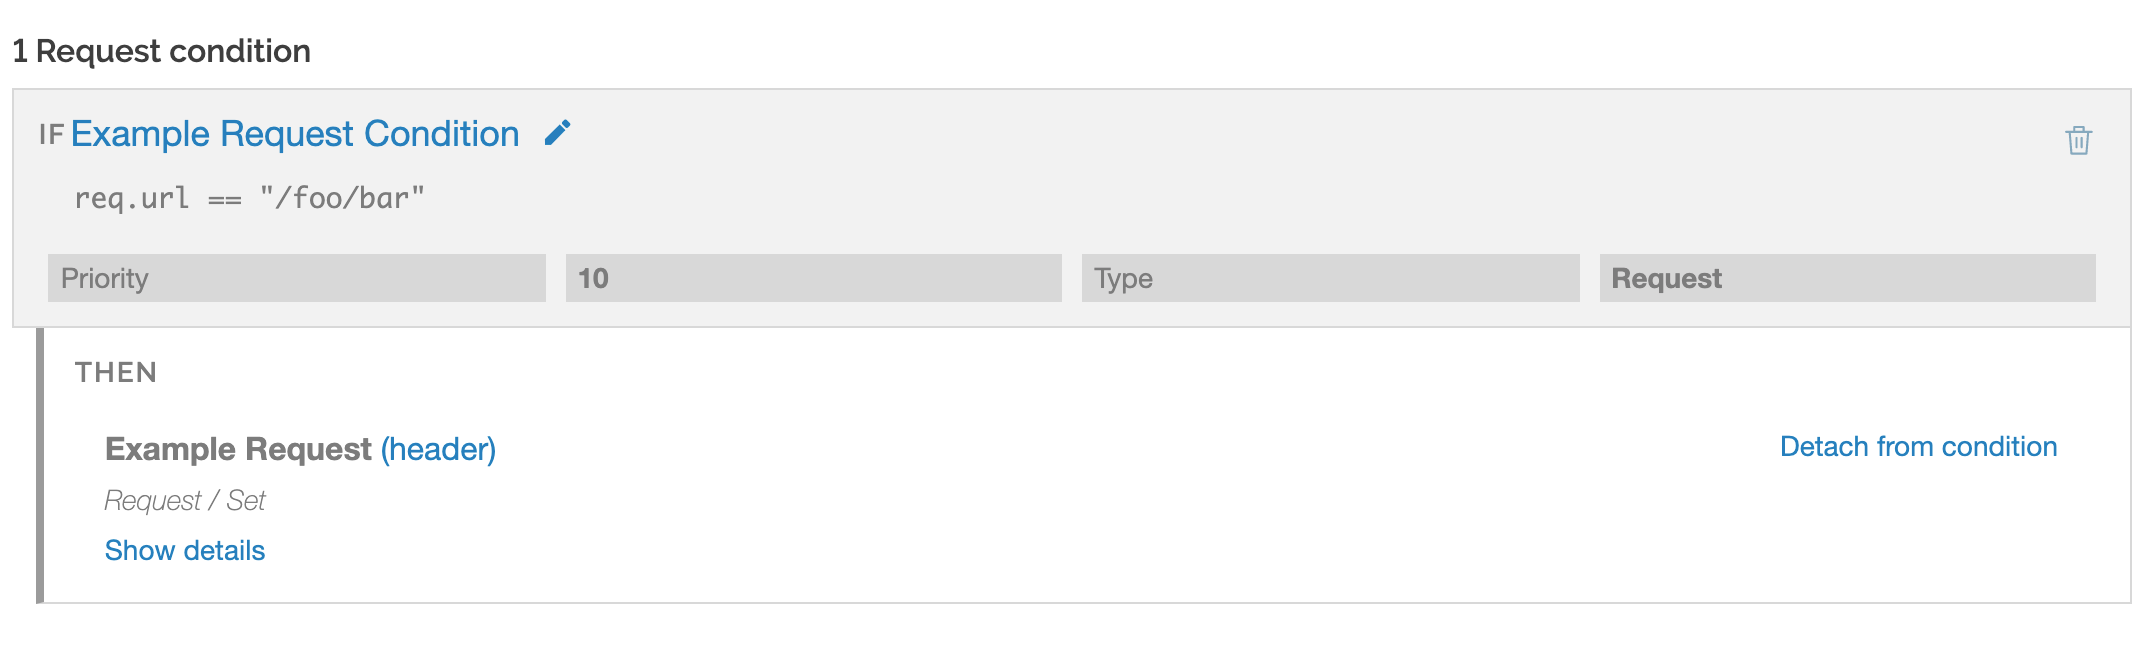
The Example Request Condition shown above currently isn't applied to a configuration object (as indicated by "Not applied to anything"). If it was, it would instead appear similar to this:
Conditions attached directly to a configuration object
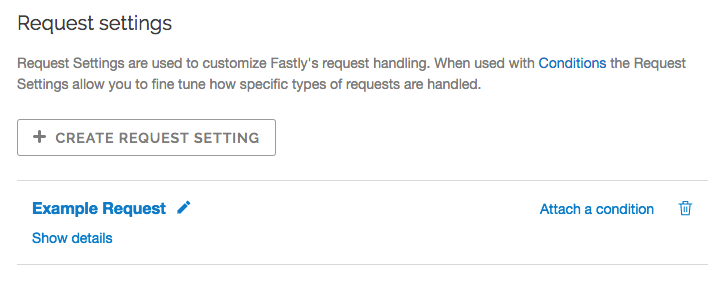
Configuration objects appear differently in the web interface when conditions are attached to them. For example, this request setting has no condition attached to it:
Once you click the Attach a condition link to create a new condition or attach an existing condition, however, the web interface changes how the configuration object appears:
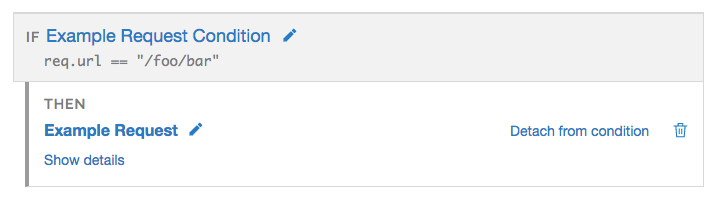
By default, configuration objects hide the majority of details for any attached conditions. You can unhide those details by clicking the Show details link. When expanded, the details vary depending on the type of condition.
Parts of a properly configured condition
Conditions require only a few parameters, making them appear deceptively simple. Specifically, they require:
- a Type parameter that classifies the condition being added. If added via the Manage conditions page, the type can always be manually selected. If added via the Attach a condition link on a configuration object, the type is automatically applied whenever possible.
- a Name parameter that serves human-readable identifier of the condition.
- an Apply if statement containing the logical expression to execute in VCL to determine if condition resolves as True or False.
Most problems with conditions occur in the Apply if parameter.
Performing matches on basic logical expressions
Properly configured conditions can perform matches on complicated logical expressions specified in the Apply if parameter. For example:
| This logical expression ... | Matches when ... |
|---|---|
client.ip == "127.0.0.1" | The client requesting a resource on your service has the IP 127.0.0.1. |
req.http.host == "example.com" | The Host header of the incoming request is example.com. |
req.method == "POST" && req.url ~ "^/api/articles/" | The request is a POST and the URL begins with /api/articles/. |
The client.ip, req.http.host, req.method, and req.url conditions shown above all represent configuration variables in VCL.
Using operators to perform matches on complex logical expressions
You could also get creative and create a more complex condition used by Fastly that might have an Apply if parameter that looked like this:
req.http.host == "www.example.com" && (req.url !~ "/foo" && req.url !~ "/bar" && req.url !~ "^/baz")This condition tells the cache server that the Host should equal www.example.com and the URL cannot match /foo or /bar or /baz. You might use this type of condition when you have multiple variables or options and want to fine-tune your results. In this example, you are indicating that you don't want URLs that contain foo, bar, or baz by using the following operators:
| This operator ... | Does this ... |
|---|---|
( ) | groups expressions and restricts alteration to part of the regex |
&& | ensures each equation is true |
!~ | excludes any URLs that include the specified variables |
An example of adding conditions
The scenario: You want to add a new origin server that handles a specific portion of your API requests. Some requests to this API must be cached differently than other requests to your API, so you want to set special headers for specific types of requests. Specifically, you don't want your new origin server to cache PUT, POST, or DELETE requests because they're special for this particular API and send back extra, time dependent, meta-information in each response. And finally, you want to track the effectiveness of doing this. To accomplish all of this using conditions via the Fastly control panel, you would:
- Create a new origin server to handle the special API traffic.
- Create a new condition that tells the cache how to route some of the API requests to that origin server.
- Create a new cache setting object to ensure the origin server caches only the correct responses.
- Create a new condition that specifies when the cache settings object should be applied.
- Create a new header to track the specific type of API requests.
- Create a new response condition to make sure that the header is only set on specific type of request.
- Check your work.
Create a new origin server
To create a new origin server that will handle the special API traffic, follow the instructions for working with hosts. You'll add specific details about your API server when you fill out the Create a host fields:
- In the Name field, enter a name for your API server (for example,
Special API Server). - In the Address field, enter the IP address (or hostname) of the API server.
Create a request condition
Once you've created a new origin server to handle the special API traffic, tell the cache how to route requests to this origin server by creating a request condition.
In the Hosts area, click Attach a condition next to the name of the origin server you just created.
You can either select an available condition or you can click Create a new request condition.
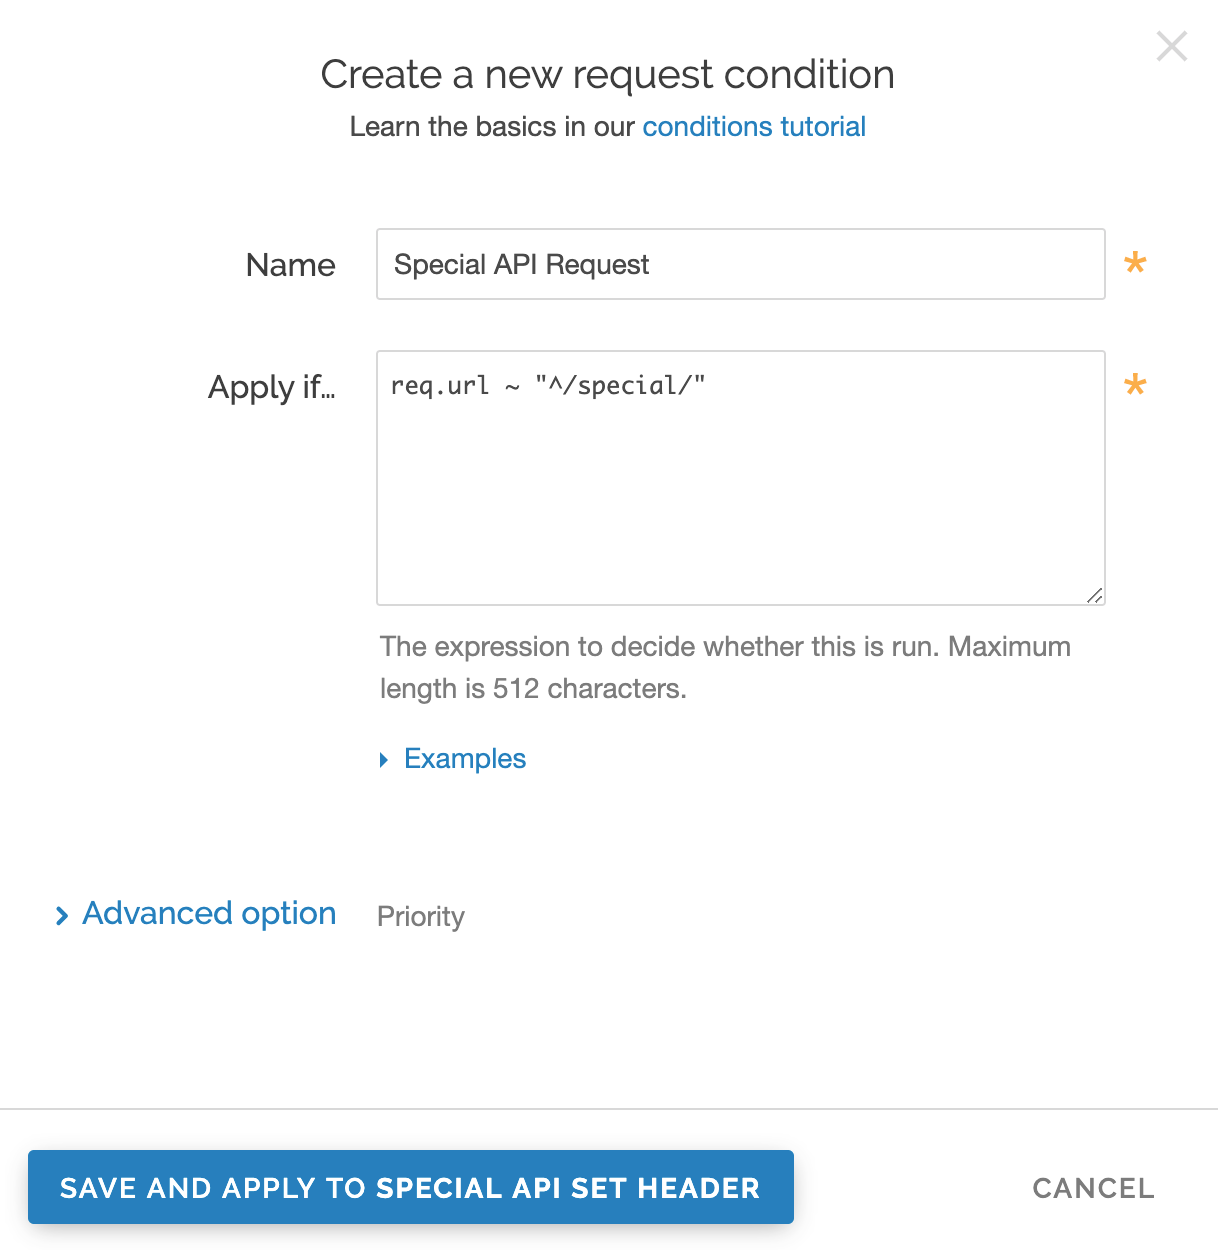
Fill out the Create a new request condition fields as follows:
- In the Name field, enter a descriptive name for the new condition (for example
Special API Request). - In the Apply if field, enter the appropriate request condition that will be applied (for example,
req.url ~ "^/special/"could address all requests related to the special API server).
- In the Name field, enter a descriptive name for the new condition (for example
Click Save and apply to. The new condition for the host is created.
Create a cache settings object
Requests are now are being properly routed to the new origin server. Next, create a cache settings object to ensure Fastly doesn't cache any responses from PUT, POST, or DELETE requests. They're special for this particular API and send back extra, time dependent, meta-information in each response.
- Click Settings.
In the Cache Settings area, click the Create cache setting.

Fill out the Create a cache setting fields as follow:
- In the Name field, enter a descriptive name for the new cache settings.
- Leave the TTL (seconds) field set to its default value.
- From the Action menu, select Pass (do not cache).
- Leave the Stale TTL (seconds) field set to its default value.
Click Create.
Create and apply a condition to the cache settings object
Create a new condition that specifies when the cache settings object should be applied.
In the Cache Settings area, click the Attach a condition link next to the name of the cache setting you just created.
Click Create a new cache condition.
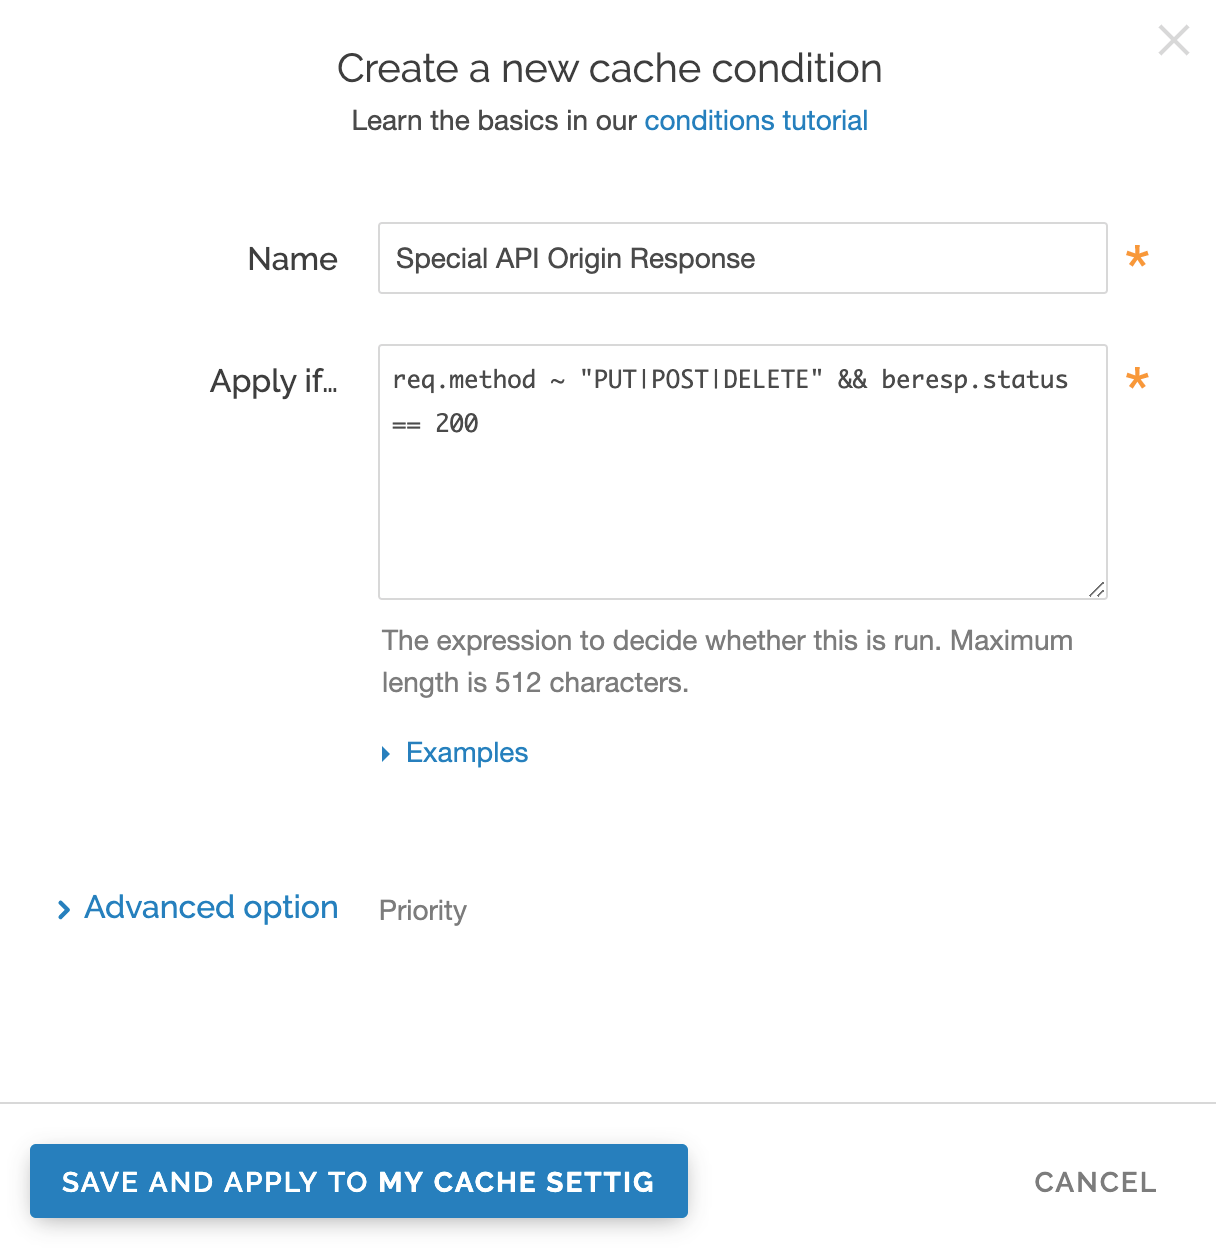
Fill out the Create a new cache condition fields as follows:
- In the Name field, enter a descriptive name for the new condition (for example,
Special API Origin Response). - In the Apply if field, enter the appropriate request condition that will be applied (for example,
req.method ~ "PUT|POST|DELETE" && beresp.status == 200).
- In the Name field, enter a descriptive name for the new condition (for example,
Click Save and apply to. The new condition for the cache setting is created.
Create a new header
To make sure you can track the effectiveness the new API, create a new header so you can use it to gather information about the special API requests as they happen.
- Click Content.
In the Headers area, click the Create header button to create a new header.

Fill out the Create a header fields as follows:
- In the Name field, enter a descriptive name for the new header (for example,
Special API Set Header). - From the Type menu, select Response and from the Action menu, select Set.
- In the Destination field, enter the name of the header that will be affected by the action (for example,
http.super). - In the Source field, enter a description of the source where the content for this header comes from (for example,
"Thanks for asking!"). - Leave the Ignore if set and Priority fields set to their default settings.
- In the Name field, enter a descriptive name for the new header (for example,
Click Create.
Create a response condition for the new header
Once the header is created, create an associated condition to ensure this header is only set on that special type of request.
In the Headers area, click Attach a condition next to the name of the new header you just created.
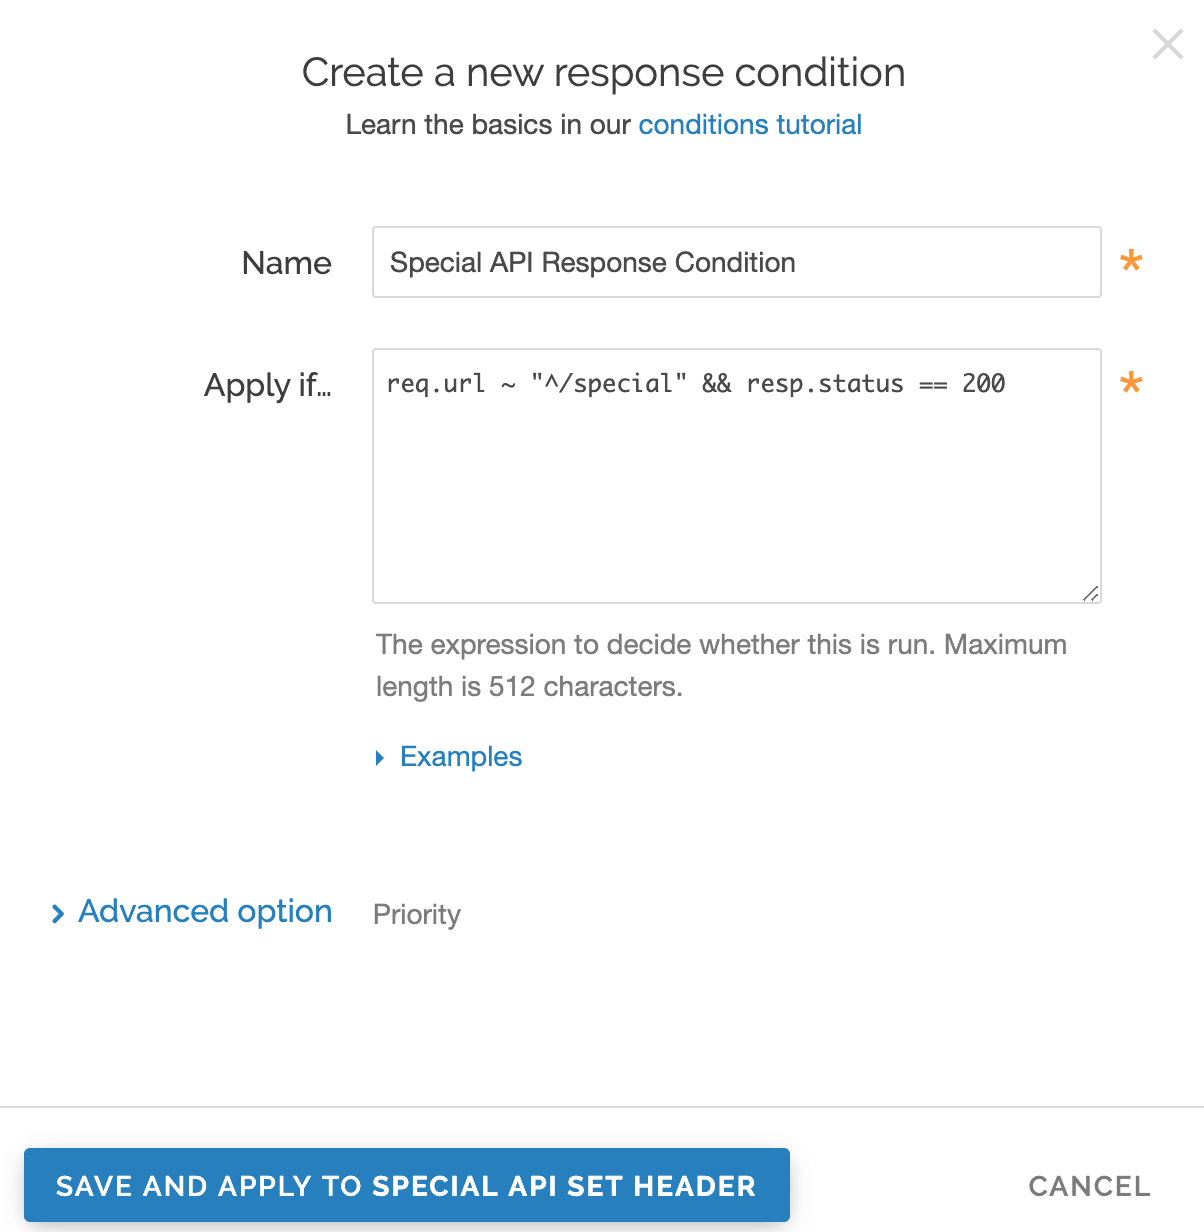
Fill out the Create a new response condition fields as follows:
- In the Name field, enter a descriptive name for the new condition (for example,
Special API Response Condition). - In the Apply if field, enter the appropriate request condition that will be applied (for example,
req.url ~ "^/special" && resp.status == 200).
- In the Name field, enter a descriptive name for the new condition (for example,
Click Save and apply to. The new condition for the header is created.
Check your work
Before activating the configuration, review the generated VCL to see how Fastly converted the objects and conditions into actual VCL. For the example shown above, the VCL for the request condition appears as:
12345# Condition: Special API Request Prio: 10if (req.url ~ "^/special/") { set req.backend = F_Special_API_Server;}#end conditionThe cache settings and condition VCL appears as:
12345if (req.method ~ "PUT|POST|DELETE" && beresp.status == 200) { set beresp.ttl = 0s; set beresp.grace = 0s; return(pass);}And the new header response condition VCL appears as:
123456# Condition Special API Response Condition Prio: 10if (req.url ~ "^/special" && resp.status == 200) {
# Header rewrite Special API Set Header: 10 set resp.http.super = "Thanks for asking!";}As you become more familiar with the VCL syntax and programming, look at the generated VCL to see if the configuration is doing what you think it is doing (most VCL is pretty simple once you know what the variables are referring to).
Do not use this form to send sensitive information. If you need assistance, contact support. This form is protected by reCAPTCHA and the Google Privacy Policy and Terms of Service apply.
