
- English
- 日本語
Uploading custom VCL
Last updated 2024-05-10
Fastly allows you create your own Varnish Configuration Language (VCL) files with specialized configurations. By uploading custom VCL files, you can use custom VCL and Fastly VCL together at the same time. Any time you upload VCL files, you can preview the VCL prior to activating a new version of your service. Keep in mind that your custom VCL always takes precedence over VCL generated by Fastly.
IMPORTANT
Personal data should not be incorporated into VCL. Our Compliance and Law FAQ describes in detail how Fastly handles personal data privacy.
Uploading a VCL file
Follow these instructions to upload a custom VCL file:
- Log in to the Fastly control panel.
- From the Home page, select the appropriate service. You can use the search box to search by ID, name, or domain.
- Click Edit configuration and then select the option to clone the active version.
Click Custom VCL.
Click Upload a new VCL file.

In the Name field, enter the name of the VCL file. For included files, this name must match the include statement in the main VCL file. See how to include additional VCL configurations for more information.
Click Upload file and select a file to upload.
IMPORTANT
Don't upload generated VCL that you've downloaded from the Fastly control panel. Instead, edit and then upload a copy of Fastly's VCL boilerplate to avoid errors.
Click Create. The VCL file appears in the Varnish Configurations area.
- Click Activate to deploy your configuration changes.
Editing a VCL file
To edit an existing VCL file, follow these instructions:
- Log in to the Fastly control panel.
- From the Home page, select the appropriate service. You can use the search box to search by ID, name, or domain.
- Click Edit configuration and then select the option to clone the active version.
Click Custom VCL.
In the Varnish Configurations area, click the VCL file you want to edit.
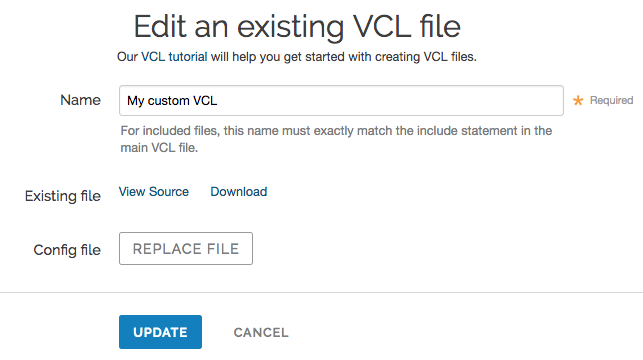
(Optional) In the Name field, enter a new name for the VCL file.
Click Download to download the appropriate file.
Make the necessary changes to your file and save them.
Click Replace file and select the file you updated. The selected file replaces the current VCL file and the file name appears next to the button.
Click Update to update the VCL file in the Fastly application.
- Click Activate to deploy your configuration changes.
Including additional VCL configurations
To make your full VCL configuration easier to maintain, you can split it up into multiple files that are accessed by a main VCL file. This allows you to separate out chunks of logic (for example, logic that has a specific purpose or that might change frequently) into as many separate files as makes sense.
Start by isolating a portion of VCL and placing it in a separate file. The name of the file doesn't matter, nor does the file extension. A
foo.vclfile will work just as well as abar.txtfile.Upload the file to include it in your Varnish configurations and give it a unique name when you fill out the Name field at the time of upload (for example, you could call it
Included VCL). The uploaded file will appear in the Varnish Configurations area along with your main VCL file.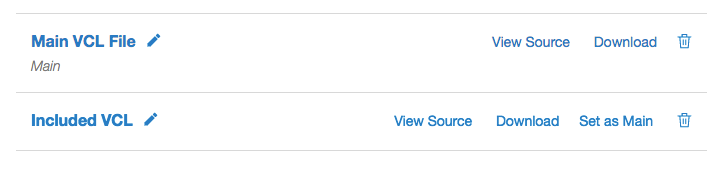
Enter the name of the included VCL file on a separate line in the main VCL configuration file. For example, your Included VCL file would get added to the main VCL file in a single line like this:
include "Included VCL";Continue uploading VCL files and then including them in your main VCL using the syntax
include "<VCL FILE>";where<VCL FILE>exactly matches the name you entered in the Name field.
TIP
Our guide to manually creating access control lists demonstrates a common example of using included VCL.
Previewing VCL before activation
Follow these instructions to preview VCL prior to activating a service version:
- Log in to the Fastly control panel.
- From the Home page, select the appropriate service. You can use the search box to search by ID, name, or domain.
Click Show VCL.

The VCL preview page appears.
Do not use this form to send sensitive information. If you need assistance, contact support. This form is protected by reCAPTCHA and the Google Privacy Policy and Terms of Service apply.
