
- English
- 日本語
Working with rate limiting policies
Last updated 2024-05-10
You can use the Fastly Rate Limiting feature to create rate limiting policies. When you create a rate limiting policy, you define the criteria to track requests counts and their rates over time. Accumulated counts are converted to an estimated rate computed over the time window you specify: either 1s, 10s or 60s. Rates are always measured in requests per second (RPS). If the rate limit is exceeded, Fastly logs the event and can also block additional requests for a time period you specify.
Limitations and considerations
When creating or making changes to a rate limiting policy, consider the following questions:
- Should the service be protected, or should different protection levels be configured for different endpoints? For example, authentication-related endpoints may require more strict limits.
- How should clients be identified? For example, should the client key be the client IP address, or a more complex key that identifies individual clients behind a single IP address?
- How should the rates be set? A typical client rate should be established, and rate limiting should be configured over an appropriate time window to allow normal client usage, including some overhead to prevent false positives.
When testing a rate limiting policy, keep the following things in mind:
- You can use logging to test that your rate limiting configuration is behaving as desired.
- You can identify clients or client IP addresses to be excluded. For example, remote performance monitoring, testing solutions, and penetration testing solutions could be excluded from a rate limiting policy.
- If you're using shielding, you may need to make modifications to your rate limiting policy. Refer to the developer documentation for more information.
Creating a rate limiting policy at the edge
Create a rate limiting policy at the edge by following these steps:
- Log in to the Fastly control panel.
Go to Security > Edge rate limiting.
Click Add rate limiting to a service.
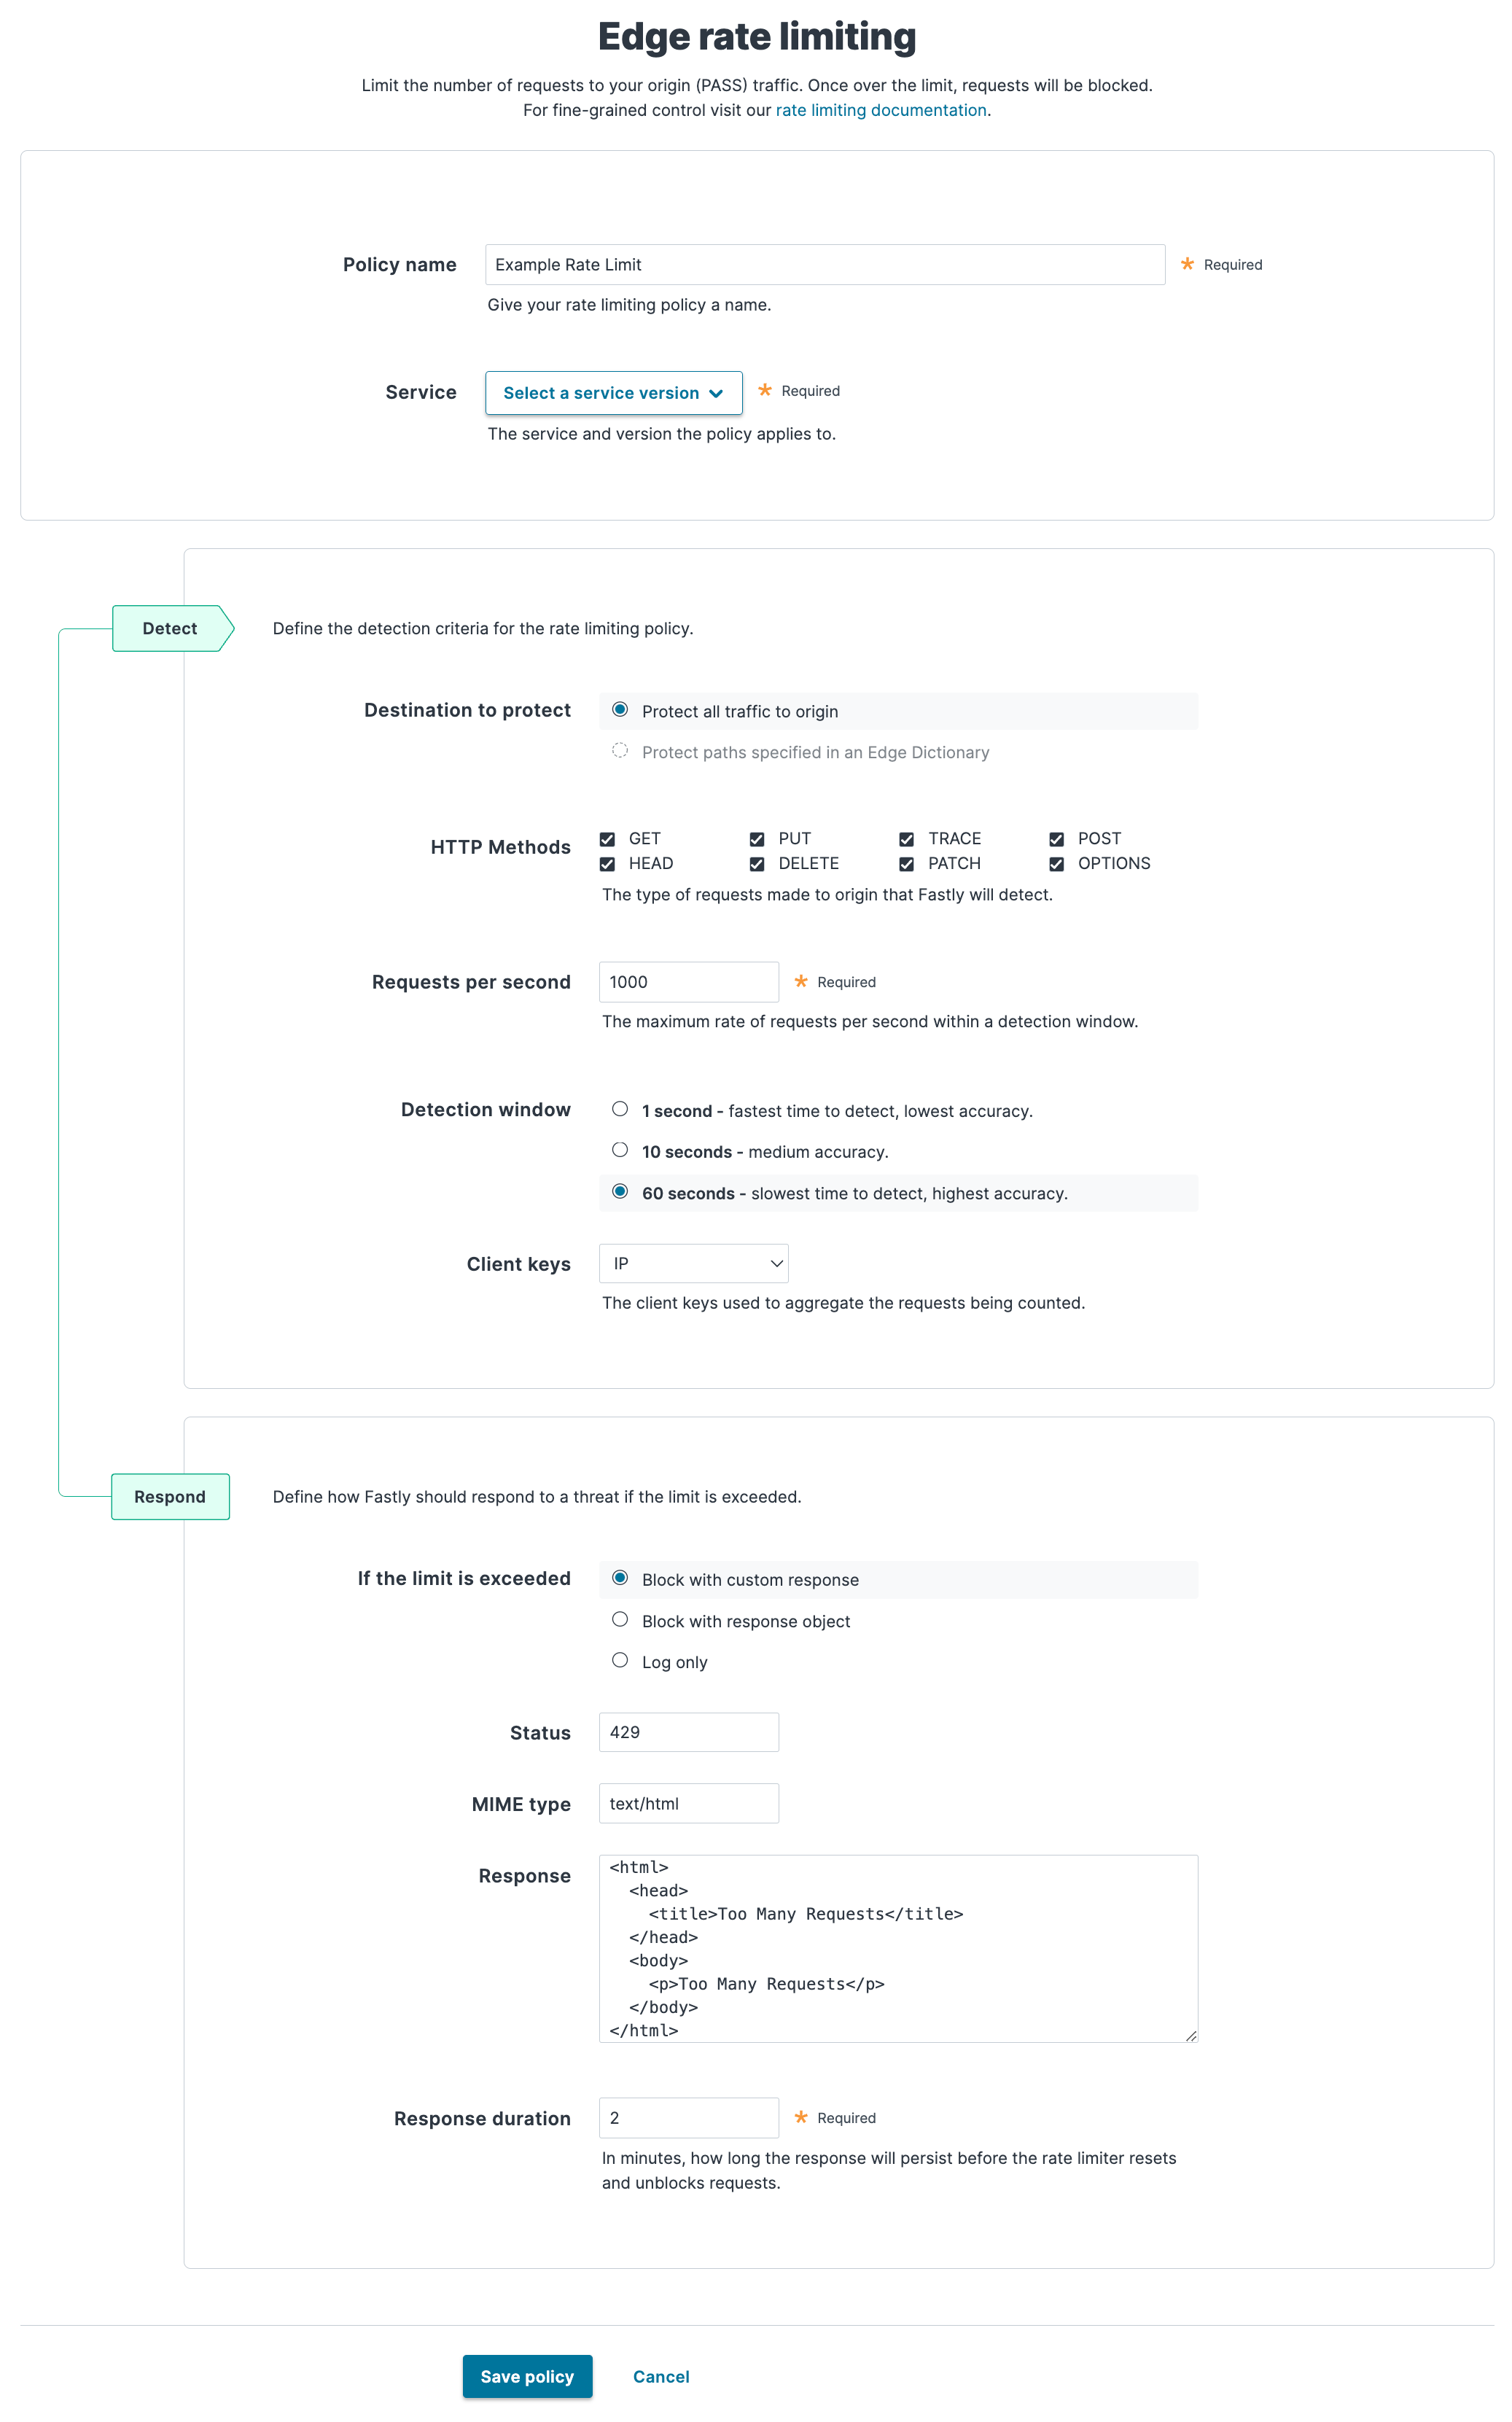
In the Policy name field, enter a human-readable name for your policy. This name is displayed on the rate limiting dashboard.
From the Service menu, select the service and version you want to apply the policy to. Use the search box to search by ID or name.
In the Detect section, fill out the fields to define the detection criteria for the rate limiting policy:
- In the Destination to protect field, select whether to protect all traffic to origin or specific requests via a dictionary. If the service you selected doesn't have a dictionary, this option is disabled.
- In the HTTP Methods field, select the check box next to the types of request to detect.
- In the Requests per second field, enter the maximum number of requests per second to count within the detection window before enacting the rate limiting policy. The lowest rate limit supported by this feature to demonstrate effective behavior is 10 RPS. Using a limit below 10 RPS may result in unpredictable accuracy and detection time.
- In the Detection window field, select the duration of the rate limiting window. The window size helps determine the effective time to detection (TTD) for excessive traffic to your origin. You can use a shorter window to improve the detection time for attacks at some expense of accuracy. For more information, review the limitations and caveats.
- From the Client keys menu, select either IP, User-Agent, or IP and User-Agent to aggregate the requests being counted.
In the Respond section, select how Fastly should respond to your rate limiting policy being exceeded, then fill out the additional fields that appear.
- Block with custom response: block requests once the rate limit is exceeded and display a custom response in the browser. See Block with custom response.
- Block with response object: block requests once the rate limit is exceeded and display a response object in the browser. Note that you must have a response object created to use this option. See Block with response object.
- Log only: log when the rate limit is exceeded but still allow requests. See Log only.
Click Save policy.
NOTE
You can create an advanced configuration by configuring rate limiting in VCL. Refer to the developer documentation for more information.
Using dictionaries for more specific protection
Edge Rate Limiting allows you to specify paths to protect using dictionaries. You must specify a path to protect as a key in the key-value pair within a dictionary. For example, to protect a specific API, such as /checkout, you would create a key-value pair where the key is /checkout and the value is Checkout.
Note the following:
- Keys must be specified using relative paths and without using a trailing
/. - Query strings are excluded.
- Keys using regex are not supported.
Block with custom response
Select the Block with custom response option to block requests once the rate limit is exceeded and display a custom response. If you select this option, the following fields become available:
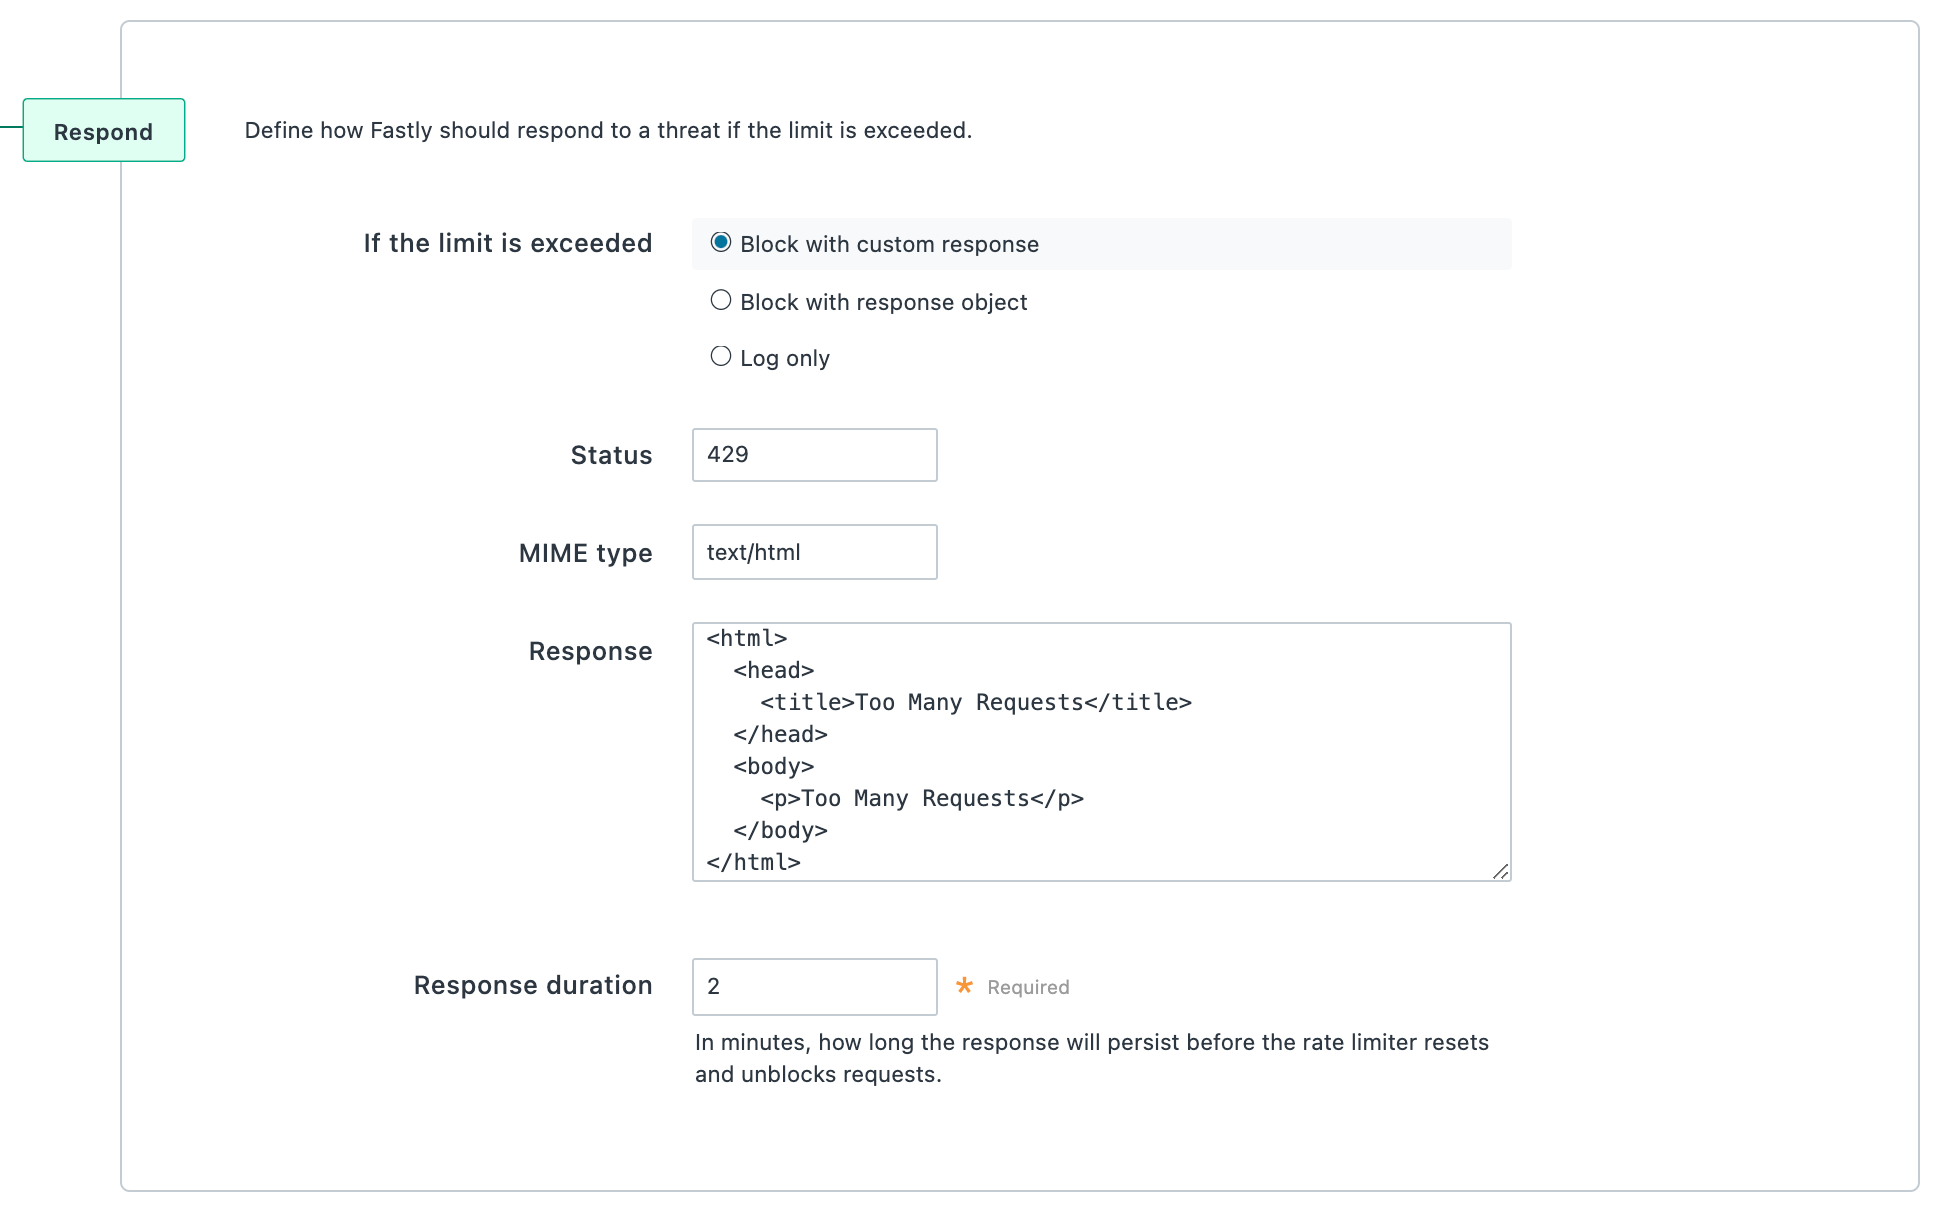
- In the Status field, enter an HTTP status code to display in the browser.
- In the MIME type field, enter a media type identifier. Any MIME type can be specified as long as it's compatible with the text entered in the
Responsefield. - In the Response field, enter the custom response that appears in the browser when the rate limit is exceeded.
- In the Response duration field, enter a value between 1 and 60 to determine how long, in minutes, to display the custom response before the rate limiter resets and unblocks requests.
Block with response object
Select the Block with response object option to block requests once the rate limit is exceeded and display a response object. Note that you must have a response object created to use this option. If you select this option, the following fields become available:
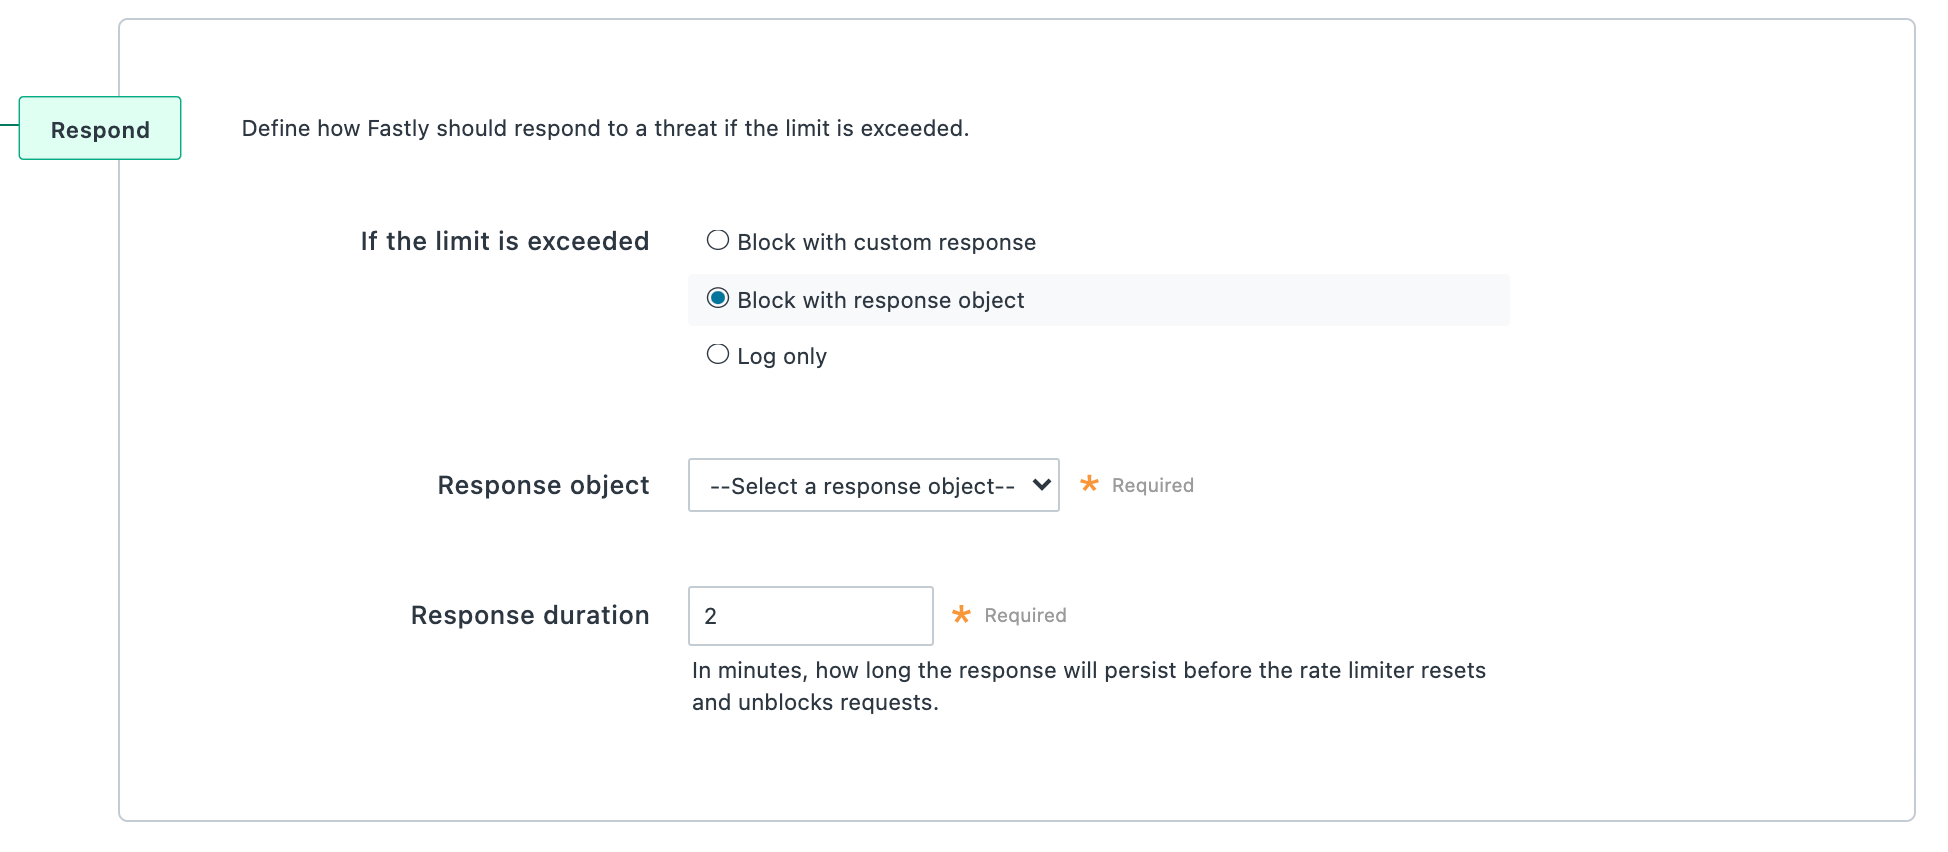
- From the Response object menu, select the response object that will appear in the browser when the rate limit is exceeded.
NOTE
Make sure the response object selected has a condition attached or else the response will be returned for all requests.
- In the Response duration field, enter the number of minutes you want the custom response to appear before the rate limiter resets and unblocks requests.
Log only
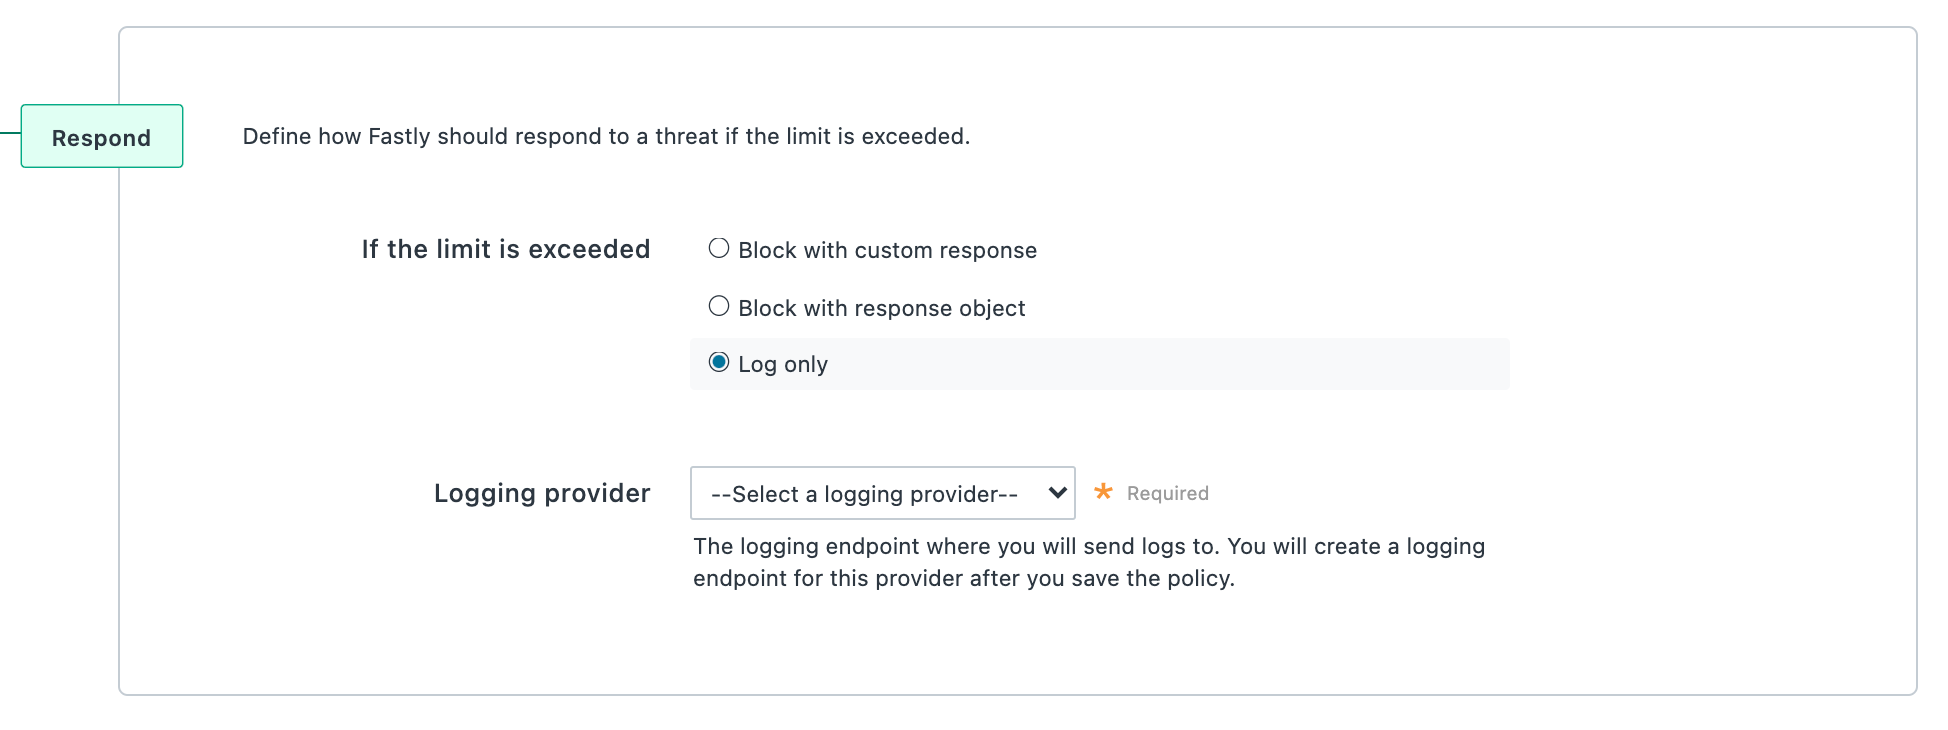
Select the Log only option to log when the rate limit is exceeded but still allow requests. By default, the following fields are logged: timestamp, policy_name, url, limit, window, entry, and rate.
NOTE
In place of the timestamp field, Datadog logs time_start and Honeycomb logs time.
If you select this option, the Logging provider menu becomes available. Select the logging endpoint where you want to send logs. Once you click Save policy, an abbreviated form appears to create a logging endpoint for the provider you specified. Complete the fields and then click Save.
NOTE
You can only have one logging endpoint for all rate limiting policies. By default, the logging endpoint is named ratelimit-debug. You can also create this endpoint via the Fastly control panel or API.
Log formats
The following JSON log formats are used when you choose the Log only option. These schemas can be useful to understand how data is written to different logging providers.
Unless otherwise specified, the default format is used to log information about particular policies that exceed the rate limit.
- Default
- Datadog
- Honeycomb
123456789{ "timestamp": “%{strftime({"%Y-%m-%dT%H:%M:%S"}, time.start)}V”, "policy_name": "%{json.escape(“<rate limiter name>”)}V”, "url": “%{json.escape(req.url)}V”, "limit": <limit>, "window": <window>, "entry": "<entry>", "rate": “<rate>"}Editing a rate limiting policy
After you've created a rate limiting policy, you can edit the same controls specified when you created the policy. You can only edit policies attached to services in a Draft state. You cannot edit policies attached to Active or Locked services.
To edit a rate limiting policy, follow the steps below:
- Log in to the Fastly control panel.
- Go to Security > Edge rate limiting.
- Locate the rate limiting policy you want to edit.
- For policies attached to a Draft service, click the pencil
 to edit the rate limiting policy. For policies attached to an Active or Locked service, click Clone version to edit.
 - Update the values of the edge rate limiting controls you want to edit.
- Click Save policy.
Deleting a rate limiting policy
To delete a rate limiting policy, follow the steps below. You can only delete policies attached to services in a Draft state. You cannot delete policies attached to Active or Locked services. To delete a policy attached to an Active or Locked service, you must first clone the service.
To delete a rate limiting policy:
- Log in to the Fastly control panel.
- Go to Security > Edge rate limiting.
- Locate the rate limiting policy you want to delete.
- For policies attached to a Draft service, click the trash
 and then Confirm and delete to delete the rate limiting policy.
Security products note
No security product, such as a WAF or DDoS mitigation product, including those security services offered by Fastly, will detect or prevent all possible attacks or threats. As a subscriber, you should maintain appropriate security controls on all web applications and origins. The use of Fastly's security products does not relieve you of this obligation. As a subscriber, you should test and validate the effectiveness of Fastly's security services to the extent possible prior to deploying these services in production, continuously monitor their performance, and adjust these services as appropriate to address changes in your web applications, origin services, and configurations of the other aspects of your Fastly services.Do not use this form to send sensitive information. If you need assistance, contact support. This form is protected by reCAPTCHA and the Google Privacy Policy and Terms of Service apply.
