
- English
- 日本語
About Fastly Image Optimizer
Last updated 2024-04-12
Fastly's Image Optimizer (Fastly IO) is an image optimization service that manipulates and transforms your images in real time and caches optimized versions of them. When an image is requested from your origin server, Fastly IO can perform one or more transformation tasks before serving and caching the optimized version. For example, you can resize, adjust quality, crop and trim, serve responsive images, and more.
WARNING
Only send image content through Fastly IO. Non-image content can't be optimized using it, but will still be counted and charged as an image optimization request, which may cost you more.
Before you begin
Before you begin using Fastly IO, keep the following in mind:
Fastly's Image Optimizer is disabled by default. It can be purchased for an account by contacting sales@fastly.com. Once purchased, it can be enabled for a service in the web interface by anyone assigned the role of superuser, which will result in changes to your monthly bill.
Services that use image optimization require shielding. When setting up shielding, be sure to choose a shield location as geographically close to your image's origin as possible. Our guide to enabling shielding provides more information on how to enable shielding. Take special note of the step immediately following your shielding location selection in that guide. If the Host header for the service has been changed from the default, you must ensure the new hostname is added to the list of domains.
Using premium Fastly IO features (e.g., the AVIF encoding format) requires the purchase of Image Optimizer Professional. Contact sales@fastly.com to purchase Image Optimizer Professional for your account.
Starting a trial
Anyone assigned the role of superuser can start a Fastly IO trial on the Trials page.
Enabling and disabling the Fastly Image Optimizer
After Fastly IO has been purchased for your account, it can be enabled and disabled in the web interface by anyone assigned the role of superuser.
NOTE
To enable or disable Fastly IO via the API, check out our developer documentation.
Enabling the Fastly Image Optimizer
To enable Fastly IO for a service, follow the steps below:
- Log in to the Fastly web interface.
- From the Home page, select the appropriate service. You can use the search box to search by ID, name, or domain. You can also click Compute services or CDN services to access a list of services by type.
- Click Edit configuration and then select the option to clone the active version.
- Click Image Optimizer.
- Click the Image Optimizer switch to enable Fastly IO for the service.
NOTE
If you've been assigned the role of superuser and you don't see the switch to enable Fastly IO, contact sales.
Disabling the Fastly Image Optimizer
To disable Fastly IO for a service, follow the steps below:
- Log in to the Fastly web interface.
- From the Home page, select the appropriate service. You can use the search box to search by ID, name, or domain. You can also click Compute services or CDN services to access a list of services by type.
- Click Edit configuration and then select the option to clone the active version.
- Click Image Optimizer.
- Click the Image Optimizer switch to disable Fastly IO for the service.
Setting up image optimization
Once you've enabled Fastly IO for your service, you can set up image optimization by following this process:
Add the Fastly Image Optimizer header
Once image optimization has been enabled for your service, configure your service by adding the Fastly Image Optimizer header.
- Log in to the Fastly web interface.
- From the Home page, select the appropriate service. You can use the search box to search by ID, name, or domain. You can also click Compute services or CDN services to access a list of services by type.
- Click Edit configuration and then select the option to clone the active version.
- Click Content.
Click Create header.
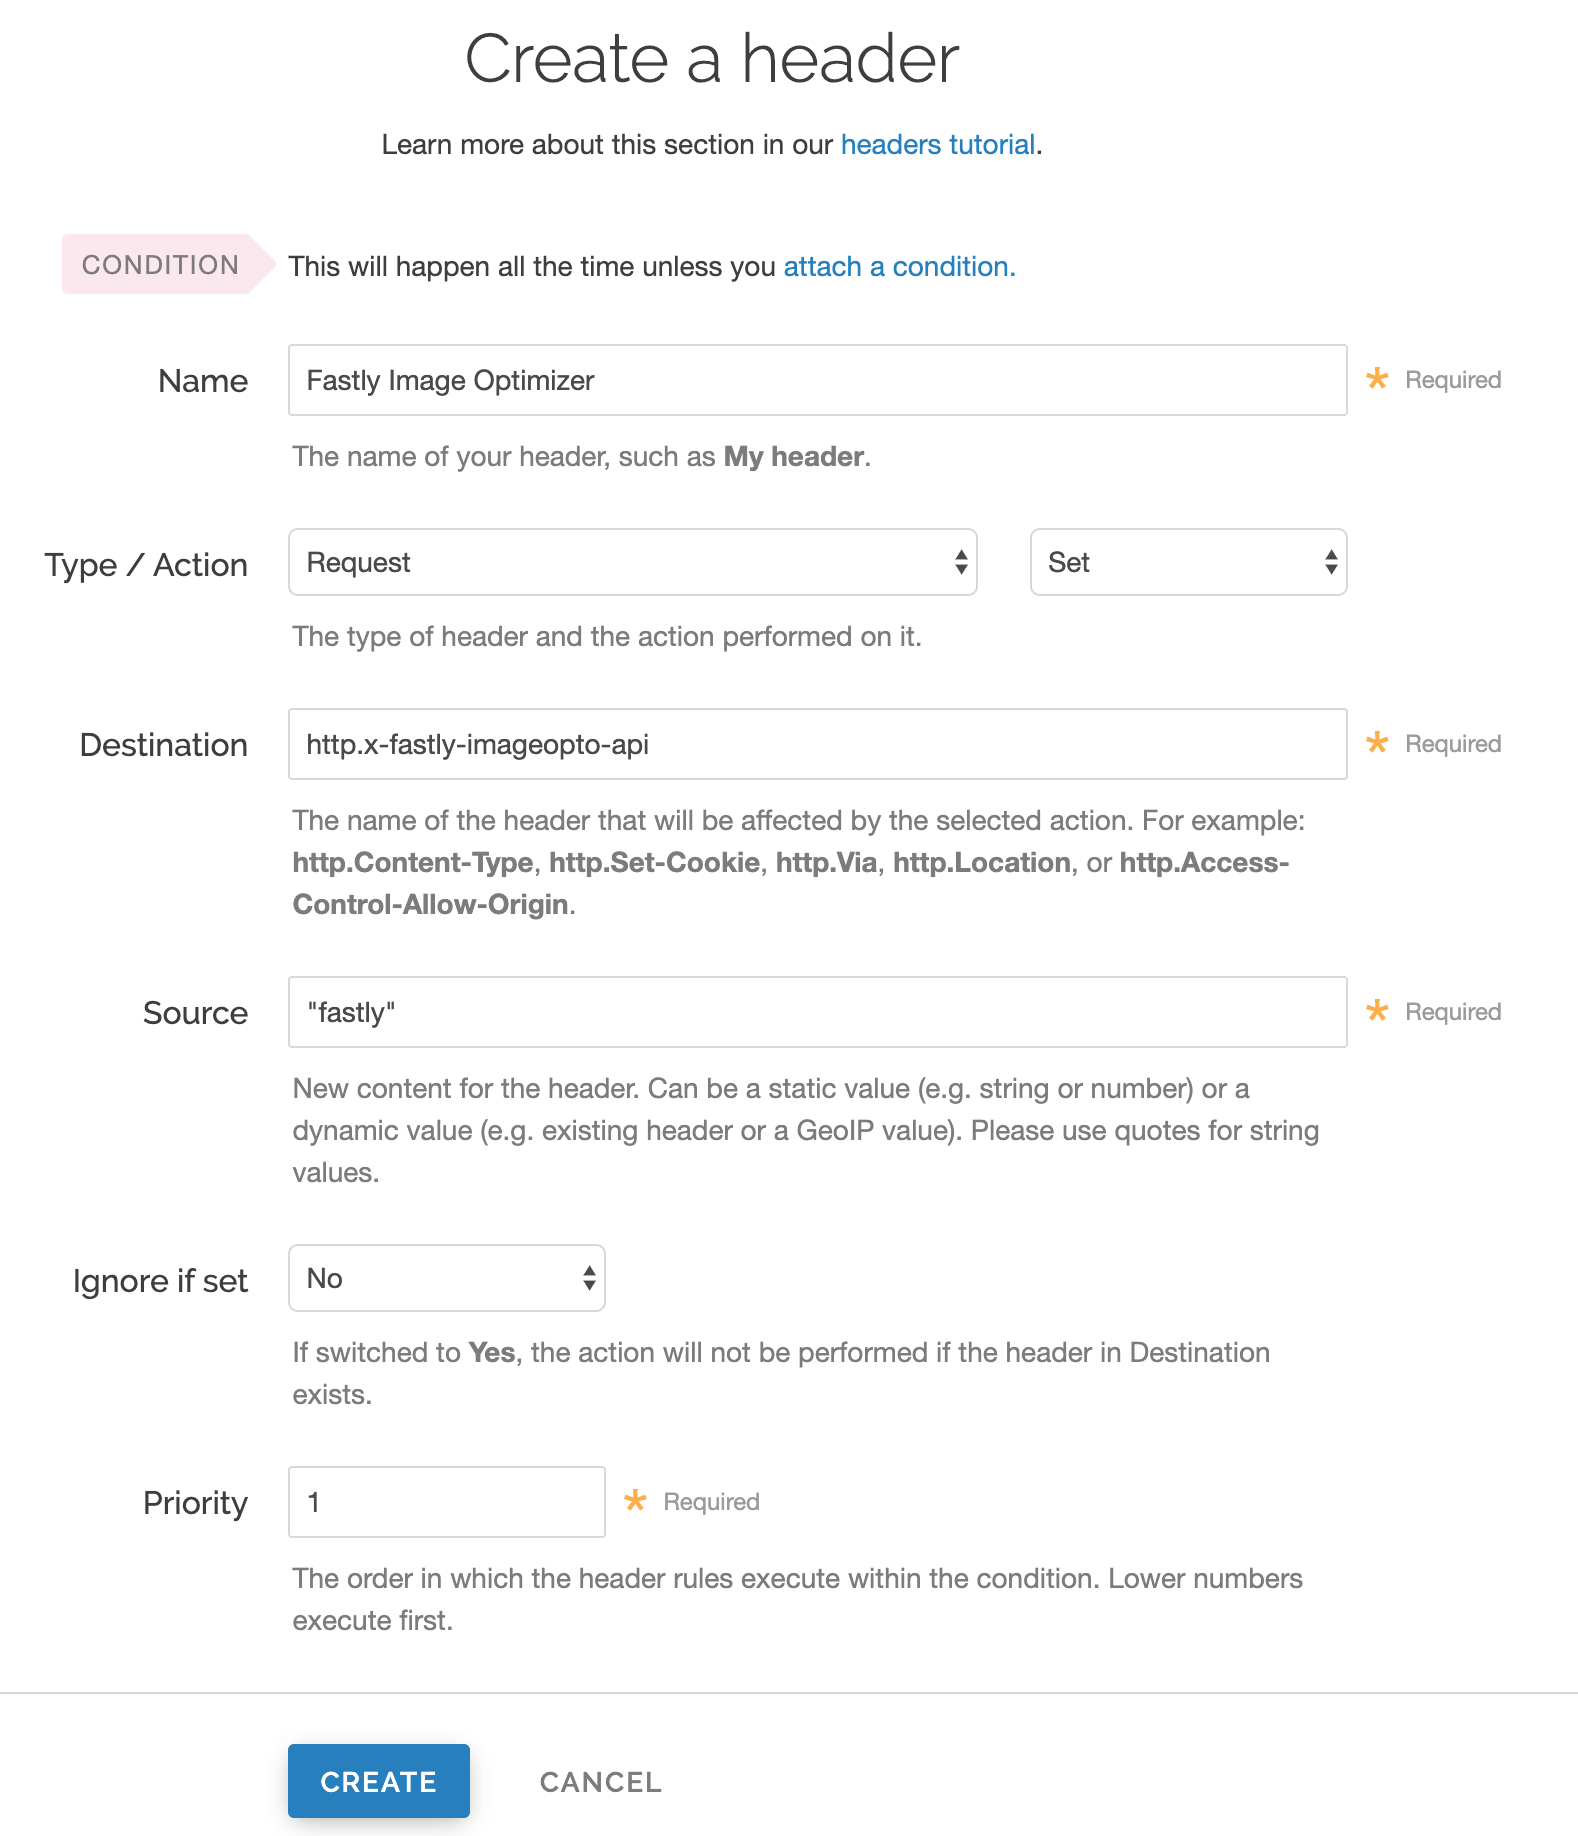
Fill out the Create a header window as follows:
- In the Name field, enter
Fastly Image Optimizer. - From the Type menu, select Request, and from the Action menu, select Set.
- In the Destination field, enter
http.x-fastly-imageopto-api. - In the Source field, enter
"fastly". By default, the Fastly Image Optimizer removes any additional query string parameters that are not part of our image API. If your source image requires delivery of additional query string parameters from origin then enter"fastly; qp=*"instead. - From the Ignore if set menu, select No.
- In the Priority field, enter
1.
- In the Name field, enter
Click Create to create the new header.
TIP
For more help with adding or modifying headers, see our guide.
Create a request condition
To ensure only your image assets are routed via the Fastly Image Optimizer, create a request condition.
Click Attach a condition next to the
Fastly Image Optimizerheader.Click Create a new request condition.
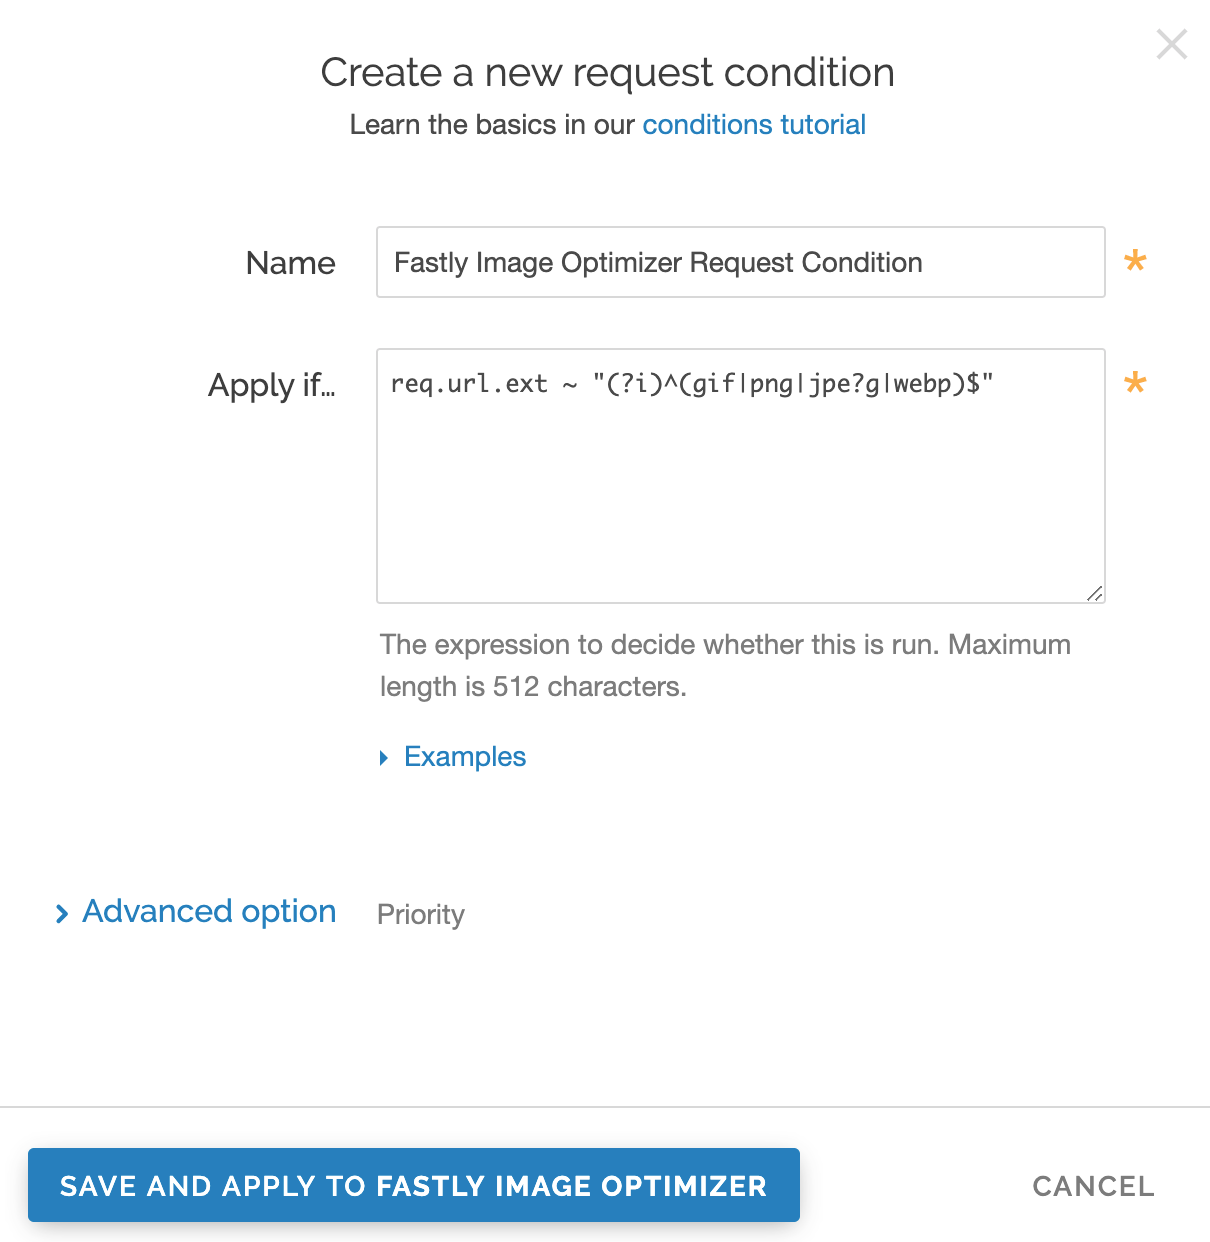
Fill out the Create a new request condition window as follows:
- In the Name field, enter a descriptive name for the new condition (for example,
Fastly Image Optimizer Request Condition). - In the Apply if field, enter the appropriate request condition. For example,
req.url.ext ~ "(?i)^(gif|png|jpe?g|webp)$"will send all files with gif, png, jpg, jpeg, and webp extensions via the Fastly Image Optimizer. Likewise,req.url ~ "^/images/"will send all files in theimagesdirectory via the Fastly Image Optimizer.
- In the Name field, enter a descriptive name for the new condition (for example,
Click Save and apply to create the new condition for the header.
- Click Activate to deploy your configuration changes.
TIP
For more help using conditions, see our guide.
Confirm everything is working
Once you've activated your changes, check to see if the Fastly Image Optimizer is processing your image request by typing the following command on the command line:
$ echo -n "Image Width: " ; curl -sI "https://www.fastly.io/image.jpg?width=200" | grep -i "Fastly-Io-Info:" | cut -d' ' -f6 | cut -d= -f2 | cut -dx -f1Replace https://www.fastly.io/image.jpg?width=200 with the full image URL and width of the image you're testing.
The command line output will display the image's width, which should match the width query string you added to your image's URL. For example, the output might be:
Image Width: 200
Configuring default image settings
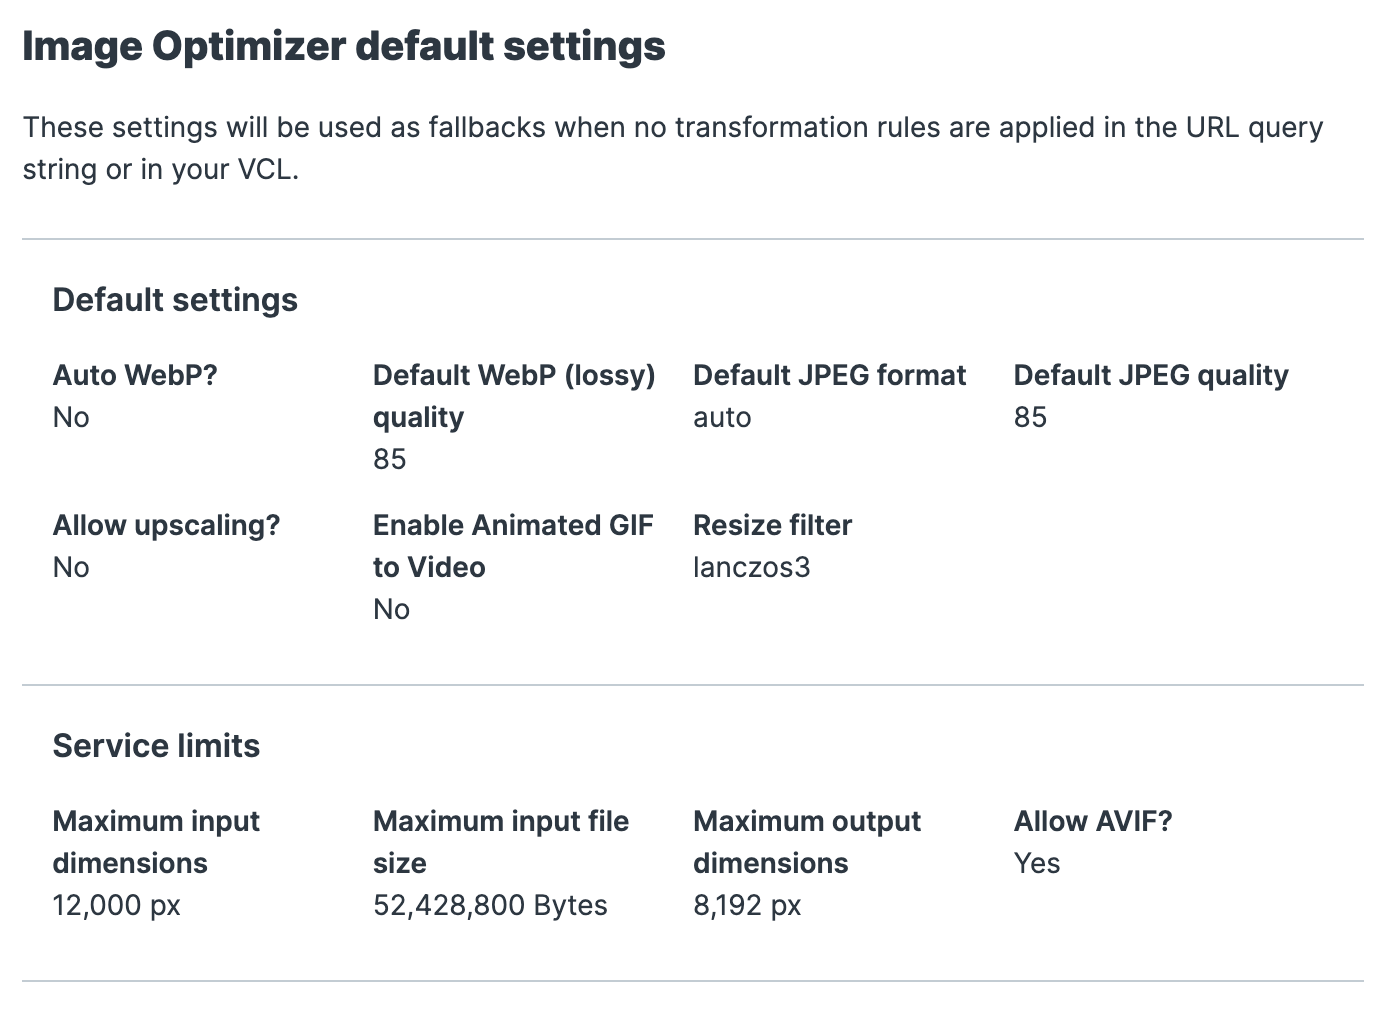
The Fastly Image Optimizer supports a variety of image formats and applies specific settings to all images by default. Use the Fastly web interface to review and adjust the default settings as appropriate. Changes to other image settings, including most image transformations, require using query string parameters.
To review and edit the default image settings via the web interface, follow the steps below:
- Log in to the Fastly web interface.
- From the Home page, select the appropriate service. You can use the search box to search by ID, name, or domain. You can also click Compute services or CDN services to access a list of services by type.
- Click Edit configuration and then select the option to clone the active version.
Click Image Optimizer.
Click the pencil next to the Default settings.
Adjust the Edit default settings as follows:
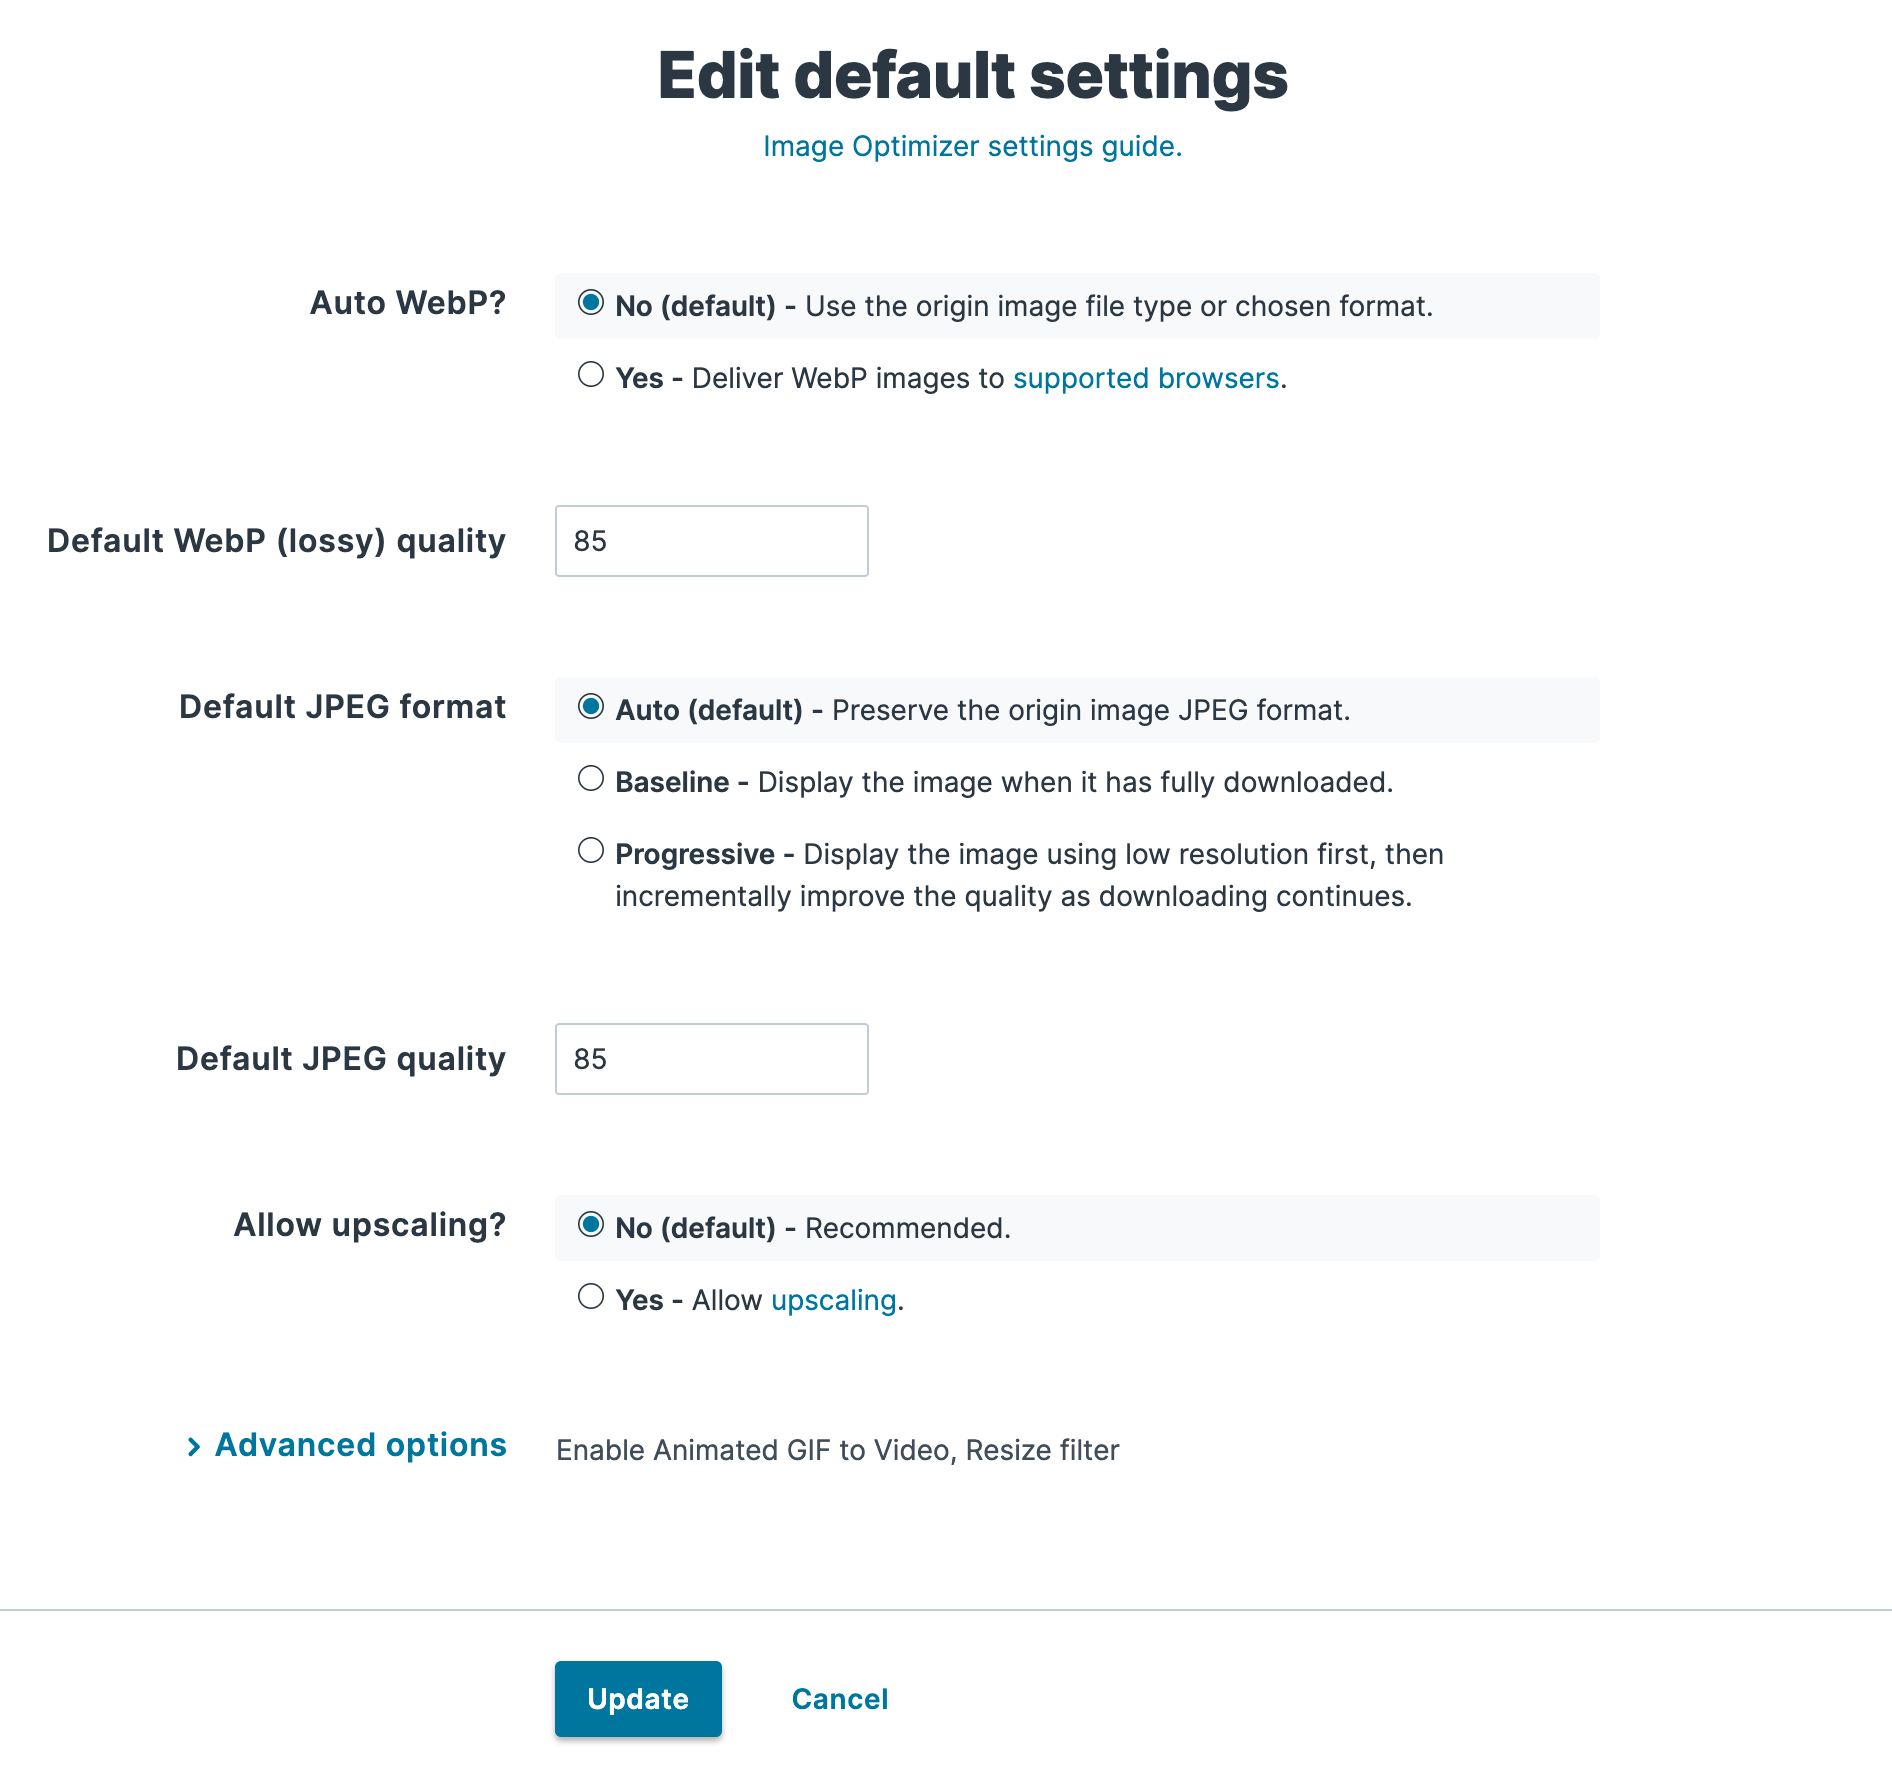
- From the Auto WebP controls, leave the settings at their default or select Yes to convert images to the WebP format in browsers that support it. When you use the default setting, No, Fastly uses the image file type instead.
- In the Default WebP (lossy) quality field, leave the settings at their default or enter the compression level for lossy file-formatted images. Fastly uses
85for the default quality but you can specify any whole number between1and100. - From the Default JPEG format controls, leave the settings at their default or select the JPEG type to use when delivering the image. By default, Fastly sets the JPEG type to Auto to deliver images with the output type matching the input type. You can also select Baseline to display the image line by line starting from top left and going to the bottom right, or Progressive to display a blurry image that becomes clear as it loads.
- In the Default JPEG quality field, leave the settings at their default or enter the compression level for quality of lossy file formats. Fastly uses
85for the default quality but you can specify any whole number between1and100. - From the Allow upscaling controls, leave the settings at their default or select Yes to return images larger than the original source file so they can fit the requested dimensions.
Click Advanced options.
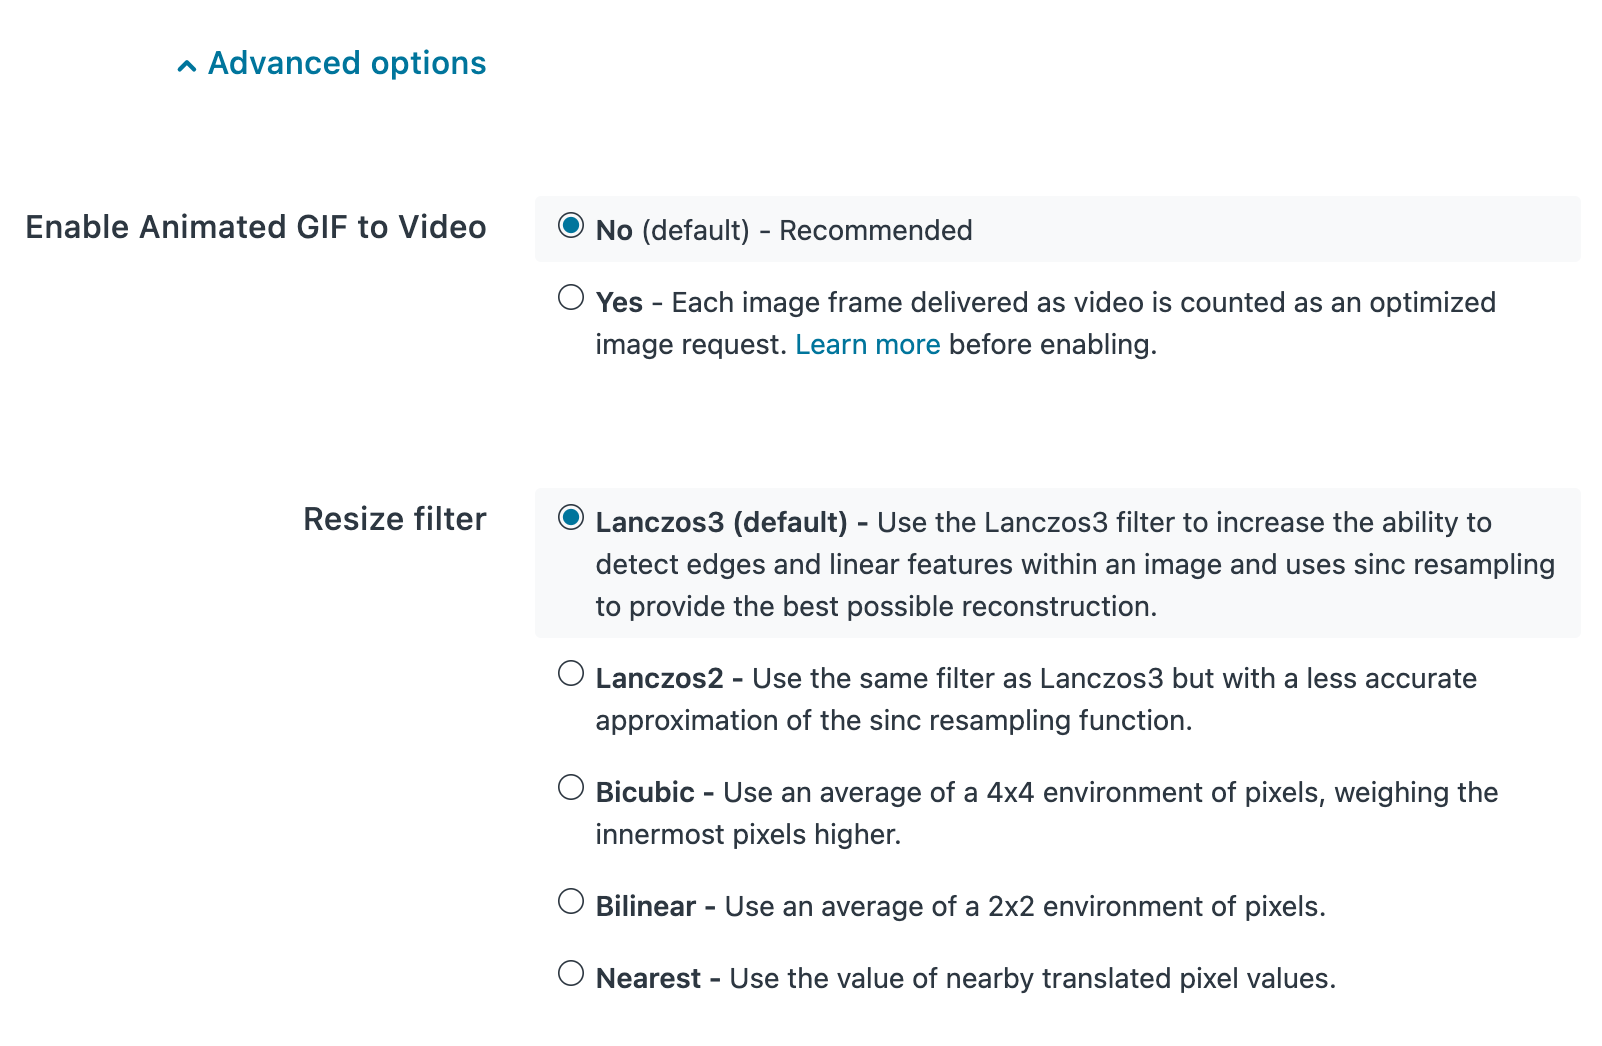
Adjust the Advanced options settings as follows:
- From the Enable Animated GIF to Video controls, leave the settings at their default or select Yes to enable Animated GIF to video functionality. Each video frame will be counted and charged as an image optimizer request.
- From the Resize filter controls, select the image quality filter to use when resizing and generating new images to use a higher or lower number of pixels. By default, Fastly uses the Lanczos3 filter. You can also choose Lanczos2, Bicubic, Bilinear, and Nearest.
Using advanced image settings
To go beyond the basic image optimization and transformation settings in the Fastly web interface, you must change your existing image URLs by adding query string parameters. For example, if your image source existed at http://www.example.com/image.jpg, you would need to add ?<PARAMETER=VALUE> to the end of the URL to create the proper query string structure for Fastly to transform the image.
Our Fastly IO documentation describes each of the available image transformations in detail and includes the exact pattern you can add to URLs, along with a description and example of how to use each parameter and its values. These examples perform transformations and optimizations on our www.fastly.io/image.jpg URL so you can see exactly how they work before you change your image URLs. Additionally, it provides details you should know before you start adding Fastly IO query strings to your existing image URLs.
Debugging
Running into problems? See our details on image optimization debugging for more information.
What's next
Start experimenting with Fastly IO by following along with Introduction to Fastly Image Optimizer, a step-by-step tutorial that shows you how to set up Fastly IO for a real website. It builds on the concepts introduced in Introduction to Fastly's CDN, and it guides you through the steps of optimizing the images for Taco Labs, the static website we used as an example in Introduction to Fastly's CDN.
This article describes a product that may use third-party cloud infrastructure to process or store content or requests for content. For more information, check out our cloud infrastructure security and compliance program.
Do not use this form to send sensitive information. If you need assistance, contact support. This form is protected by reCAPTCHA and the Google Privacy Policy and Terms of Service apply.
