Basics
- About the web interface controls
- Always-on DDoS mitigation
- Browser recommendations when using the Fastly web interface
- Content and its delivery
- Fastly POP locations
- Getting started with Fastly
- How caching and CDNs work
- How Fastly's CDN Service works
- HTTP status codes cached by default
- Self-provisioned Fastly services
- Sign up and create your first service
- Working with services
Domains & Origins
Performance
Basics
Dictionaries
Domains & Origins
- Changing origins based on user location
- Connecting to origins
- Enabling global POPs
- Failover configuration
- IPv6 support
- Maintaining separate HTTP and HTTPS requests to origin servers
- Routing assets to different origins
- Setting up redundant origin servers
- Specifying an override host
- Using Fastly with apex domains
Request settings
Cache settings
Headers
Responses
Performance
- About Dynamic Servers
- Cache control tutorial
- Caching configuration best practices
- Controlling caching
- Creating and using pools with Dynamic Servers
- Creating and using server entries with Dynamic Servers
- Enabling API caching
- Enabling automatic gzipping
- Failure modes with large files
- HTTP/2 server push
- Implementing API cache control
- Making query strings agnostic
- Request collapsing
- Segmented Caching
- Serving stale content
- Setting Surrogate-Key headers based on a URL
- Setting Surrogate-Key headers for Amazon S3 origins
- Streaming Miss
Purging
Custom VCL
- Accept-Language header VCL features
- Authenticating before returning a request
- Basic authentication
- Creating location-based tagging
- Custom responses that don't hit origin servers
- Delivering different content to different devices
- Enabling URL token validation
- Guide to VCL
- Isolating header values without regular expressions
- Manipulating the cache key
- IP geolocation variables: Migrating to the new dataset
- Overriding which IP address the geolocation features use
- Response Cookie handling
- Support for the Edge-Control header
- Understanding the different PASS action behaviors
- Using edge side includes (ESI)
- VCL regular expression cheat sheet
Image optimization
Video
Access Control Lists
Monitoring and testing
Securing communications
Security measures
TLS
- Domain validation for TLS certificates
- Enabling HSTS through Fastly
- Forcing a TLS redirect
- Managing domains on TLS certificates
- Serving HTTPS traffic using certificates you manage
- Serving HTTPS traffic using Fastly-managed certificates
- Setting up free TLS
- TLS key and certificate replacement
- TLS termination
Web Application Firewall
Logging endpoints
- Log streaming: Amazon S3
- Log streaming: Microsoft Azure Blob Storage
- Log streaming: Cloud Files
- Log streaming: Datadog
- Log streaming: DigitalOcean Spaces
- Log streaming: Elasticsearch
- Log streaming: FTP
- Log streaming: Google BigQuery
- Log streaming: Google Cloud Storage
- Log streaming: Honeycomb
- Log streaming: Kafka
- Log streaming: Log Shuttle
- Log streaming: LogDNA
- Log streaming: Logentries
- Log streaming: Loggly
- Log streaming: Heroku's Logplex
- Log streaming: OpenStack
- Log streaming: Papertrail
- Log streaming: Scalyr
- Log streaming: SFTP
- Log streaming: Splunk
- Log streaming: Sumo Logic
- Log streaming: Syslog
Non-Fastly services
Streaming logs
Debugging techniques
Common errors
Account management
Billing
User access and control
Authenticating URL purge requests via API
Last updated August 27, 2019
Fastly's URL purge feature allows you to purge individual URLs on your website. By default, authentication is not required to purge a URL with the Fastly API, but you can enable API token authentication in the Fastly web interface by adding a header or by using custom VCL.
NOTE: All purge requests other than URL purges require authentication by default, as indicated in the API documentation.
Enabling authentication in the Fastly web interface
You can enable API token authentication for URL purge requests by adding a header and optionally attaching a condition in the Fastly web interface.
Adding the header
- Log in to the Fastly web interface and click the Configure link.
- From the service menu, select the appropriate service.
- Click the Edit configuration button and then select Clone active. The Domains page appears.
- Click the Content link. The Content page appears.
-
Click the Create header button. The Create a header window appears.
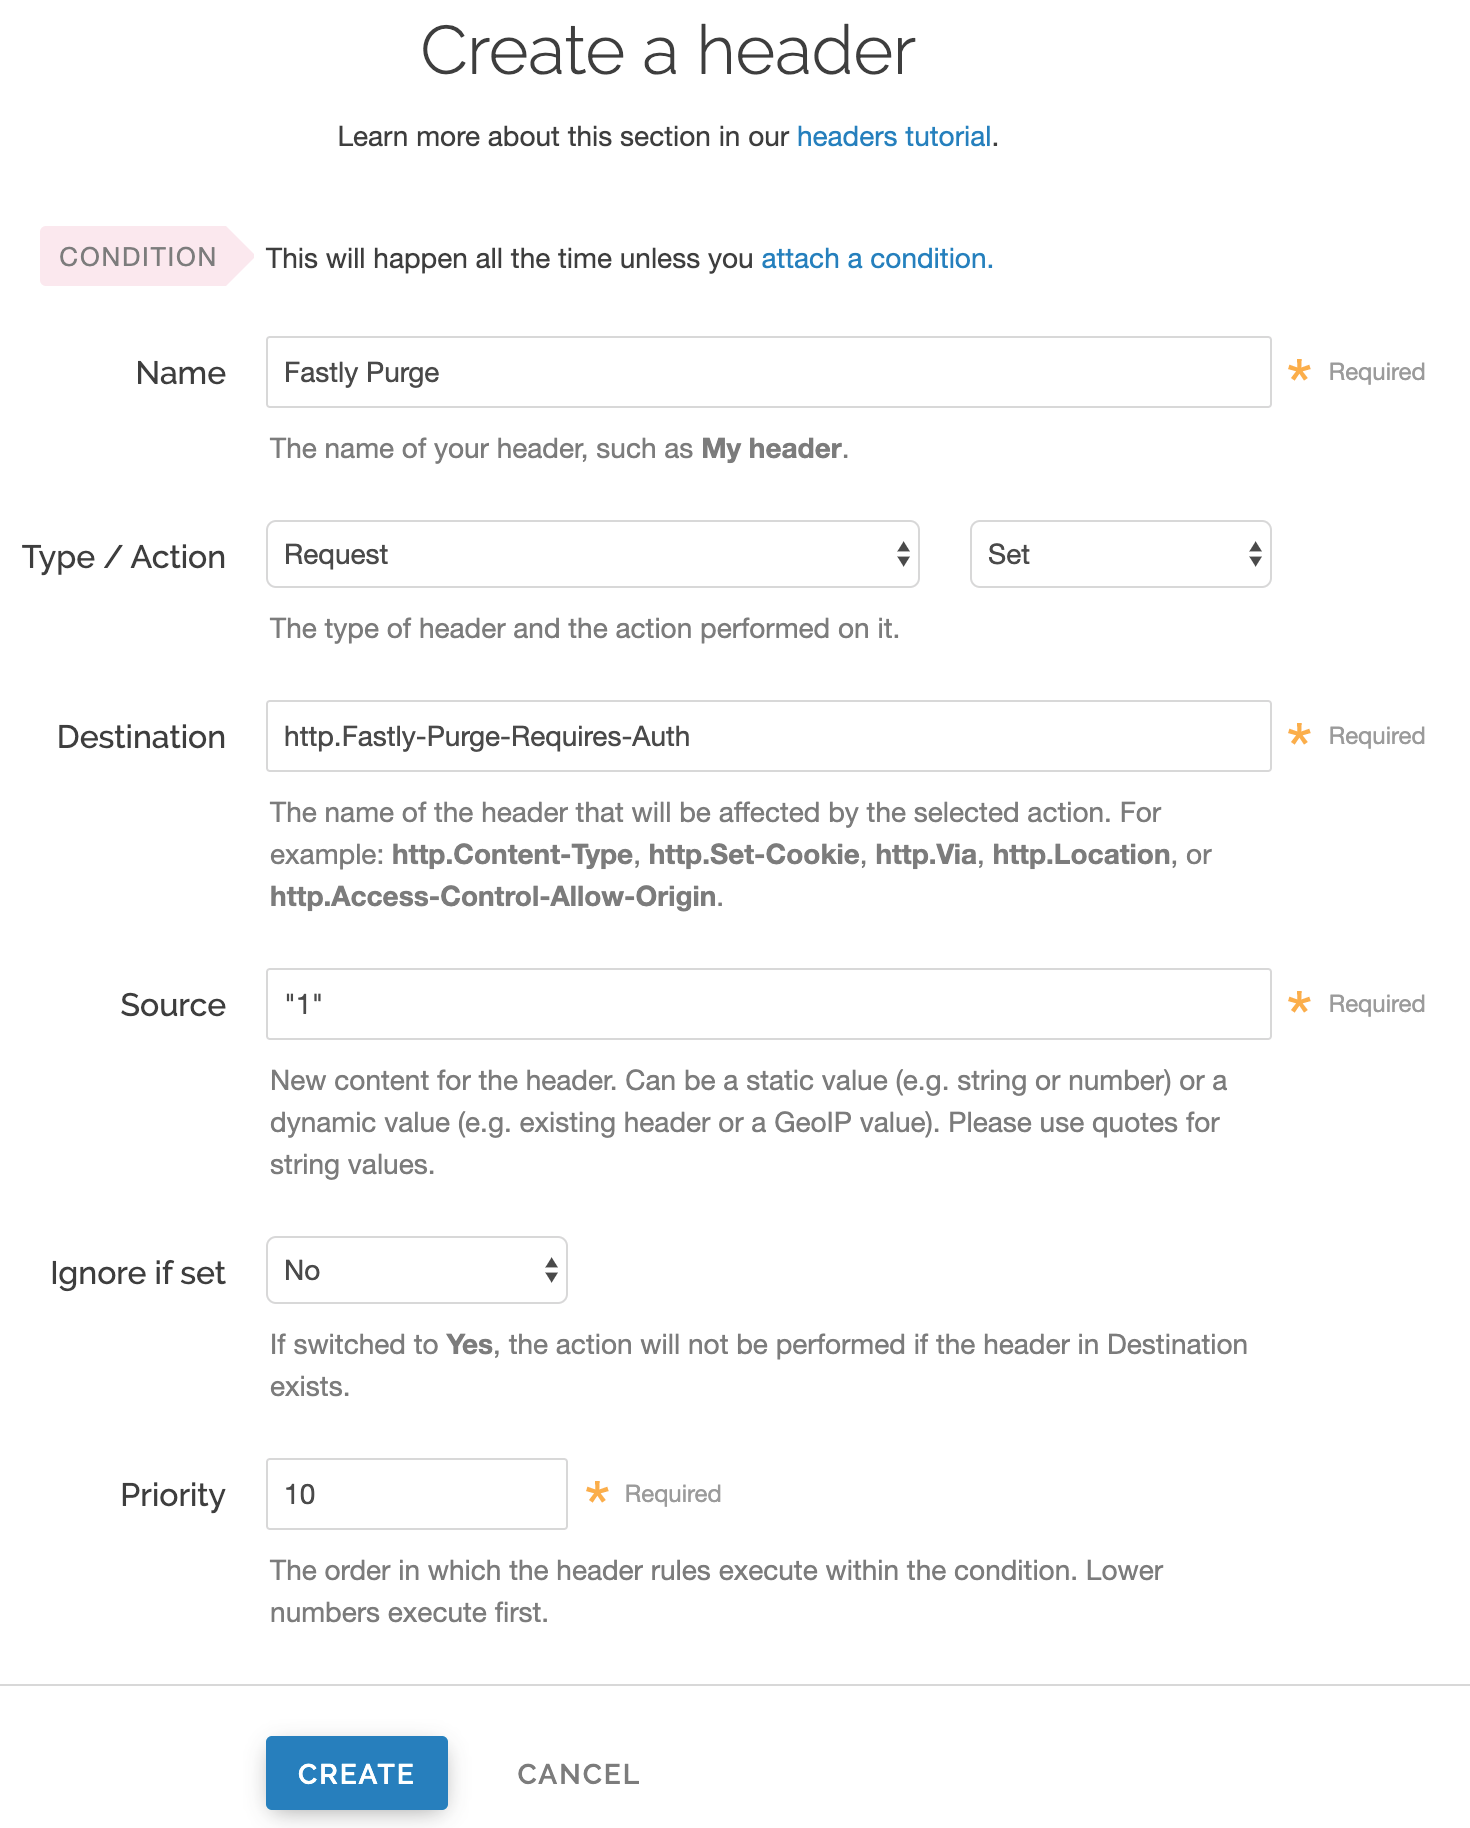
- Fill out the Create a header fields as follows:
- In the Name field, type the name of your header rule (for example,
Fastly Purge
). - From the Type menu, select Request, and from the Action menu, select Set.
- In the Destination field, type
http.Fastly-Purge-Requires-Auth
. - In the Source field, type
"1"
. - From the Ignore if set menu, select No.
- In the Priority field, type
10
.
- In the Name field, type the name of your header rule (for example,
- Click the Create button.
Attaching a condition
Attaching the following condition is optional. Without the condition, the header you just created will be added to all requests. With the condition, the header will be added to purge requests only.
-
On the Content page, click the Attach a condition link to the right of your new header. The Create a new request condition window appears.
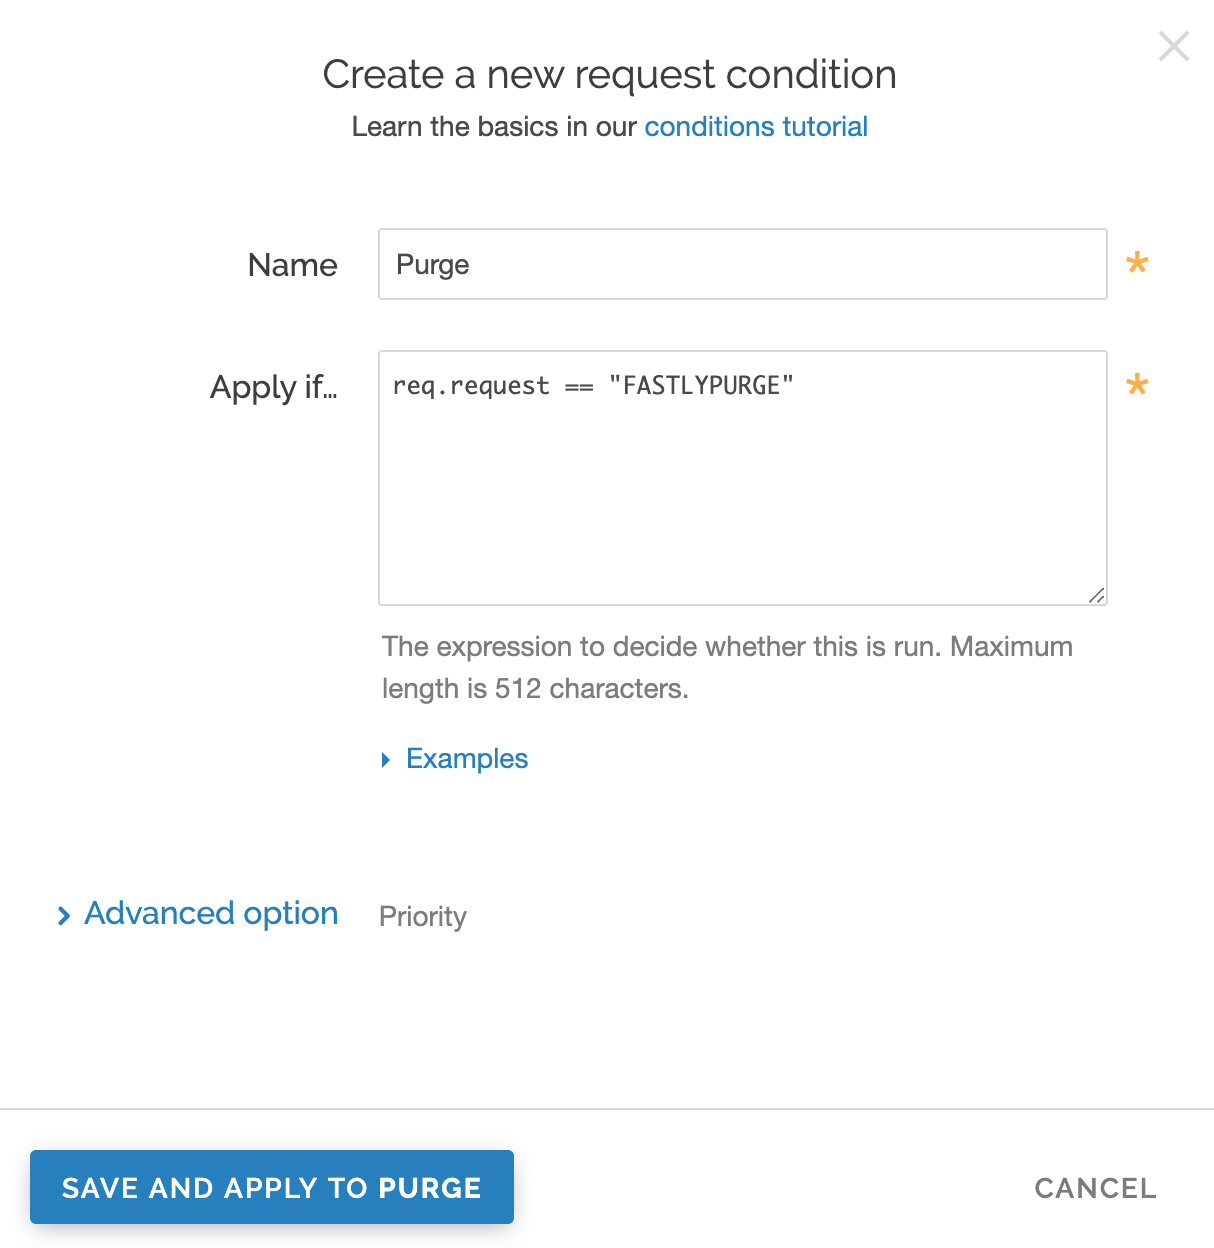
- Fill out the Create a new request condition fields as follows:
- In the Name field, type a descriptive name for the new condition (for example,
Purge
). - In the Apply if field, type
req.request == "FASTLYPURGE"
.
- In the Name field, type a descriptive name for the new condition (for example,
- Click the Save and apply to button.
- Click the Activate button to deploy your configuration changes.
Enabling authentication with VCL Snippets
You can also enable API token authentication for URL purge requests using VCL Snippets:
- Log in to the Fastly web interface and click the Configure link.
- From the service menu, select the appropriate service.
- Click the Edit configuration button and then select Clone active. The Domains page appears.
- Click the VCL Snippets link. The VCL Snippets page appears.
-
Click Create Snippet. The Create a VCL snippet page appears.
- In the Name field, type an appropriate name (e.g., Purge Require Auth).
- From the Type controls, select within subroutine.
- From the Select subroutine menu, select recv (vcl_recv).
-
In the VCL field, add the following condition:
1 2 3
if (req.request == "FASTLYPURGE") { set req.http.Fastly-Purge-Requires-Auth = "1"; }
- Click Create to create the snippet.
- Click the Activate button to deploy your configuration changes.
Purging URLs with an API token
After you've enabled API token authentication for URL purge requests, you'll need to provide your API token in the URL purge API request:
1
curl -X PURGE -H Fastly-Key:FASTLY_API_TOKEN https://www.example.com/
which would return this response:
1
{"status": "ok", "id": "1234567890"}
WARNING: If your website is not configured to use HTTPS, we recommend purging using a POST request with a secure Fastly API URL. This will ensure that your API token in the header is encrypted in transit. The request will look like this: curl -X POST -H Fastly-Key:FASTLY_API_TOKEN https://api.fastly.com/purge/<your_url_here>
.