
- English
- 日本語
Controlling caching
Last updated 2025-04-01
When we store your content in cache, we calculate a Time to Live (TTL). The TTL is the maximum amount of time we will use the content to answer requests without consulting your origin server. After the TTL expires, we may keep the content in storage, but we won't use it to answer requests unless we're able to revalidate it with your origin.
There's no guarantee that the content will stay cached for the length of time specified in the TTL. Depending on the size of the object and how popular it is relative to other objects, we may delete it before its TTL expires.
For more information about controlling how long Fastly caches your resources, start with our documentation on cache freshness. In general, we will honor any Cache-Control headers you send to us from your origin.
Determining the TTL of an object
You can determine the TTL of an individual object as follows:
- If you've set the
Surrogate-Control: max-age,Cache-Control: max-age, orExpiresheaders, the TTL is whatever you specified in those headers - If you've specified the TTL in the Fastly control panel or custom VCL, the TTL is whatever you specified
- If you've specified the TTL in the Fastly control panel or custom VCL and you've set the
Surrogate-Control: max-age,Cache-Control: max-age, orExpiresheaders, the TTL specified in the control panel might override the TTL specified in the origin response - If you haven't specified the TTL in the Fastly control panel or custom VCL and you haven't set the
Surrogate-Control: max-age,Cache-Control: max-age, orExpiresheaders, the TTL is 3600 seconds. If you use custom VCL or Fiddle, the default is 120 seconds.
You can change the fallback TTL in the service configuration.
Setting different TTLs for Fastly cache and web browsers
Purging objects from the Fastly cache is easy. Clearing the caches of users' web browsers is much harder. For that reason, it can make sense to set different TTLs for content in the Fastly cache versus users' web browsers. You can set different TTLs for the Fastly cache and web browsers through Surrogate-Control headers defined by the W3C. For example, if you wanted Fastly to cache something for a year but you also wanted to set a maximum age of a single day for users viewing that object in a web browser, then you could return the following HTTP headers:
Surrogate-Control: max-age=31557600Cache-Control: max-age=86400The Surrogate-Control header in this example tells Fastly to cache the object for a maximum of 31557600 seconds (one year). The Cache-Control header in this example tells the browser to cache the object for a maximum of 86400 seconds (1 day).
TIP
CDNs can't invalidate an end user's web browser cache. If your content is going to change frequently or if you want new content immediately available to end users, the best strategy is to cache that content on Fastly and specifically instruct browsers not to cache it. Then, when you purge the Fastly cache, an end user's browser will display the new version the next time the content is requested.
One way to do this is to return the following headers:
Surrogate-Control: max-age=31557600Cache-Control: private, no-storeThis Surrogate-Control header tells Fastly to cache the object for a maximum of 31557600 seconds (one year). The Cache-Control header should be added in vcl_deliver. It tells the browser not to cache the object.
For Surrogate-Control, Fastly supports the max-age, stale-if-error, and stale-while-revalidate parameters.
For more information about controlling caching, check out our documentation on cache freshness.
Conditionally preventing pages from caching
To conditionally prevent pages from caching, follow the steps below.
- Log in to the Fastly control panel.
- From the Home page, select the appropriate service. You can use the search box to search by ID, name, or domain.
- Click Edit configuration and then select the option to clone the active version.
- Click Settings.
Click Create cache setting to create a new cache setting.
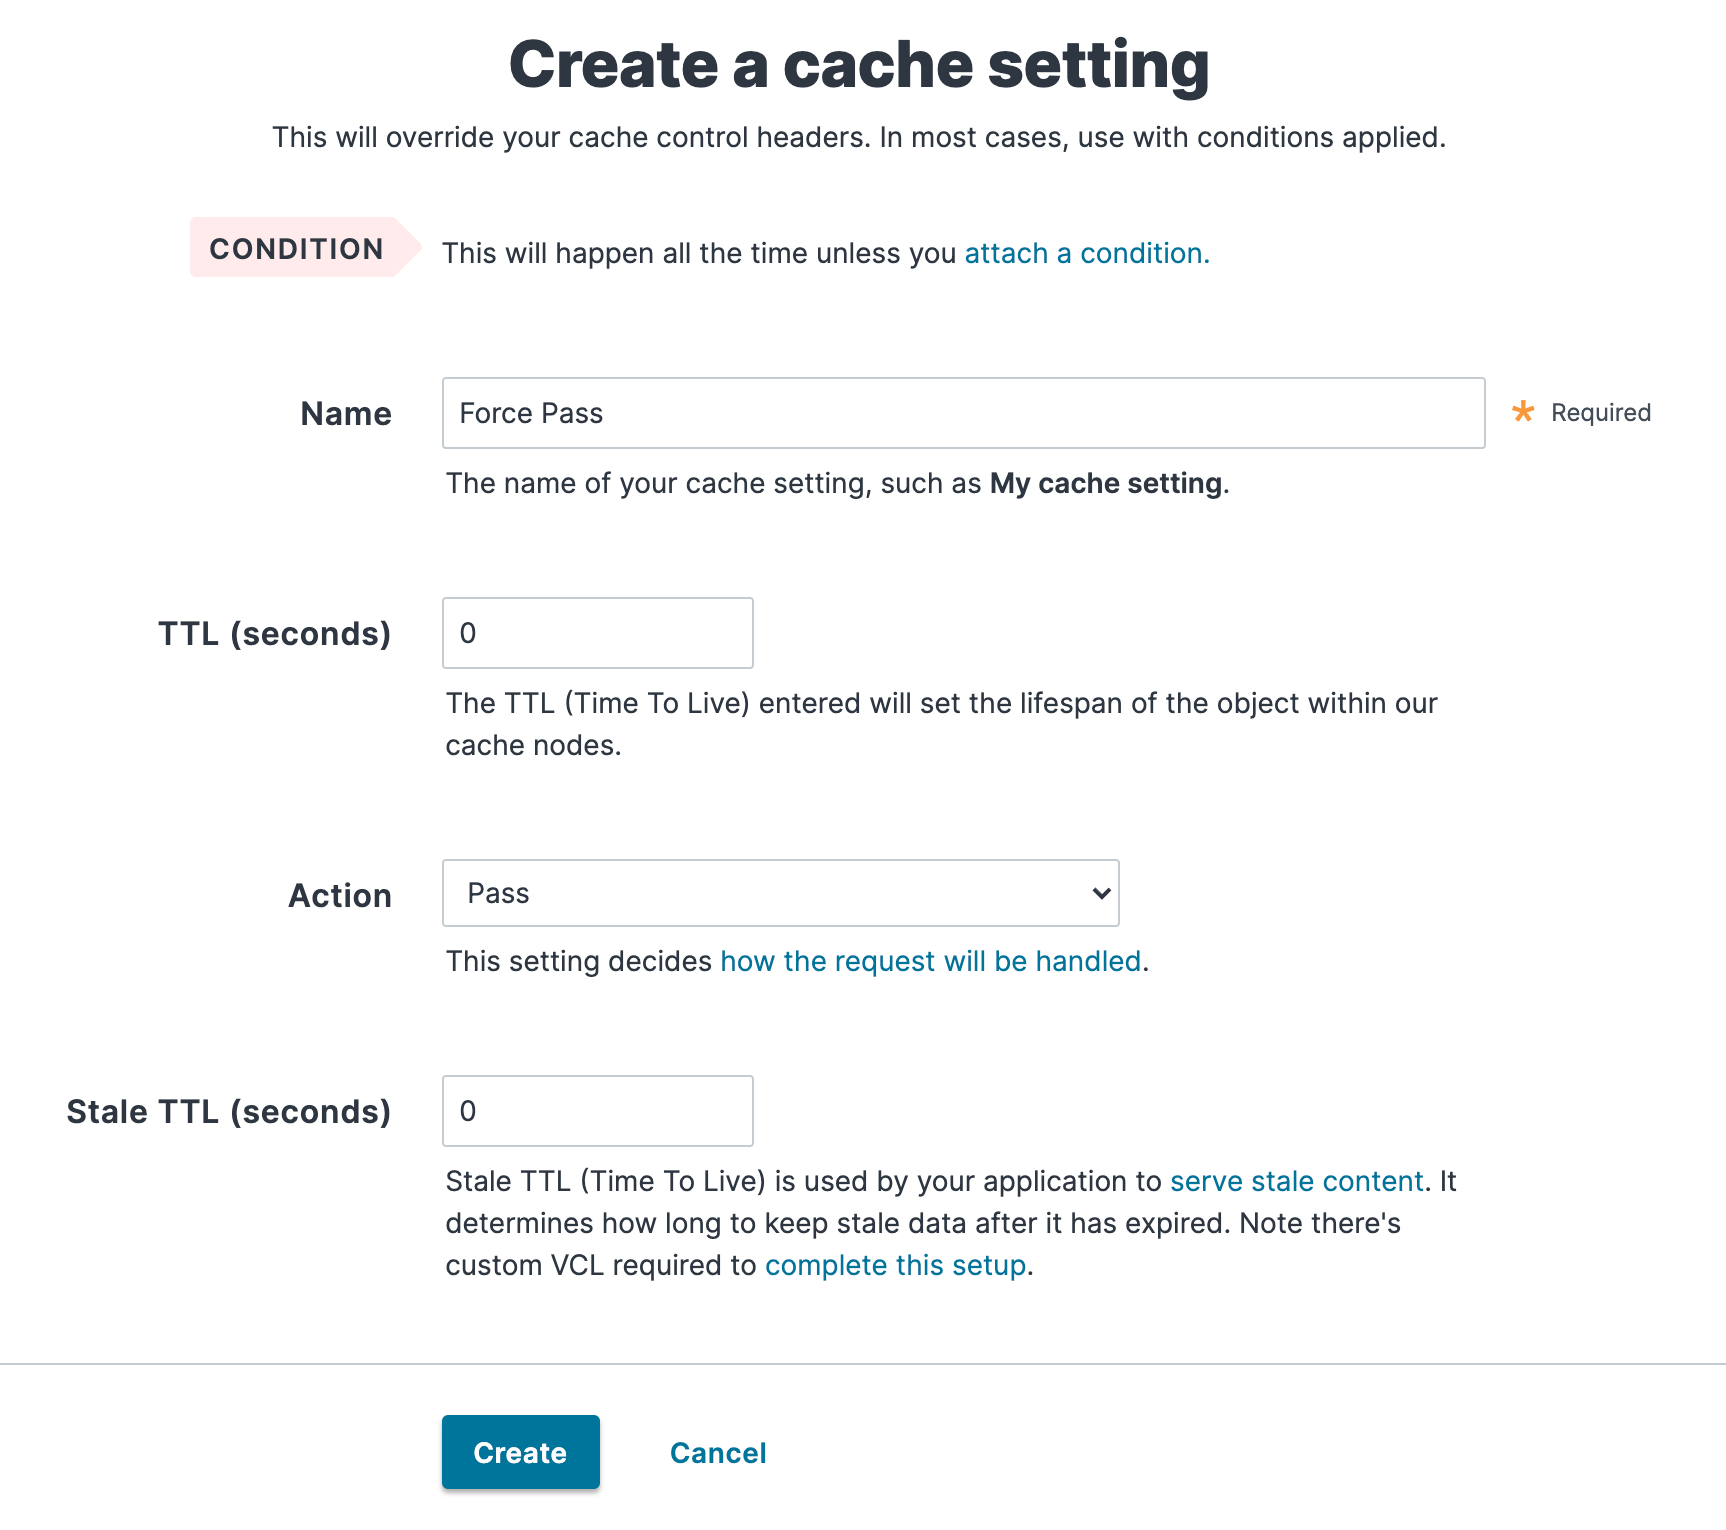
Fill out the Create a cache setting fields as follows:
- In the Name field, enter a descriptive name for the new cache setting (e.g.,
Force Pass). - In the TTL (seconds) field, enter
0to set the lifespan of the object in our cache nodes to zero. - From the Action menu, select Pass (do not cache) to pass the request and avoid caching it.
- In the Stale TTL (seconds) field, enter
0to set the amount of time to serve stale content, in seconds, to zero.
- In the Name field, enter a descriptive name for the new cache setting (e.g.,
Click Create.
Click the Attach a condition link to the right of the newly created cache setting.

Fill out the Create a new cache condition fields as follows:
- In the Name field, enter a descriptive name for the condition (e.g.,
Cacheable URLs). - In the Apply if field, create a condition that matches the URLs to not cache. For example, you could enter
req.url !~ "^/(cacheable|images|assets)"to set the condition to look for URLs that do not start with/cacheable,/images, or/assets. If the condition finds them, the URLs should be cached. If the condition doesn’t find them, the cache setting that is set toPassensures the URLs are explicitly not cached.
- In the Name field, enter a descriptive name for the condition (e.g.,
Click Save and apply to.
- Click Activate to deploy your configuration changes.
TIP
You can use these steps to override default caching based on a backend response.
Do not use this form to send sensitive information. If you need assistance, contact support. This form is protected by reCAPTCHA and the Google Privacy Policy and Terms of Service apply.
