
- English
- 日本語
Alibaba Object Storage Service
Last updated 2022-03-01
Alibaba Object Storage Service (OSS) can be used as an origin for Fastly for both public and private content.
Using OSS as an origin
To use OSS as an origin, follow the steps below.
Setting up and configuring your OSS account
Sign up for Alibaba Object Storage Service.
Create a bucket to store your origin's data.
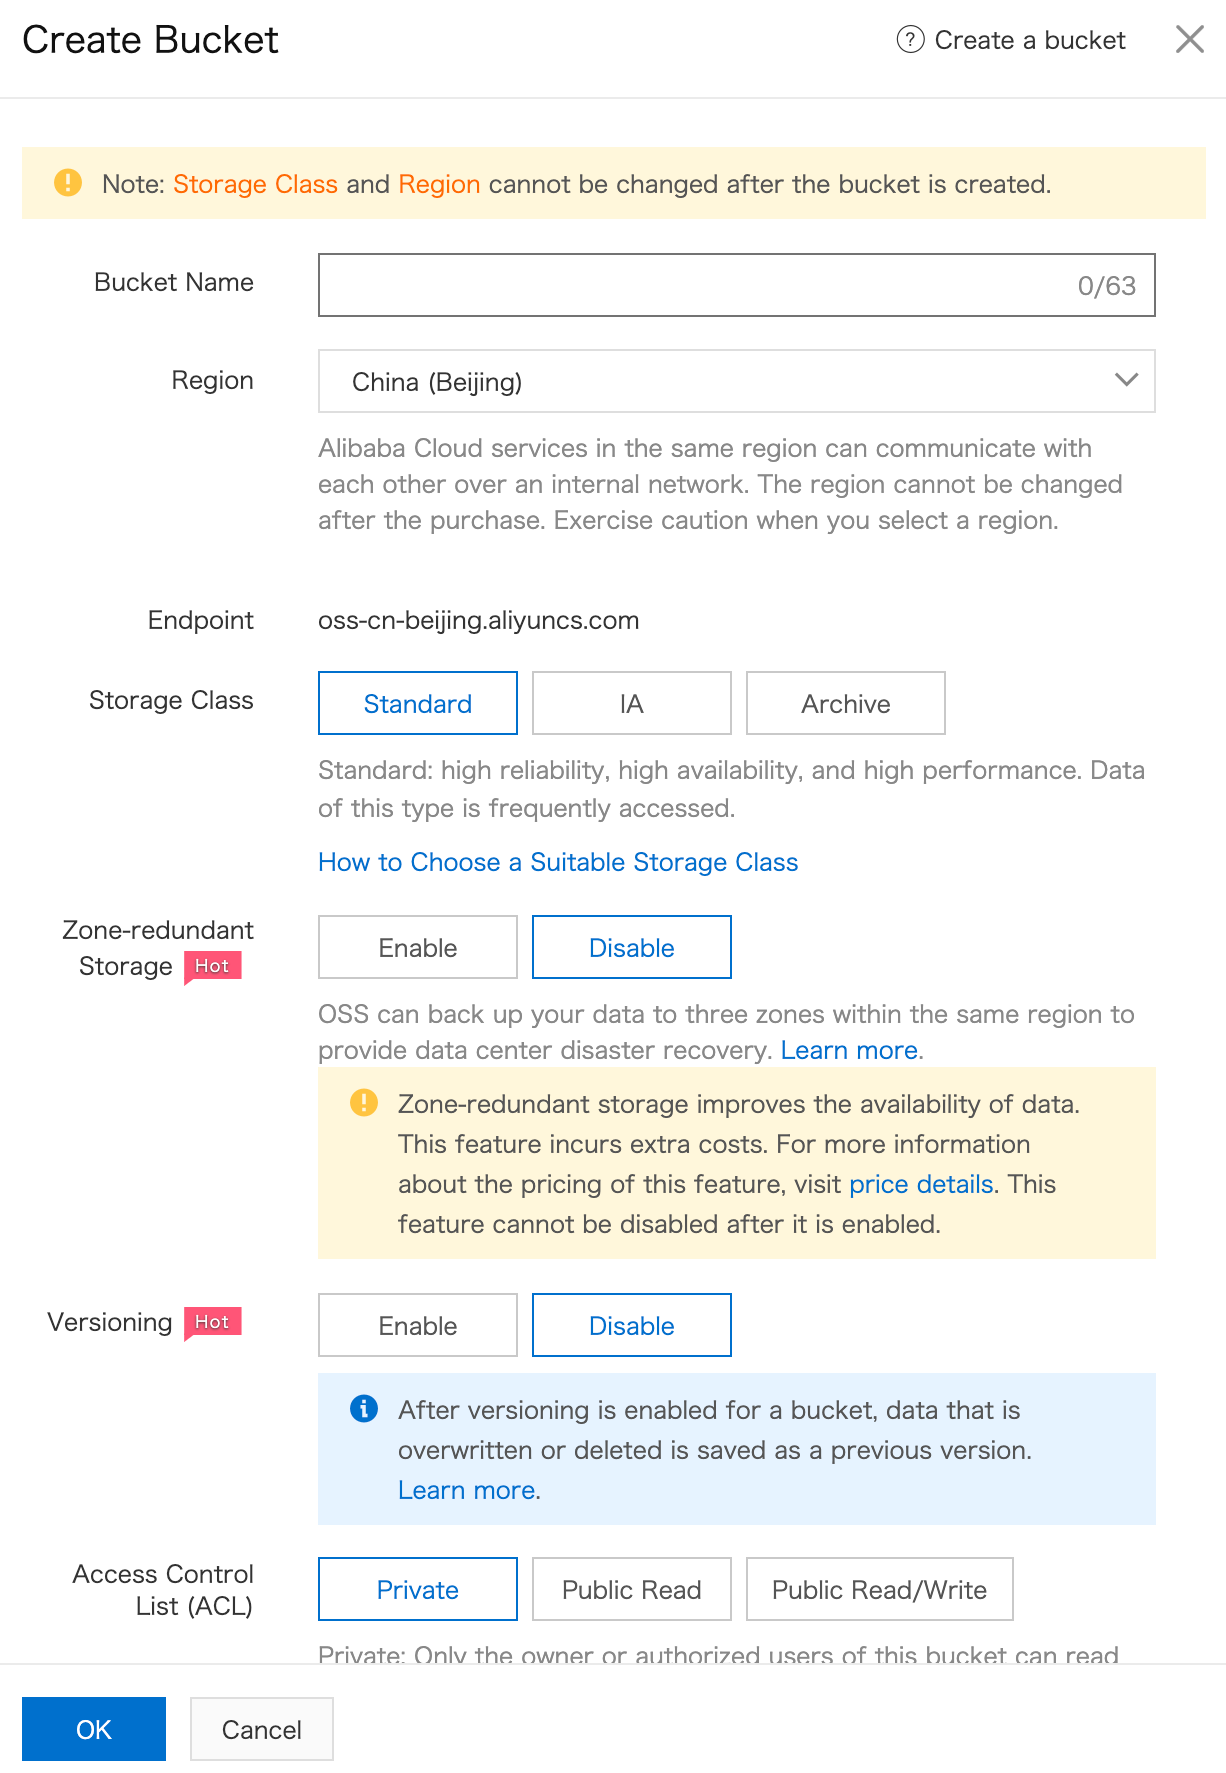
Fill out the Create Bucket fields as follows:
- In the Bucket Name field, enter a name for your bucket. Remember the name you enter. You'll need it to connect your bucket to your Fastly service.
- From the Region menu, select a location to store your content. Most customers select a region close to the POP they specify for shielding.
- From the Storage Class options, select Standard.
- From the Access Control List (ACL) options, select Public Read.
- (Optional) Select other options, such as Server-side Encryption and Scheduled Backup.
Click OK.
Uploading files to your bucket
Once you've created your bucket, select it and then navigate to the Files tab to add files to it by clicking Upload.
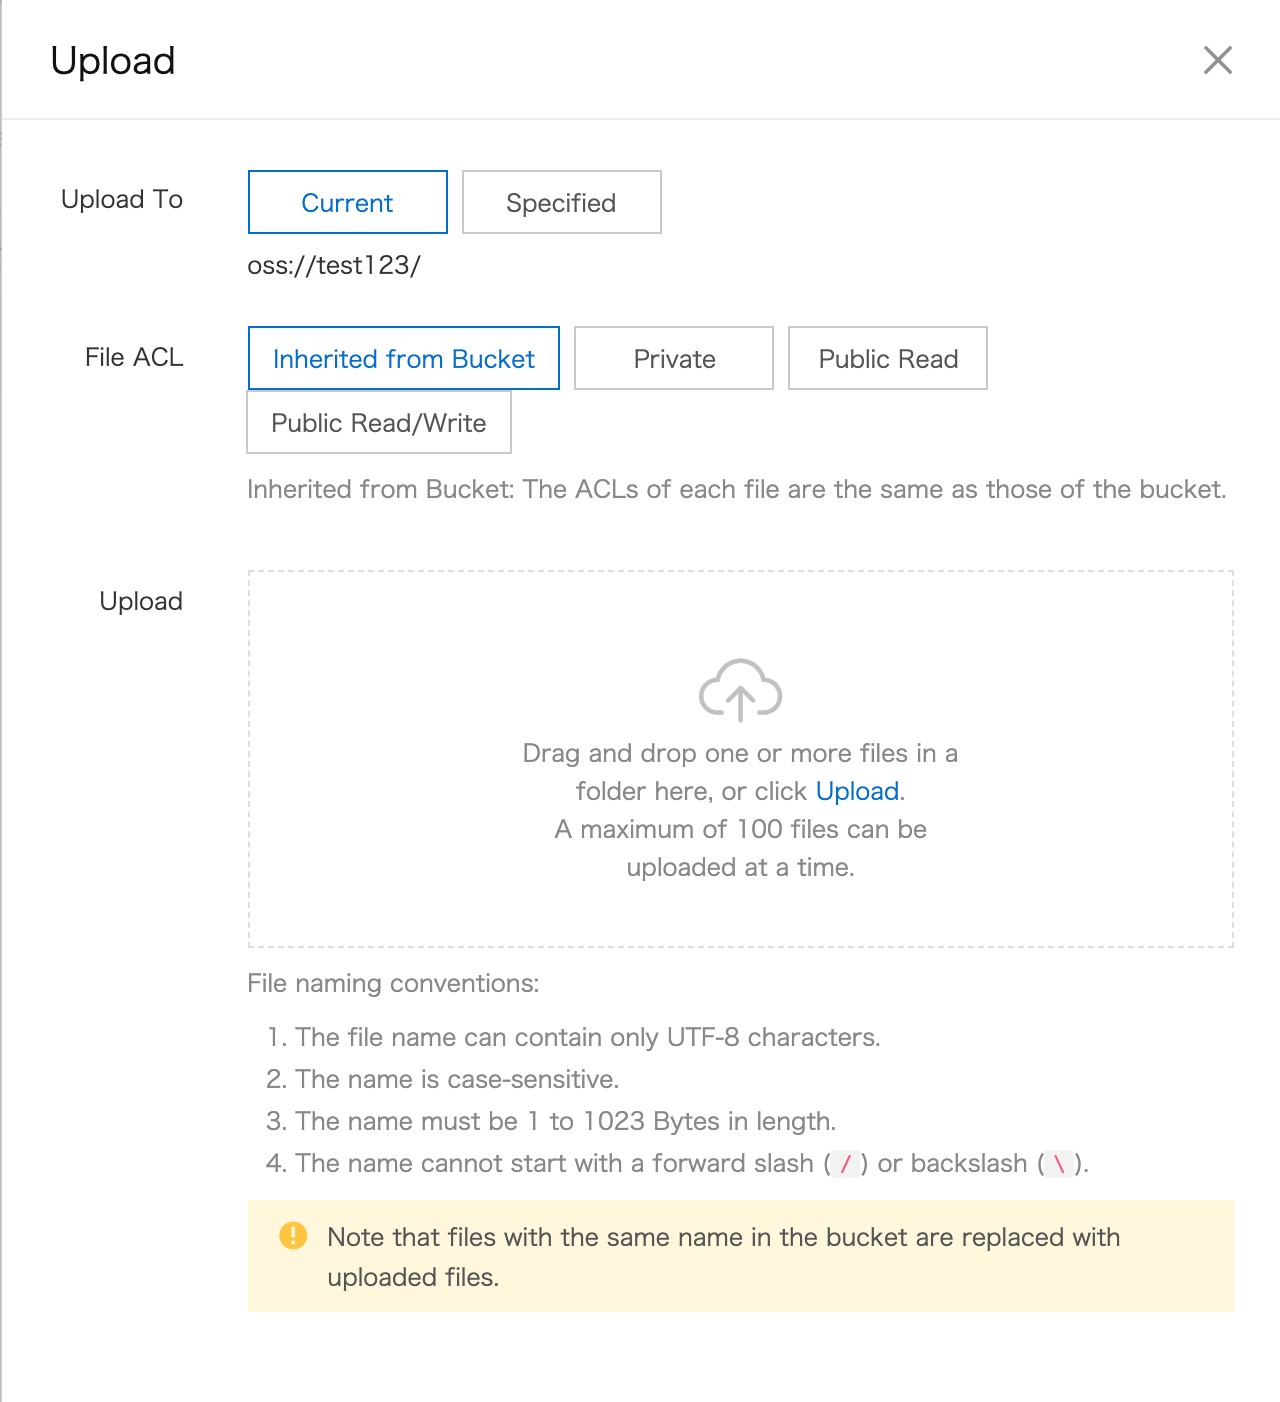
You can make the files externally accessible by selecting the Public Read option for the bucket or you can use the Inherited from Bucket option next to each of the files.
Setting up Fastly to use OSS as an origin
To add your OSS bucket as an origin, follow the instructions for working with hosts. You'll add specific details about your origin server.
- On the Origins page, click Create Host and enter the appropriate address for your Host using the format
<BUCKET>.<REGION>.aliyuncs.com. For example, if your bucket name istest123and your region is Beijing (e.g.,oss-cn-beijing) your hostname would betest123.oss-cn-beijing.aliyuncs.com. You can also find the hostname on the Bucket Overview page in the Bucket Domain Name area. - Click on the newly created Host to edit it.
- In the Name field, enter a descriptive name for your service (e.g.,
Alibaba Object Storage). - If the Address field doesn't contain the
<BUCKET>.<REGION>.aliyuncs.comhostname you provided in the first step, enter it now. - Fill out the Transport Layer Security (TLS) area fields as follows:
- Leave the Enable TLS? default set to Yes to secure the connection between Fastly and your origin.
- Leave the Verify certificate? default set to Yes.
- Set the Certificate hostname field to the same address that appears in the Address field (e.g.,
test123.oss-cn-beijing.aliyuncs.com). - In the SNI hostname field, select the checkbox to Match the SNI hostname to the Certificate hostname. The hostname address you entered during Host creation appears.
- From the Shielding menu below the TLS area, select a Fastly POP near the Alibaba region from the list of shielding locations.
- In the Override host field, enter an appropriate address for your Host (e.g.,
test123.oss-cn-beijing.aliyuncs.com). You entered this information during Host creation.
Review our caveats of shielding and select a shield POP accordingly.
Using OSS with private objects
To use Fastly with OSS private objects, be sure you've already made your OSS data available to Fastly by pointing to the right OSS bucket, then follow the steps below.
Setting up a private bucket and sub user
Setting up a private bucket is the same as setting up a public bucket, except you select the Private option in the Access Control List (ACL) area of the OSS bucket settings.
You'll need an AccessKey ID and Access Key Secret. These can be linked to your account by clicking on your avatar in the top right corner of the Alibaba Cloud Console, selecting Access Key, and then creating a new key. Since this key has full access to the account, we recommend following Alibaba's procedure for creating a sub user. Follow the steps below.
Navigate to the Resource Access Management (RAM) page.
Click Users.
Click Create User.
Enter an appropriate Logon Name and Display Name.
Select the Programmatic Access checkbox to enable access through the Alibaba API.
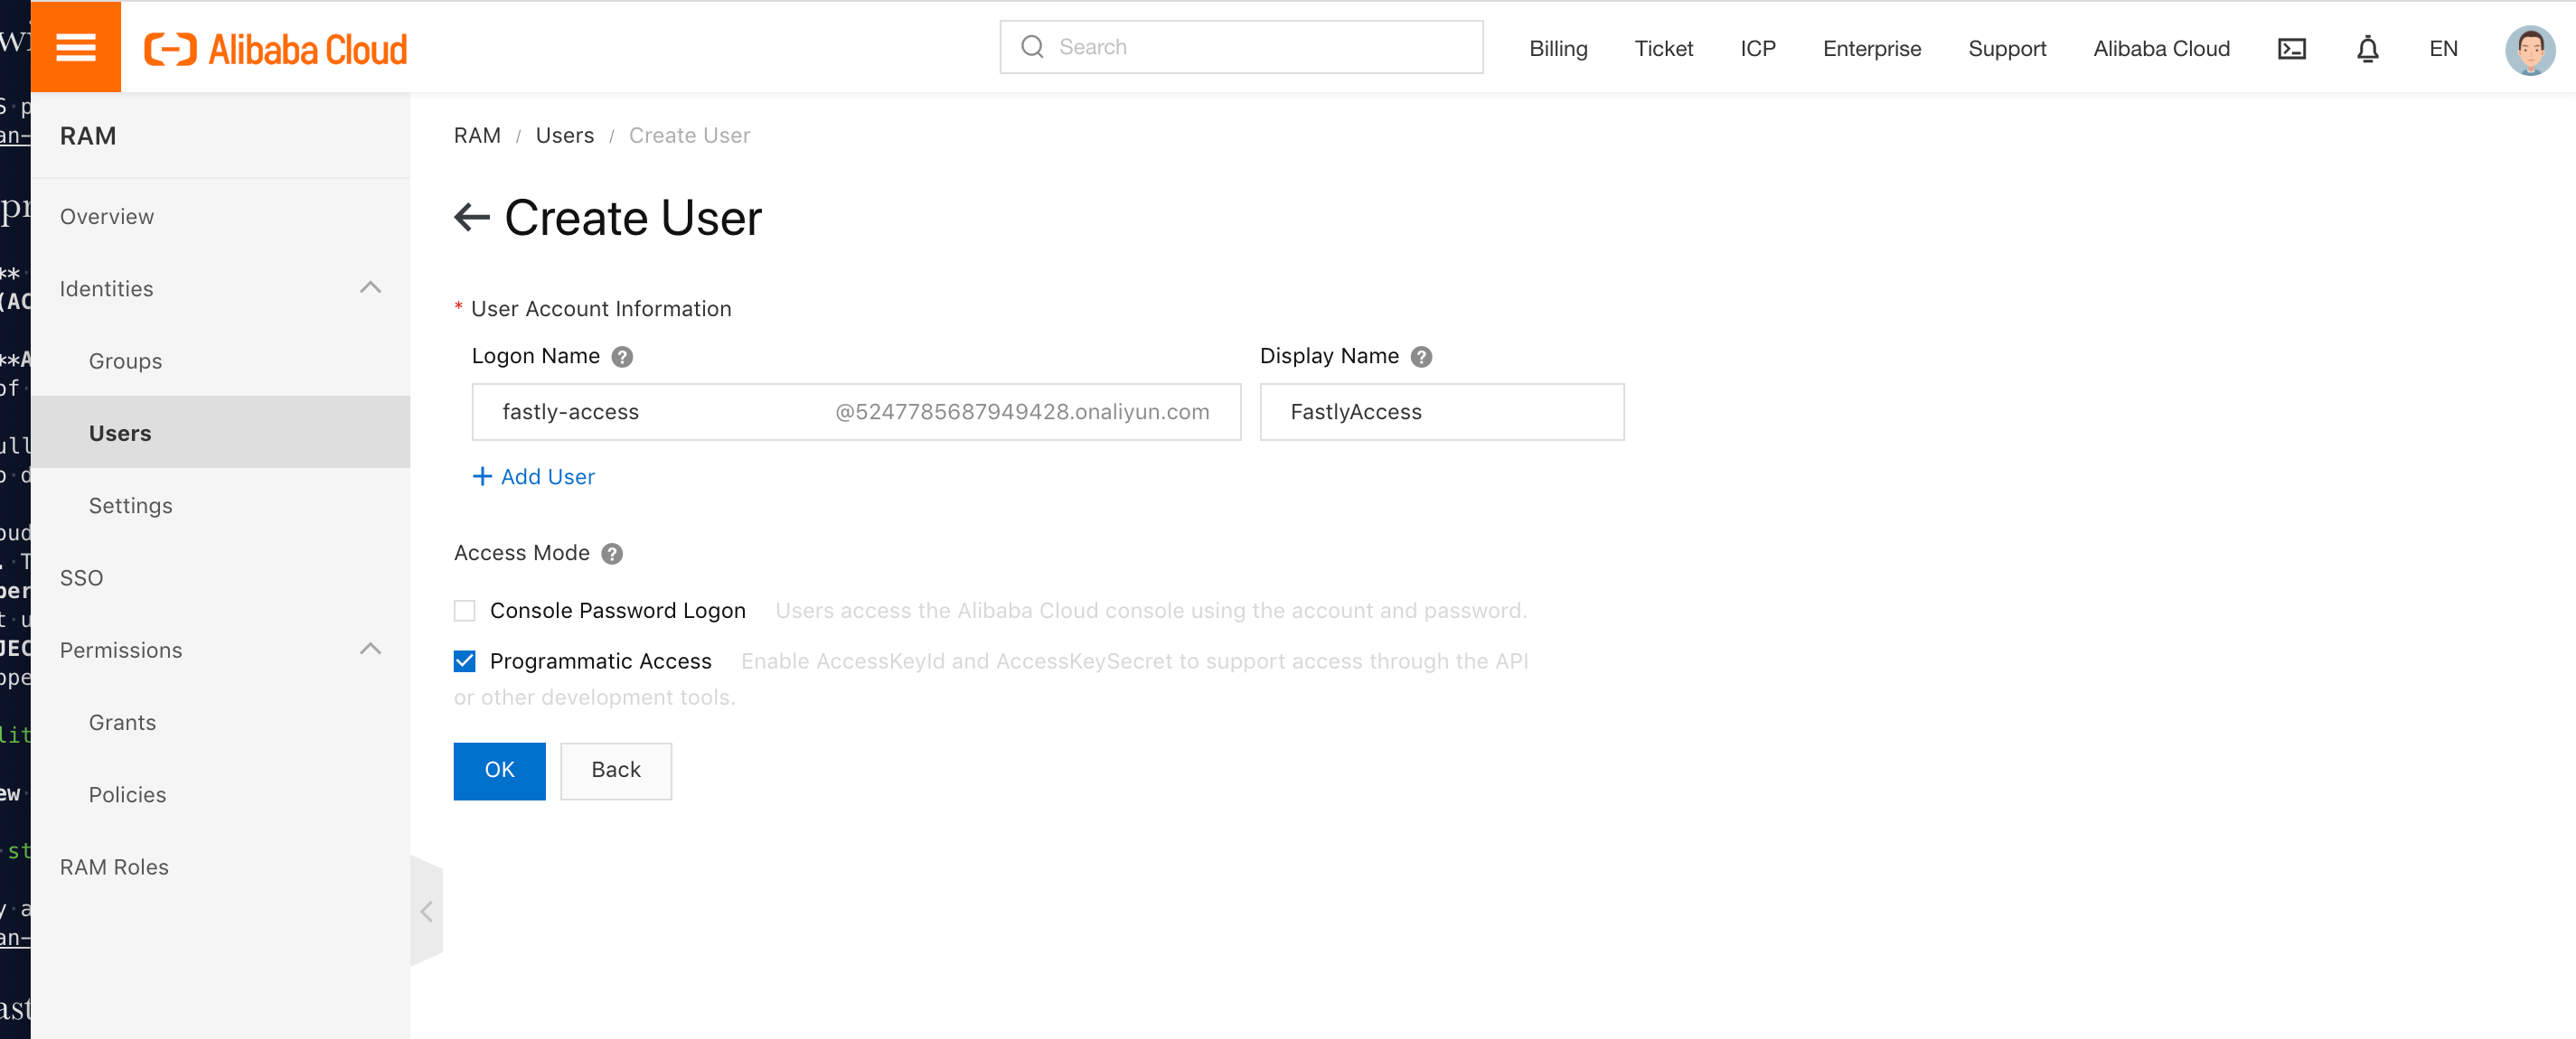
Click OK.
Copy the AccessKeyId and AccessKeySecret. You'll need these later when you're creating an Authorization header.
Go back to the bucket overview, click Files and then click Authorize. You should see a list of authorized users. If this is a new bucket it should be empty.
Click Authorize, filling out the fields as follows:
- From the Applied To menu, select the Whole Bucket option. You can select Specified Resources, but this may lead to unexpected errors later if you don't update the permissions with new files.
- From the Accounts menu, select RAM Users and then use the menu to select your newly created RAM user.
- From the Authorized Operation menu, select Read Only.
- You can leave Condition blank or customize it using IP =, Fastly's IP ranges, or setting Access Method to HTTPS.
Setting up Fastly to use OSS private content
To use OSS private content with Fastly, you'll need to create two headers: a Date header (required for authorization signature) and a Host header. You'll also need to add some authorization parameters.
Creating a Date header
- Log in to the Fastly control panel.
- From the Home page, select the appropriate service. You can use the search box to search by ID, name, or domain.
- Click Edit configuration and then select the option to clone the active version.
- Click Content.
Click Create header.
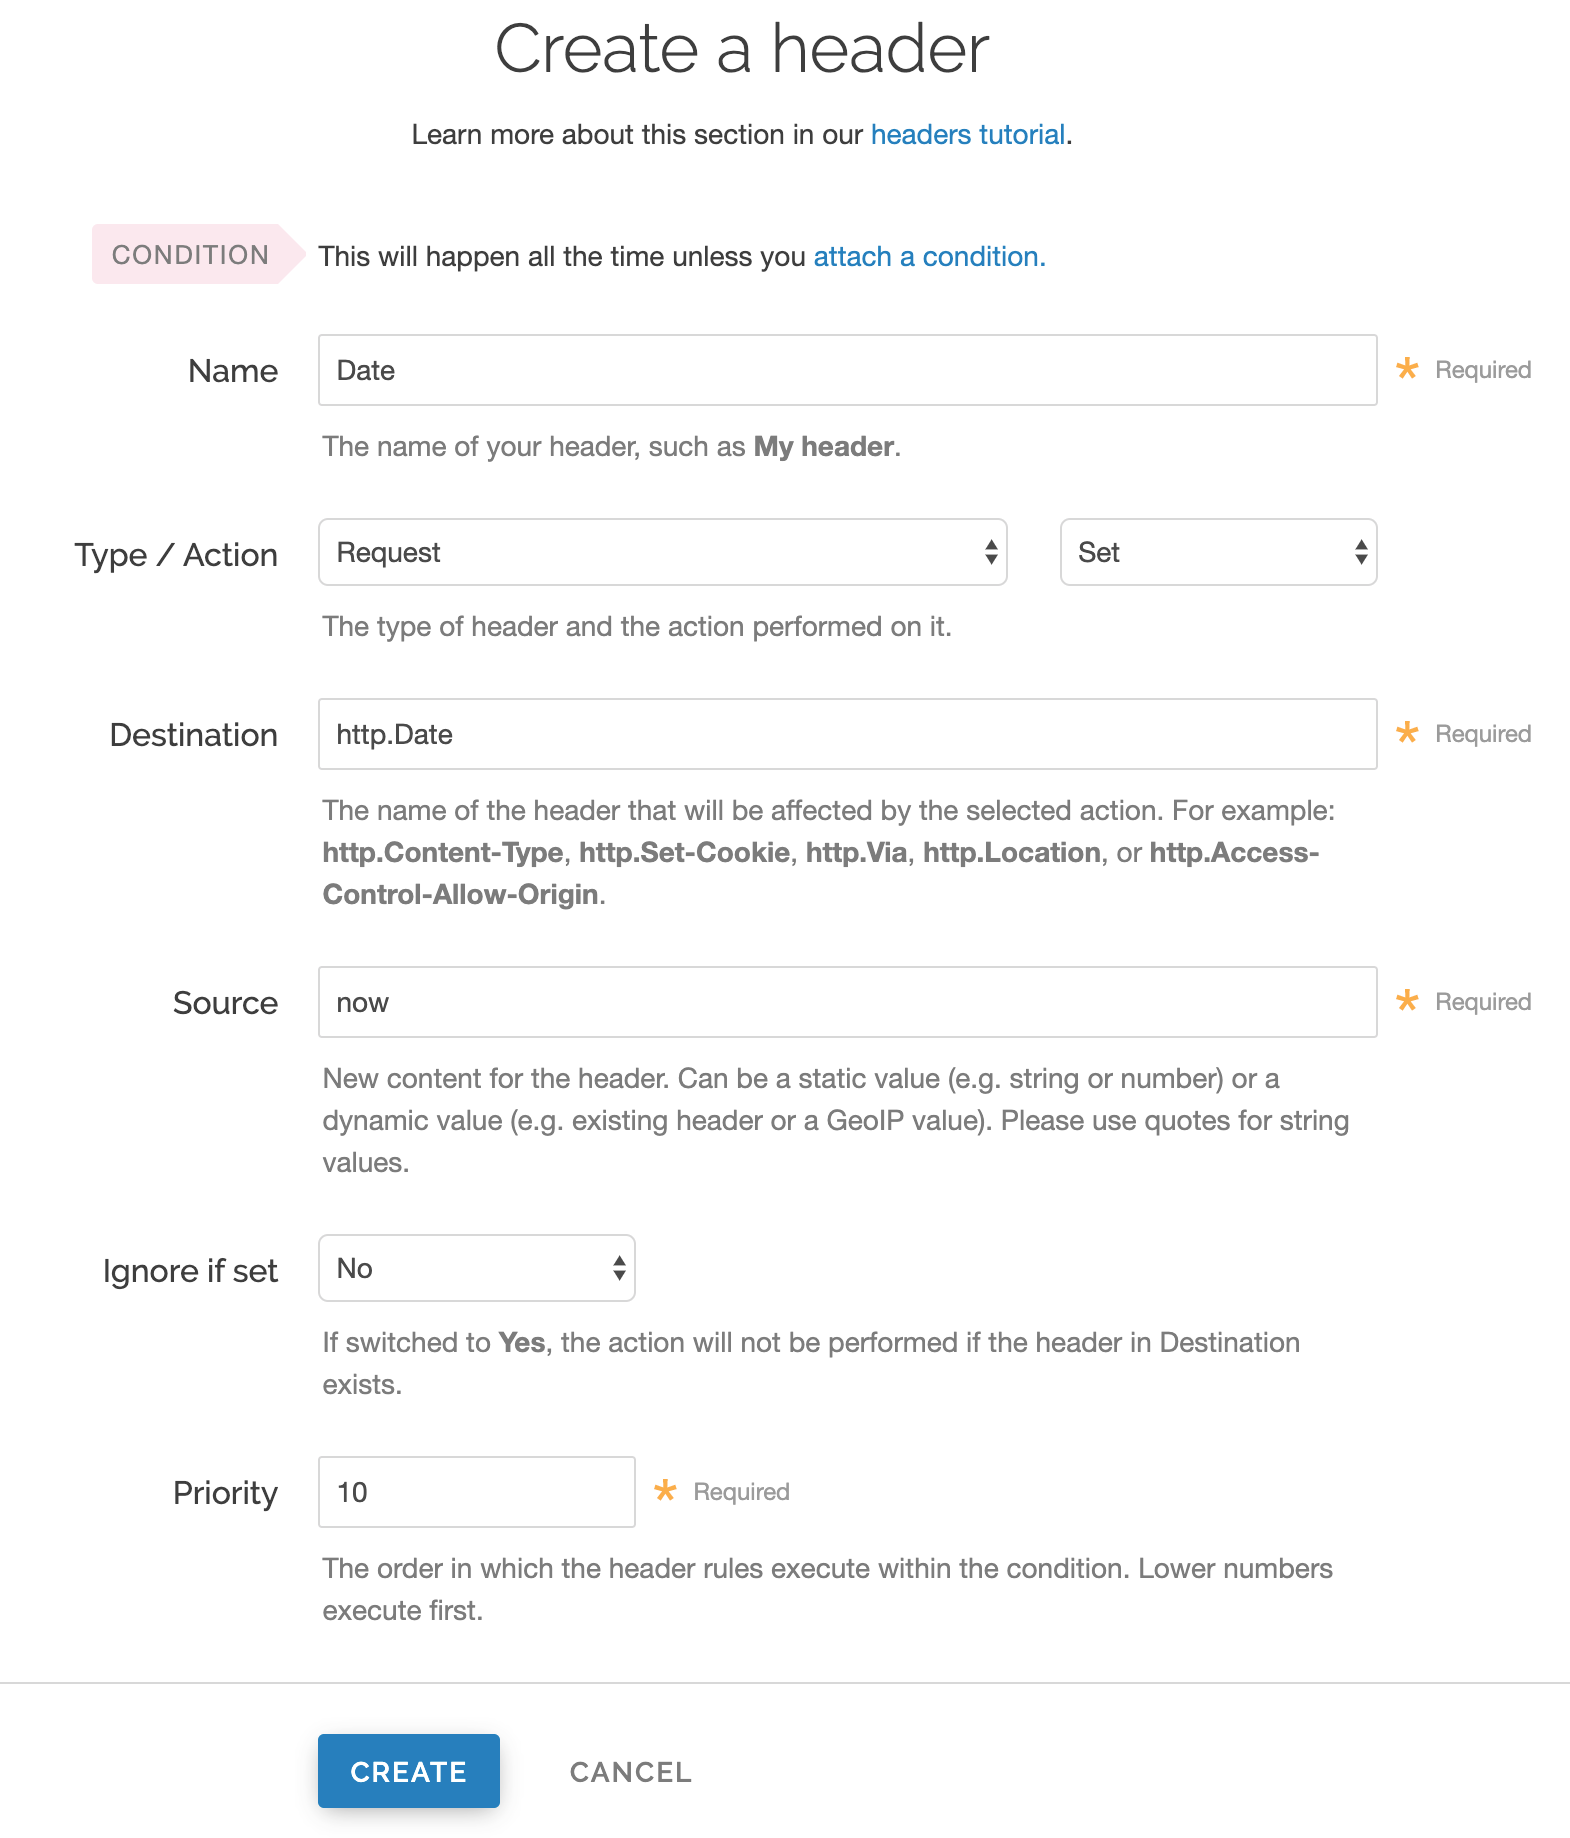
Fill out the Create a new header fields as follows:
- In the Name field, enter
Date. - From the Type menu, select Request, and from the Action menu, select Set.
- In the Destination field, enter
http.Date. - In the Source field, enter
var.ali_expires. - From the Ignore if set menu, select No.
- In the Priority field, enter
19.
- In the Name field, enter
Click Create. A new Date header appears on the Content page. You will use this later within the signature of the Authorization header.
Creating a Host header
- Click Create header.
- Fill out the Create a new header fields as follows:
- In the Name field, enter
Date. - From the Type menu, select Request, and from the Action menu, select Set.
- In the Destination field, enter
http.Host. - In the Source field, enter
"<your OSS domain>". - From the Ignore if set menu, select No.
- In the Priority field, enter
19.
- In the Name field, enter
- Click Create. A new Host header appears on the Content page.
Creating the Authorization header
Click Create header again to create another new header.
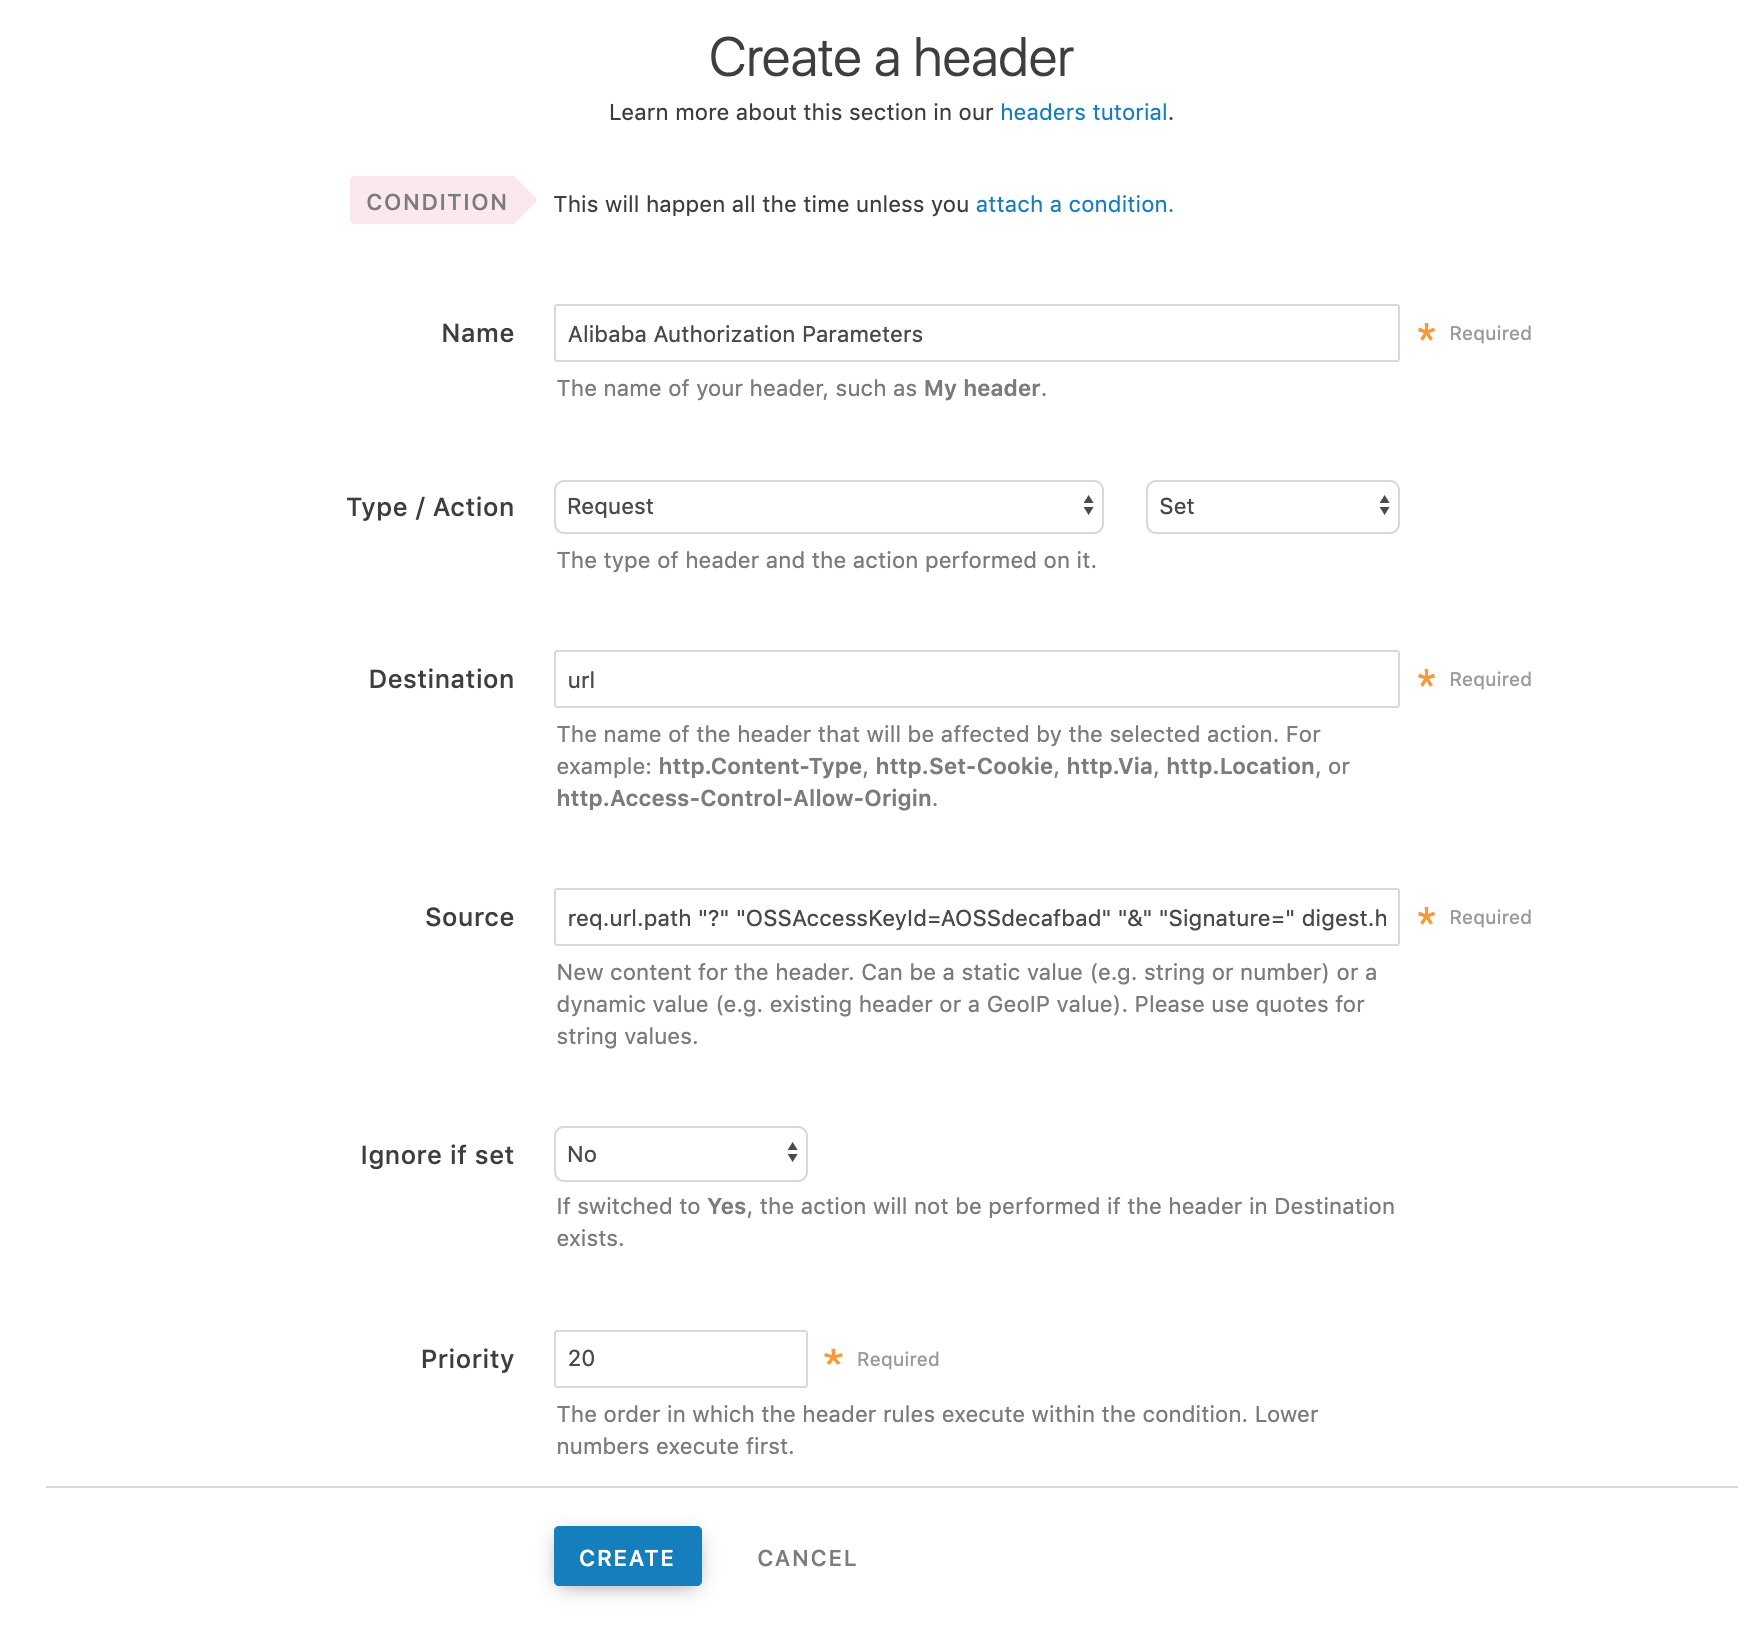
Fill out the Create a header fields as follows:
- In the Name field, enter
Authorization. - From the Type menu, select Request, and from the Action menu, select Set.
- In the Destination field, enter
url. - From the Ignore if set menu, select No.
- In the Priority field, enter
20.
- In the Name field, enter
In the Source field, enter the Authorization header information using the following format:
req.url.path "?" "OSSAccessKeyId=<AccessKeyId>" "&" "Signature=" digest.hmac_sha1_base64("<AccessKeySecret>", if(req.method == "HEAD", "GET", req.method) LF LF LF req.http.Date LF "/<OSS bucket name>" req.url.path) "&" "Expires=" var.ali_expiresReplace
<AccessKeyId>,<AccessKeySecret>, and<OSS bucket name>with the information you gathered before you began. For example:req.url.path "?" "OSSAccessKeyId=AOSSdecafbad" "&" "Signature=" urlencode(digest.hmac_sha1_base64("AOSSdeadbeef", if(req.method == "HEAD", "GET", req.method) LF LF LF req.http.Date LF "/test123" req.url.path)) "&" "Expires=" var.ali_expiresClick Create. A new Authorization header appears on the Content page.
- Click Activate to deploy your configuration changes.
Setting up Fastly to use OSS private content using VCL Snippets
You can also put the configuration in a VCL Snippet with a priority of 20.
1234567891011121314151617181920212223242526declare local var.ali_bucket STRING;declare local var.ali_region STRING;declare local var.ali_access_key_id STRING;declare local var.ali_access_key_secret STRING;declare local var.ali_expires INTEGER;declare local var.ali_canon STRING;declare local var.ali_sig STRING;_
set var.ali_bucket = "test123";set var.ali_region = "oss-cn-beijing";set var.ali_access_key_id = "decafbad";set var.ali_access_key_secret = "deadbeef";set var.ali_expires = std.atoi(now.sec);set var.ali_expires += 60;
set req.http.Host = var.ali_bucket "." + var.ali_region + ".aliyuncs.com";set req.http.Date = var.ali_expires;set var.ali_canon = if(req.method == "HEAD", "GET", req.method) LF LF LF req.http.Date LF "/" var.ali_bucket req.url.path;set var.ali_sig = digest.hmac_sha1_base64(var.alibaba_access_key_secret, var.ali_canon);
set req.url = req.url.path;set req.url = querystring.set(req.url, "OSSAccessKeyId", var.alibaba_access_key_id);set req.url = querystring.set(req.url, "Signature", var.ali_sig);set req.url = querystring.set(req.url, "Expires", var.ali_expires);NOTE
This article describes an integration with a service provided by a third party. Read our note on integrations for details.
Do not use this form to send sensitive information. If you need assistance, contact support. This form is protected by reCAPTCHA and the Google Privacy Policy and Terms of Service apply.
