
- English
- 日本語
Google Cloud Storage
Last updated 2022-03-01
Google Cloud Storage (GCS) can be used as an origin with your Fastly services once you set up and configure your GCS account and link it to a Fastly service. It can also be configured to use private content. This speeds up your content delivery and reduces your origin's workload and response times with the dedicated links between Google and Fastly's POPs.
Using GCS as an origin server
To make your GCS data available through Fastly, follow the steps below.
Setting up and configuring your GCS account
Sign up for Google Cloud Storage.
Create a bucket to store your origin's data.
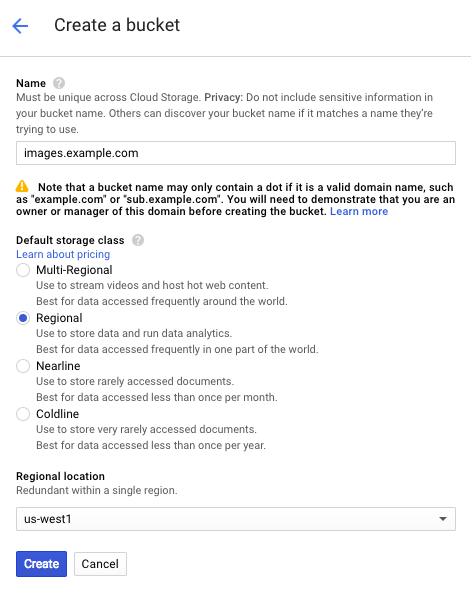
Fill out the Create a bucket fields as follows:
- In the Name field, enter a name for your bucket (e.g.,
mybucket). You can also create a domain-named bucket (e.g.,images.example.com), but you'll be required to verify your domain ownership using Google's Search Console, if you have not already done so. See the instructions on Google's website. Remember the name you type. You'll need it to connect your GCS bucket to your Fastly service. - In the Default storage class area, select Regional.
- From the Regional location menu, select a location to store your content. Most customers select a region close to the interconnect location they specify for shielding.
- In the Name field, enter a name for your bucket (e.g.,
Click Create.
You should now add objects to your bucket and make them externally accessible by selecting the Public link checkbox next to each of the objects.
Adding your GCS bucket as an origin server
To add your GCS bucket as an origin server, follow the instructions for working with hosts. You'll add specific details about your origin server.
- In the Hosts field on the Origins page, enter the appropriate address for your Host using the format
<BUCKET>.storage.googleapis.com. For example, if your bucket name istest123, your hostname would betest123.storage.googleapis.com. - For the initial Edit this host fields:
- In the Name field, enter any descriptive name for your service (e.g.,
Google Cloud Storage). - In the Address field, enter the appropriate address for your Host using the format
<BUCKET>.storage.googleapis.com. For example, if your bucket name ismybucket, your hostname would bemybucket.storage.googleapis.com.
- In the Name field, enter any descriptive name for your service (e.g.,
- When you edit the Transport Layer Security (TLS) area information for your host:
- Leave the Enable TLS? default set to Yes to secure the connection between Fastly and your origin.
- In the Certificate hostname field, enter
storage.googleapis.com. - Under the SNI hostname field, select the checkbox to Match the SNI hostname to the Certificate hostname. The hostname address you entered during Host creation appears.
- From the Shielding menu below the TLS area, select an interconnect location from the list of shielding locations.
- In the Override host field, enter an appropriate address for your Host (e.g.,
test123.storage.googleapis.com). You entered this information during Host creation.
Interconnect locations
Interconnect locations allow you to establish direct links with Google's network edge when you choose your shielding location. By selecting one of the locations listed in our documentation, your traffic will be carried across our interconnections with Google and you will be eligible to receive Google's CDN partner pricing discount. Most customers select the interconnect closest to their GCS bucket's region. Review our caveats of shielding and select an interconnect accordingly.
Setting the Cache-Control header for your GCS bucket
By default, GCS performs its own caching for publicly readable objects, which may complicate efforts to purge cache. To avoid potential problems, we recommend using the gsutil command line utility to set the Cache-Control header for one or more objects in your GCS bucket:
$ gsutil setmeta -h "Cache-Control: no-store, max-age=86400" gs://<bucket>/*.htmlReplace <bucket> in the example above with your GCS bucket's name. Note that no-store instructs GCS not to cache your content, while max-age=86400 instructs Fastly to cache your content for one day. See Google's documentation on the setmeta command for more information.
Changing the default TTL for your GCS bucket
If you want to change the default TTL for your GCS bucket, if at all, keep the following in mind:
- Your GCS account controls the default TTL for your GCS content. GCS currently sets the default TTL to 3600 seconds. Changing the default TTL will not override the default setting in your GCS account.
- To override the default TTL set by GCS from within the Fastly control panel, create a new cache setting and enter the TTL there.
- To override the default TTL in GCS, download the gsutil tool and then change the Cache-Control headers to delete the default TTL or change it to an appropriate setting.
X-Http-Method-Override header behavior
GCS provides a unique functionality that allows clients to add a X-Http-Method-Override request header to override the request method being sent in the HTTP messages. For instance, a GET request with the X-Http-Method-Override: HEAD request header is treated as a HEAD request by GCS and returns a HEAD response (200 status code with an empty body).
This can cause unintended caching behavior, which is a security risk. For example, if an X-Http-Method-Override request header is received and an unexpected response is cached. In order to minimize this risk, we strongly recommend you unset the X-Http-Method-Override header in the vcl_recv subroutine as shown below:
unset req.http.X-Http-Method-Override;
Using GCS with private objects
To use Fastly with GCS private objects, be sure you've already made your GCS data available to Fastly by pointing to the right GCS bucket, then follow the steps below.
Setting up interoperable access
By default, GCS authenticates requests using OAuth2, which Fastly does not support. To access private objects on GCS, your project must have HMAC authentication enabled and interoperable storage access keys (an Access Key and Secret pair) created. Do this by following the steps below.
TIP
To limit access to your Google Cloud account, consider creating a service account and then creating HMAC keys for that service account. For more information, see Google's documentation on managing HMAC keys for service accounts.
Open the Google Cloud Platform console and select the appropriate project.
Click Settings.
Click Interoperability.
If you have not set up interoperability before, click Enable interoperability access.
Click Make
<PROJECT-ID>your default project for interoperable access. If that project already serves as the default project, that information appears instead.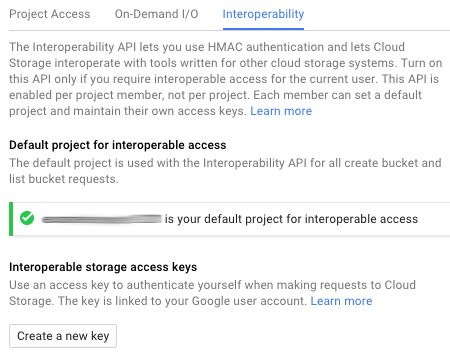
Click Create a new key. An access key and secret code appear.

Save the access key and secret code that appear. You'll need these later when you're creating an authorization header.
Setting up Fastly to use GCS private content
To use GCS private content with Fastly, create two headers, a Date header (required Authorization Signature) and an Authorization header.
Creating a Date header
- Log in to the Fastly control panel.
- From the Home page, select the appropriate service. You can use the search box to search by ID, name, or domain.
- Click Edit configuration and then select the option to clone the active version.
- Click Content.
Click Create header.
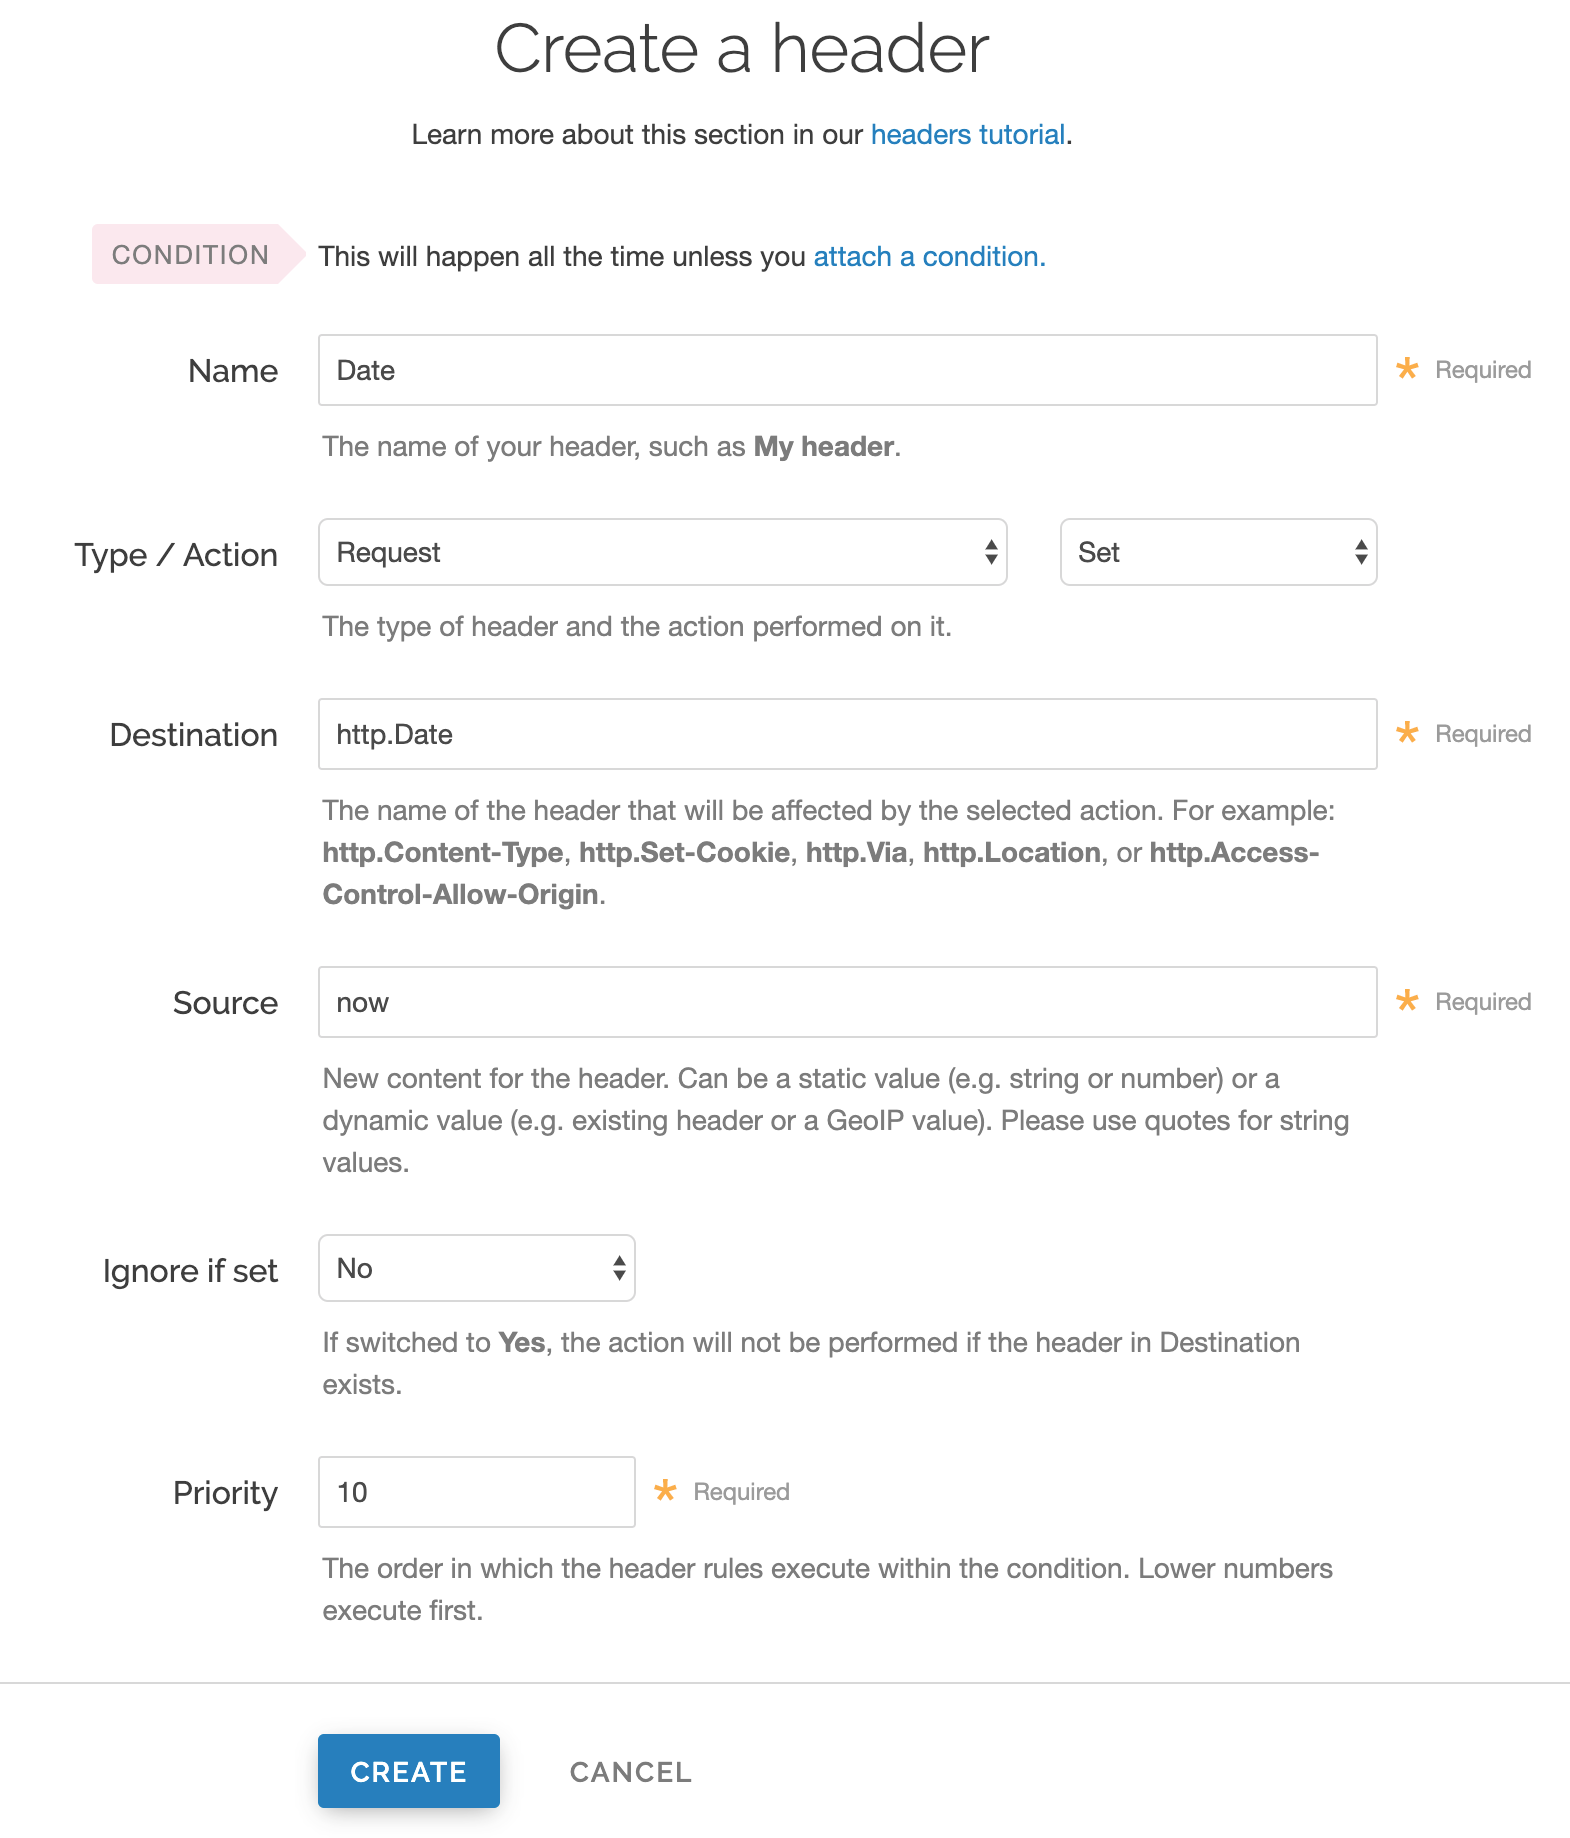
Fill out the Create a new header fields as follows:
- In the Name field, enter
Date. - From the Type menu, select Request, and from the Action menu, select Set.
- In the Destination field, enter
http.Date. - In the Source field, enter
now. - From the Ignore if set menu, select No.
- In the Priority field, enter
10.
- In the Name field, enter
Click Create. A new Date header appears on the Content page. You will use this later within the Signature of the Authorization header.
Creating an Authorization header
Click Create header again to create another new header.
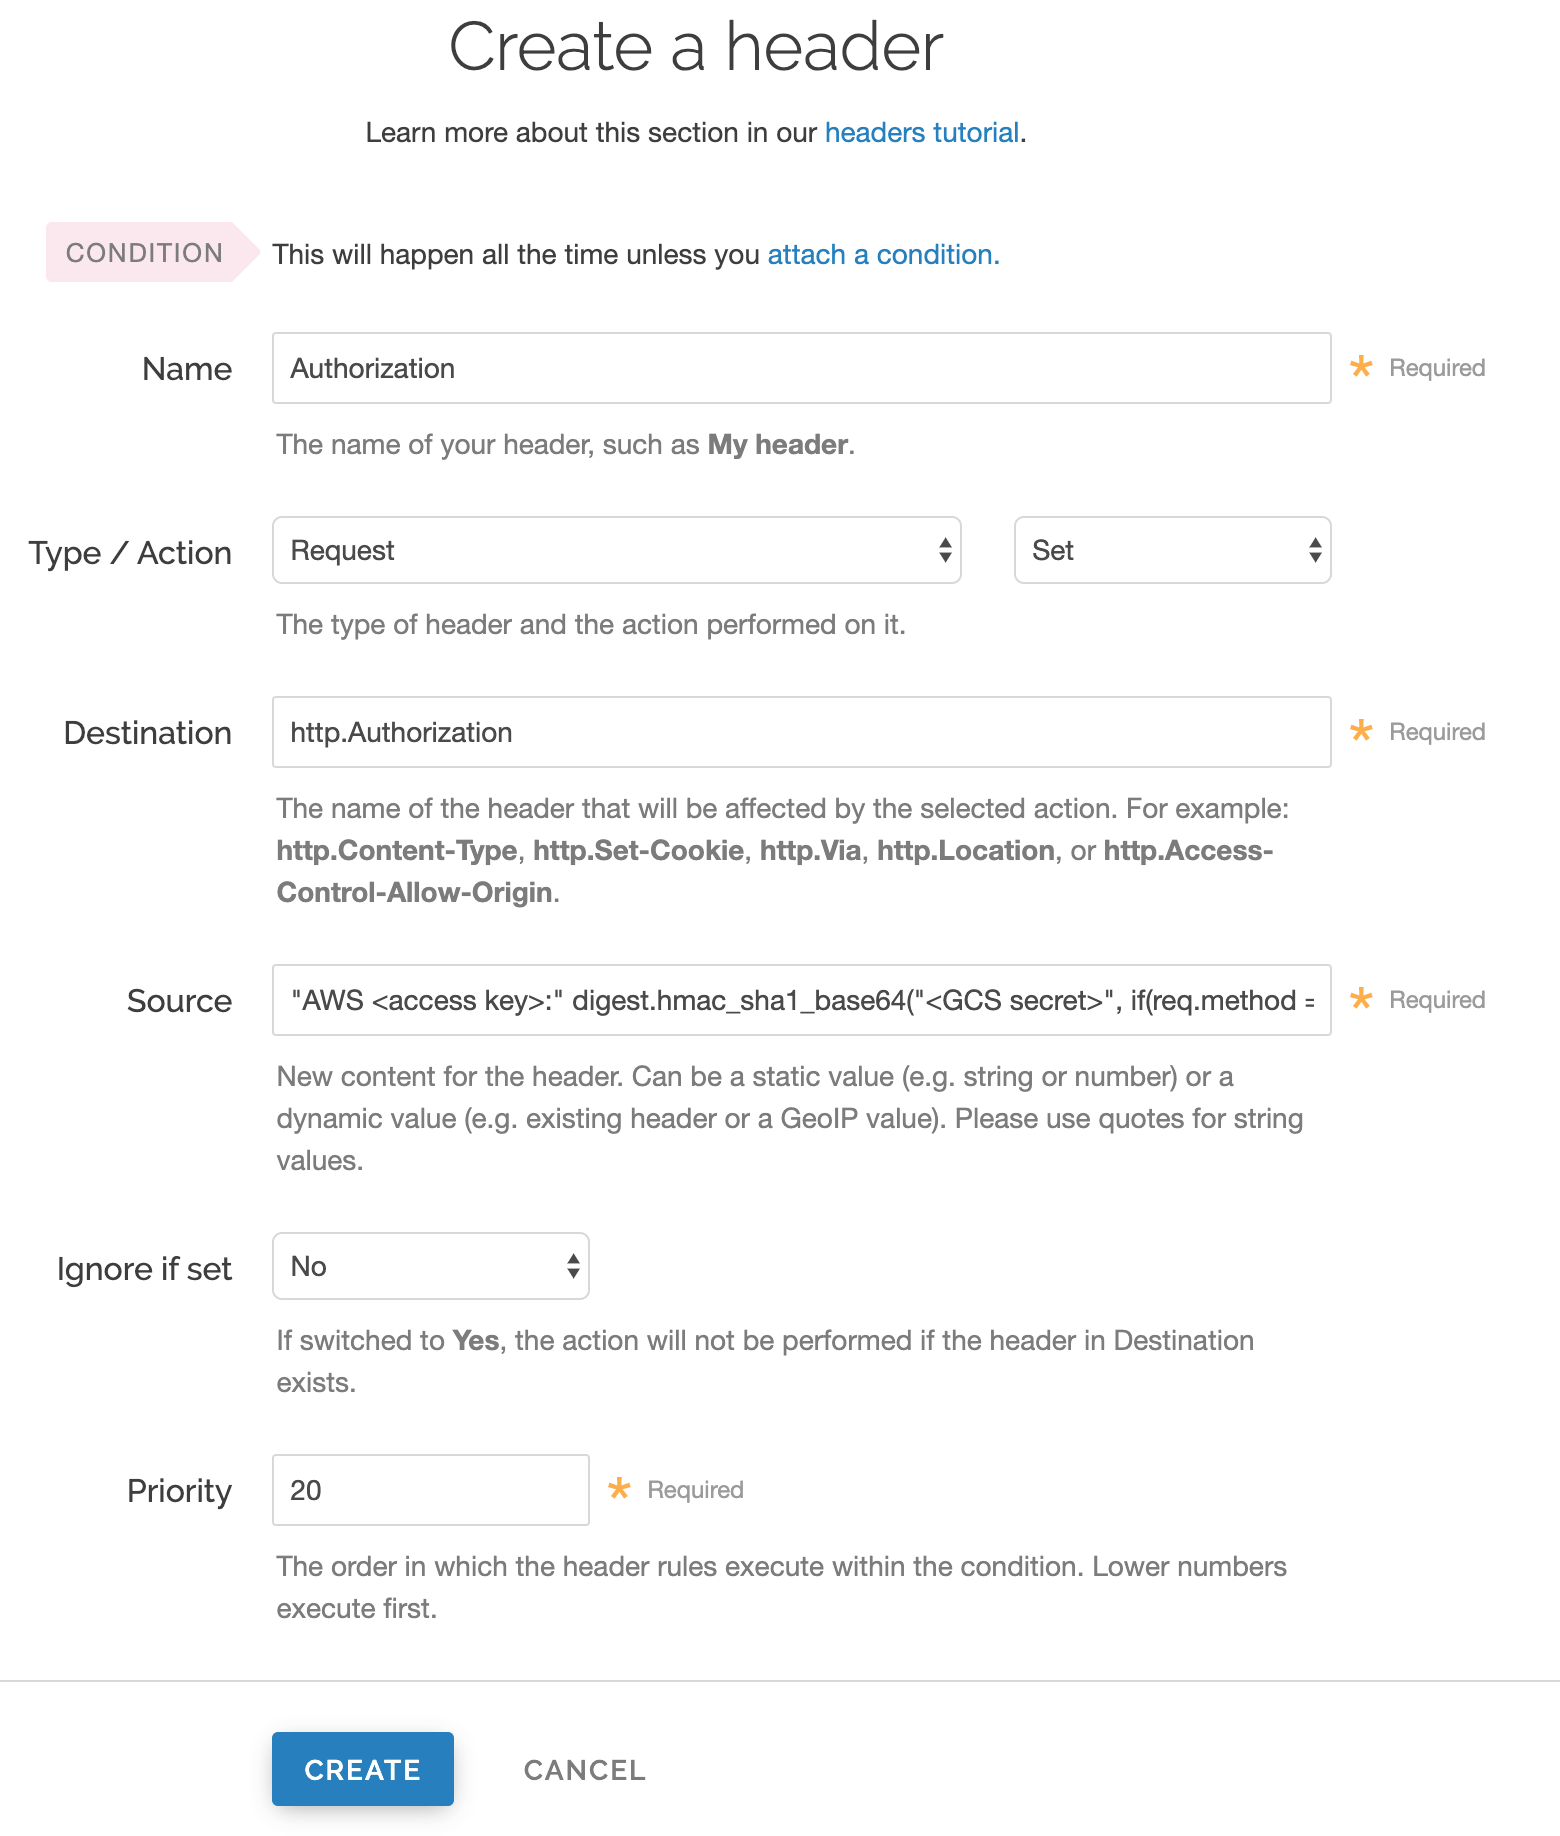
Fill out the Create a header fields as follows:
- In the Name field, enter
Authorization. - From the Type menu, select Request, and from the Action menu, select Set.
- In the Destination field, enter
http.Authorization. - From the Ignore if set menu, select No.
- In the Priority field, enter
20.
- In the Name field, enter
In the Source field, enter the header authorization information using the following format:
"AWS <access key>:" digest.hmac_sha1_base64("<GCS secret>", if(req.method == "HEAD", "GET", req.method) LF LF LF req.http.Date LF "/<GCS bucket name>" req.url.path)replacing
<access key>,<GCS secret>, and<GCS bucket name>with the information you gathered before you began. For example:"AWS GOOGQORE5WOJJHLXH6OD:" digest.hmac_sha1_base64("oQb0hdmaxFOc5UmC6F833Cde0+ghRSgsr7CCnX62", if(req.method == "HEAD", "GET", req.method) LF LF LF req.http.Date LF "/test123" req.url.path)Click Create. A new Authorization header appears on the Content page.
- Click Activate to deploy your configuration changes.
A detailed look at the Source field
So what's going on in the Source field of the Authorization header? Here's the basic format:
AWS<access key><signature function><key><message>
It tells us the following:
| Element | Description |
|---|---|
AWS | A constant placed before the access key. It's always AWS. |
access key | The access key ID from your GCS developer's account. We used GOOGQORE5WOJJHLXH6OD in this example. |
signature function | The algorithm used to validate the key and message of the signature. We used digest.hmac_sha1_base64(<key>, <message>) in this example. |
key | The secret key ID from your GCS developer's account. We used oQb0hdmaxFOc5UmC6F833Cde0+ghRSgsr7CCnX62 in this example. |
message | The UTF-8 encoding of the StringToSign. See the table below for a break down of each portion of the message. |
The message that's part of the Source field in the Authorization header takes on this basic format:
<HTTP-verb><\n><Content-MD5>\n<Content-Type><\n><Date><\n><CanonicalExtensionHeaders><\n><CanonicalizedResource>
It tells us the following:
| Element | Description |
|---|---|
HTTP-verb | The REST verb. We use req.method in this example. |
\n | A newline indicator constant. It's always \n. |
Content-MD5 | The content-md5 header value, used as a message integrity check. It's often left blank. We use LF (line feed) in this example. |
Content-Type | The content-type header value, used to specify the MIME-type. It's often left blank. We use LFin this example. |
Date | The date and time stamp. We use req.http.Date (which we created first as a separate header in the steps above). |
CanonicalExtensionHeaders | The x-amz- or x-goog- headers, which customize your GCS implementation. It's often left blank. We use LF in this example. |
CanonicalizedResource | Your GCS resource path name. We're concatenating GCS bucket name "/test123" with object path req.url.path in this example. |
NOTE
This article describes an integration with a service provided by a third party. Read our note on integrations for details.
Do not use this form to send sensitive information. If you need assistance, contact support. This form is protected by reCAPTCHA and the Google Privacy Policy and Terms of Service apply.
