
- English
- 日本語
Amazon S3
Last updated 2024-10-08
Amazon S3 public and private buckets can be used as origins with Fastly.
Using Amazon S3 as an origin
To make your S3 data buckets available through Fastly, follow the steps below.
Creating a new service
Follow the instructions for creating a new service.
When you create the new domain and the new Host:
- In the Domain Name field on the Create a domain page, enter the hostname you want to use as the URL (e.g.,
cdn.example.com). - In the Hosts field on the Origins page, enter the appropriate address for your Host using the format
<BUCKET>.s3.<REGION>.amazonaws.com. Use the table in the Amazon S3 endpoints of the AWS general reference documentation as a guide. For example, if your bucket name isfastlytestbucketand your region isus-east-2, your hostname would befastlytestbucket.s3.us-east-2.amazonaws.com.
TIP
Most customers select a region close to the interconnect location they specify for shielding.
- In the Domain Name field on the Create a domain page, enter the hostname you want to use as the URL (e.g.,
When you edit the Host details on the Edit this host page:
- In the Name field, enter any descriptive name for your service if you haven't already done so.
- In the Address field, ensure you've entered the appropriate address for your region (e.g.,
fastlytestbucket.s3.us-east-2.amazonaws.com). You entered this information during Host creation.
When you edit the Transport Layer Security (TLS) area information for your Host:
Leave the Enable TLS? default set to Yes to secure the connection between Fastly and your origin.
TIP
If you're using Amazon S3 to host a static website, Enable TLS? should be set to No instead of relying on the default. Amazon doesn't support TLS connections to S3 buckets with the static website hosting feature enabled. You can still use one of Fastly's TLS service options to secure connections between Fastly and clients.
Under the SNI hostname field, select the checkbox to Match the SNI hostname to the Certificate hostname. The address you entered during Host creation appears.
In the Certificate hostname field, enter
fastlytestbucket.s3.us-east-2.amazonaws.com.
In the Override host field, enter an appropriate address for your Host (e.g.,
fastlytestbucket.s3.us-east-2.amazonaws.com). You entered this information during Host creation. If you're using an Amazon S3 private bucket leave this field blank.
Validating the DNS mapping
By default, we create a DNS mapping called yourdomain.global.prod.fastly.net. In the example above, it would be cdn.example.com.global.prod.fastly.net. Enter this URL in a browser to confirm it's working.
Creating a DNS alias
Create a DNS alias for the domain name you specified (e.g., CNAME cdn.example.com to global-nossl.fastly.net).
Verifying your results
Fastly will cache any content without an explicit Cache-Control header for 1 hour. You can verify whether you are sending any cache headers using curl. For example:
$ curl -I opscode-full-stack.s3.amazonaws.com
HTTP/1.1 200 OKx-amz-id-2: ZpzRp7IWc6MJ8NtDEFGH12QBdk2CM1+RzVOngQbhMp2f2ZyalkFsZd4qPaLMkSlhx-amz-request-id: ABV5032583242618Date: Fri, 18 Mar 2012 17:15:38 GMTContent-Type: application/xmlTransfer-Encoding: chunkedServer: AmazonS3
In this example, no Cache-Control headers are set so the default Time to Live (TTL) will be applied.
Enhanced cache control
If you need more control over how different types of assets are cached (e.g., JavaScript files, images), check out our documentation on cache freshness.
Using an Amazon S3 private bucket
To use an Amazon S3 private bucket with Fastly, you must implement version 4 of Amazon’s header-based authentication. You can do this using custom VCL. Start by obtaining the following information from AWS:
| Item | Description |
|---|---|
| Bucket name | The name of your AWS S3 bucket. When you download items from your bucket, this is the string listed in the URL path or hostname of each object. |
| Region | The AWS region code of the location where your bucket resides (e.g., us-east-1). |
| Access key | The AWS access key string for an IAM account that has at least read permission on the bucket. |
| Secret key | The AWS secret access key paired with the access key above. |
Once you have this information, you can configure your Fastly service to authenticate against your S3 bucket using header authentication by calculating the appropriate header value in VCL.
IMPORTANT
Consider leaving the Override host field for the origin blank in your service settings. This setting will override the Host header from the snippets shown here and may invalidate the signature that authenticates the information being sent.
Start by creating a regular VCL snippet. Give it a meaningful name, such as AWS protected origin. When you create the snippet, select within subroutine to specify its placement and choose miss as the subroutine type. Then, populate the VCL field with the following code (be sure to change specific values as noted to ones relevant to your own AWS bucket):
1234567891011121314151617181920212223242526272829303132333435363738394041424344454647484950515253545556575859606162636465666768697071declare local var.awsAccessKey STRING;declare local var.awsSecretKey STRING;declare local var.awsS3Bucket STRING;declare local var.awsRegion STRING;declare local var.awsS3Host STRING;declare local var.canonicalHeaders STRING;declare local var.signedHeaders STRING;declare local var.canonicalRequest STRING;declare local var.canonicalQuery STRING;declare local var.stringToSign STRING;declare local var.dateStamp STRING;declare local var.signature STRING;declare local var.scope STRING;
set var.awsAccessKey = "YOUR_AWS_ACCESS_KEY"; # Change this value to your own dataset var.awsSecretKey = "YOUR_AWS_SECRET_KEY"; # Change this value to your own dataset var.awsS3Bucket = "YOUR_AWS_BUCKET_NAME"; # Change this value to your own dataset var.awsRegion = "YOUR_AWS_BUCKET_REGION"; # Change this value to your own dataset var.awsS3Host = var.awsS3Bucket ".s3." var.awsRegion ".amazonaws.com";
if (req.method == "GET" && !req.backend.is_shield) {
set bereq.http.x-amz-content-sha256 = digest.hash_sha256(""); set bereq.http.x-amz-date = strftime({"%Y%m%dT%H%M%SZ"}, now); set bereq.http.host = var.awsS3Host; set bereq.url = querystring.remove(bereq.url); set bereq.url = regsuball(urlencode(urldecode(bereq.url.path)), {"%2F"}, "/"); set var.dateStamp = strftime({"%Y%m%d"}, now); set var.canonicalHeaders = "" "host:" bereq.http.host LF "x-amz-content-sha256:" bereq.http.x-amz-content-sha256 LF "x-amz-date:" bereq.http.x-amz-date LF ; set var.canonicalQuery = ""; set var.signedHeaders = "host;x-amz-content-sha256;x-amz-date"; set var.canonicalRequest = "" "GET" LF bereq.url.path LF var.canonicalQuery LF var.canonicalHeaders LF var.signedHeaders LF digest.hash_sha256("") ;
set var.scope = var.dateStamp "/" var.awsRegion "/s3/aws4_request";
set var.stringToSign = "" "AWS4-HMAC-SHA256" LF bereq.http.x-amz-date LF var.scope LF regsub(digest.hash_sha256(var.canonicalRequest),"^0x", "") ;
set var.signature = digest.awsv4_hmac( var.awsSecretKey, var.dateStamp, var.awsRegion, "s3", var.stringToSign );
set bereq.http.Authorization = "AWS4-HMAC-SHA256 " "Credential=" var.awsAccessKey "/" var.scope ", " "SignedHeaders=" var.signedHeaders ", " "Signature=" + regsub(var.signature,"^0x", "") ; unset bereq.http.Accept; unset bereq.http.Accept-Language; unset bereq.http.User-Agent; unset bereq.http.Fastly-Client-IP;}You may also remove the headers that AWS adds to the response. Do this by creating another VCL snippet. Give it a meaningful name, such as Strip AWS response headers. When you create the snippet, select within subroutine to specify its placement and choose fetch as the subroutine type. Then, place the following code in the VCL field:
1234unset beresp.http.x-amz-id-2;unset beresp.http.x-amz-request-id;unset beresp.http.x-amz-delete-marker;unset beresp.http.x-amz-version-id;Following redirects to S3 objects and caching S3 responses
Using VCL Snippets, Fastly can follow redirects to S3 objects and cache the response.
To configure Fastly to follow redirects to S3 objects, follow the steps below:
- Log in to the Fastly control panel.
- From the Home page, select the appropriate service. You can use the search box to search by ID, name, or domain.
- Click Edit configuration and then select the option to clone the active version.
Click VCL Snippets.
Click Create snippet.
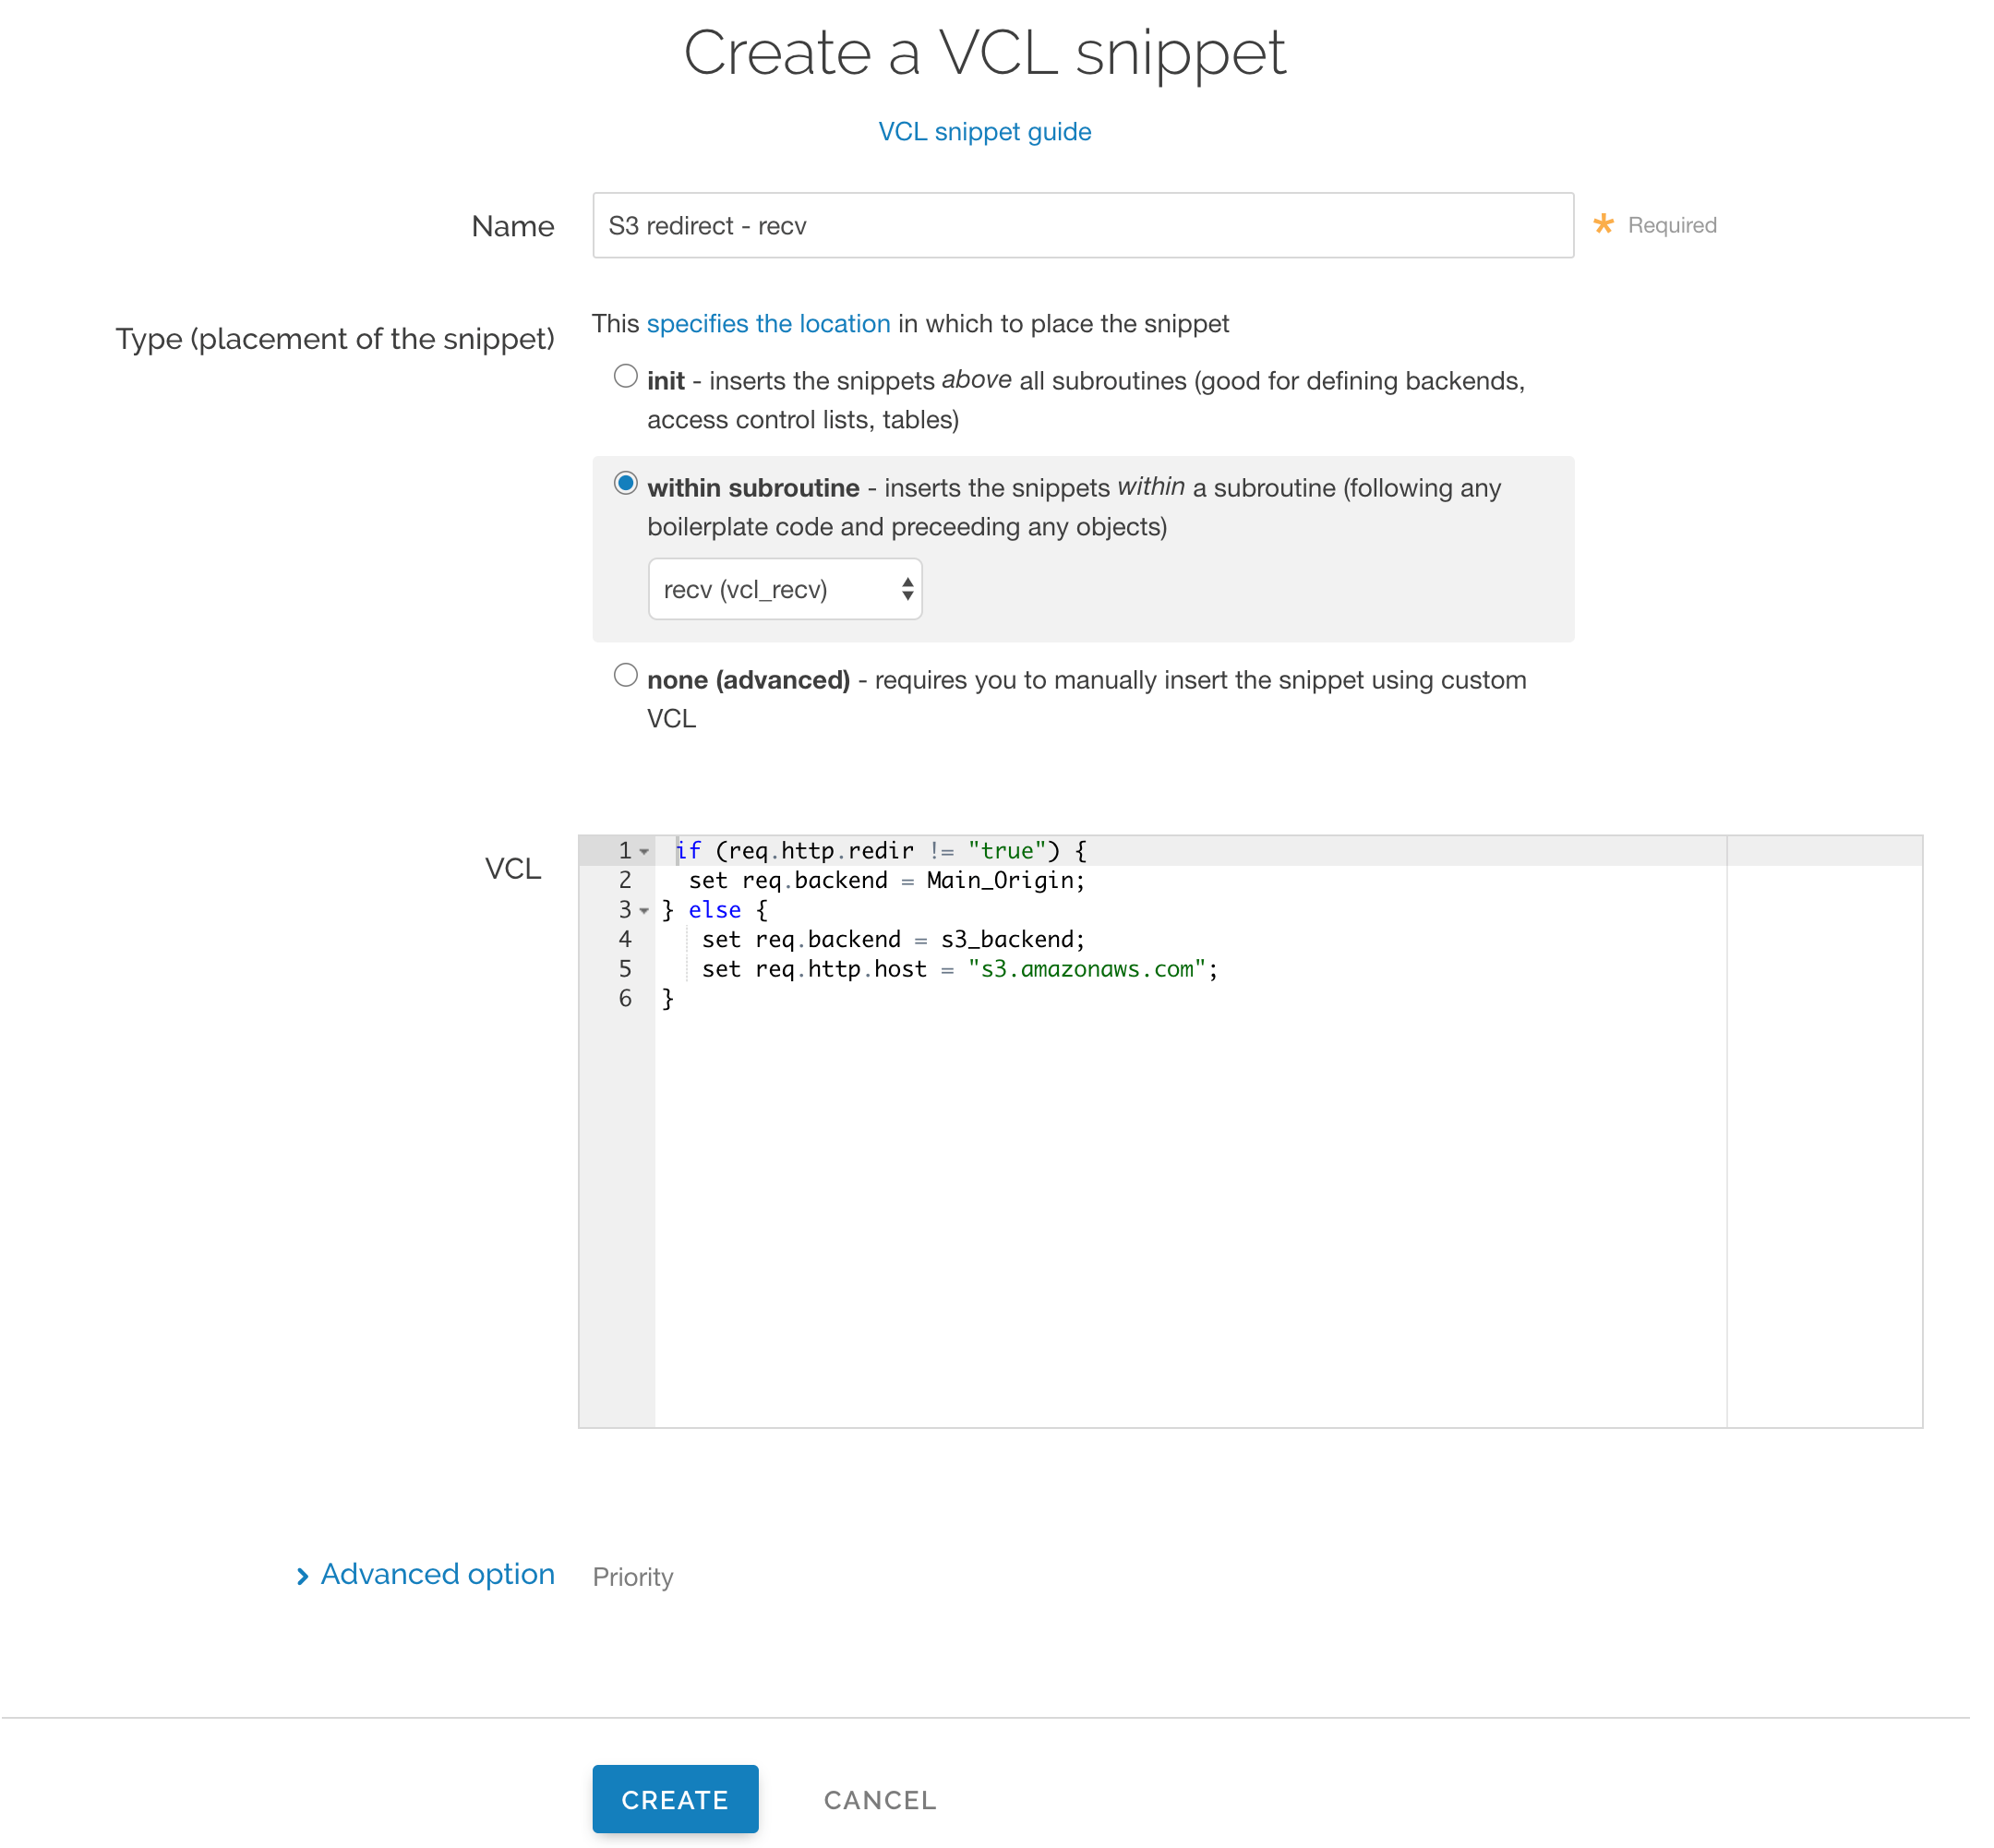
In the Name field, enter an appropriate name (e.g.,
S3 redirect - recv).From the Type (placement of the snippet) controls, select within subroutine.
From the Select subroutine menu, select recv (
vcl_recv).In the VCL field, add the following condition:
123456if (req.http.redir != "true") {set req.backend = Main_Origin;} else {set req.backend = s3_backend;set req.http.host = "s3.amazonaws.com";}IMPORTANT
In the condition above, be sure to replace the
Main_Originands3_backendplaceholders with the actual names of your backends in the service to which you're applying these redirects. You can find the exact names by navigating to the Deliver page and clicking Show VCL, which appears just beneath your service name while viewing that service.Click Create to create the snippet.
Click Create snippet again.
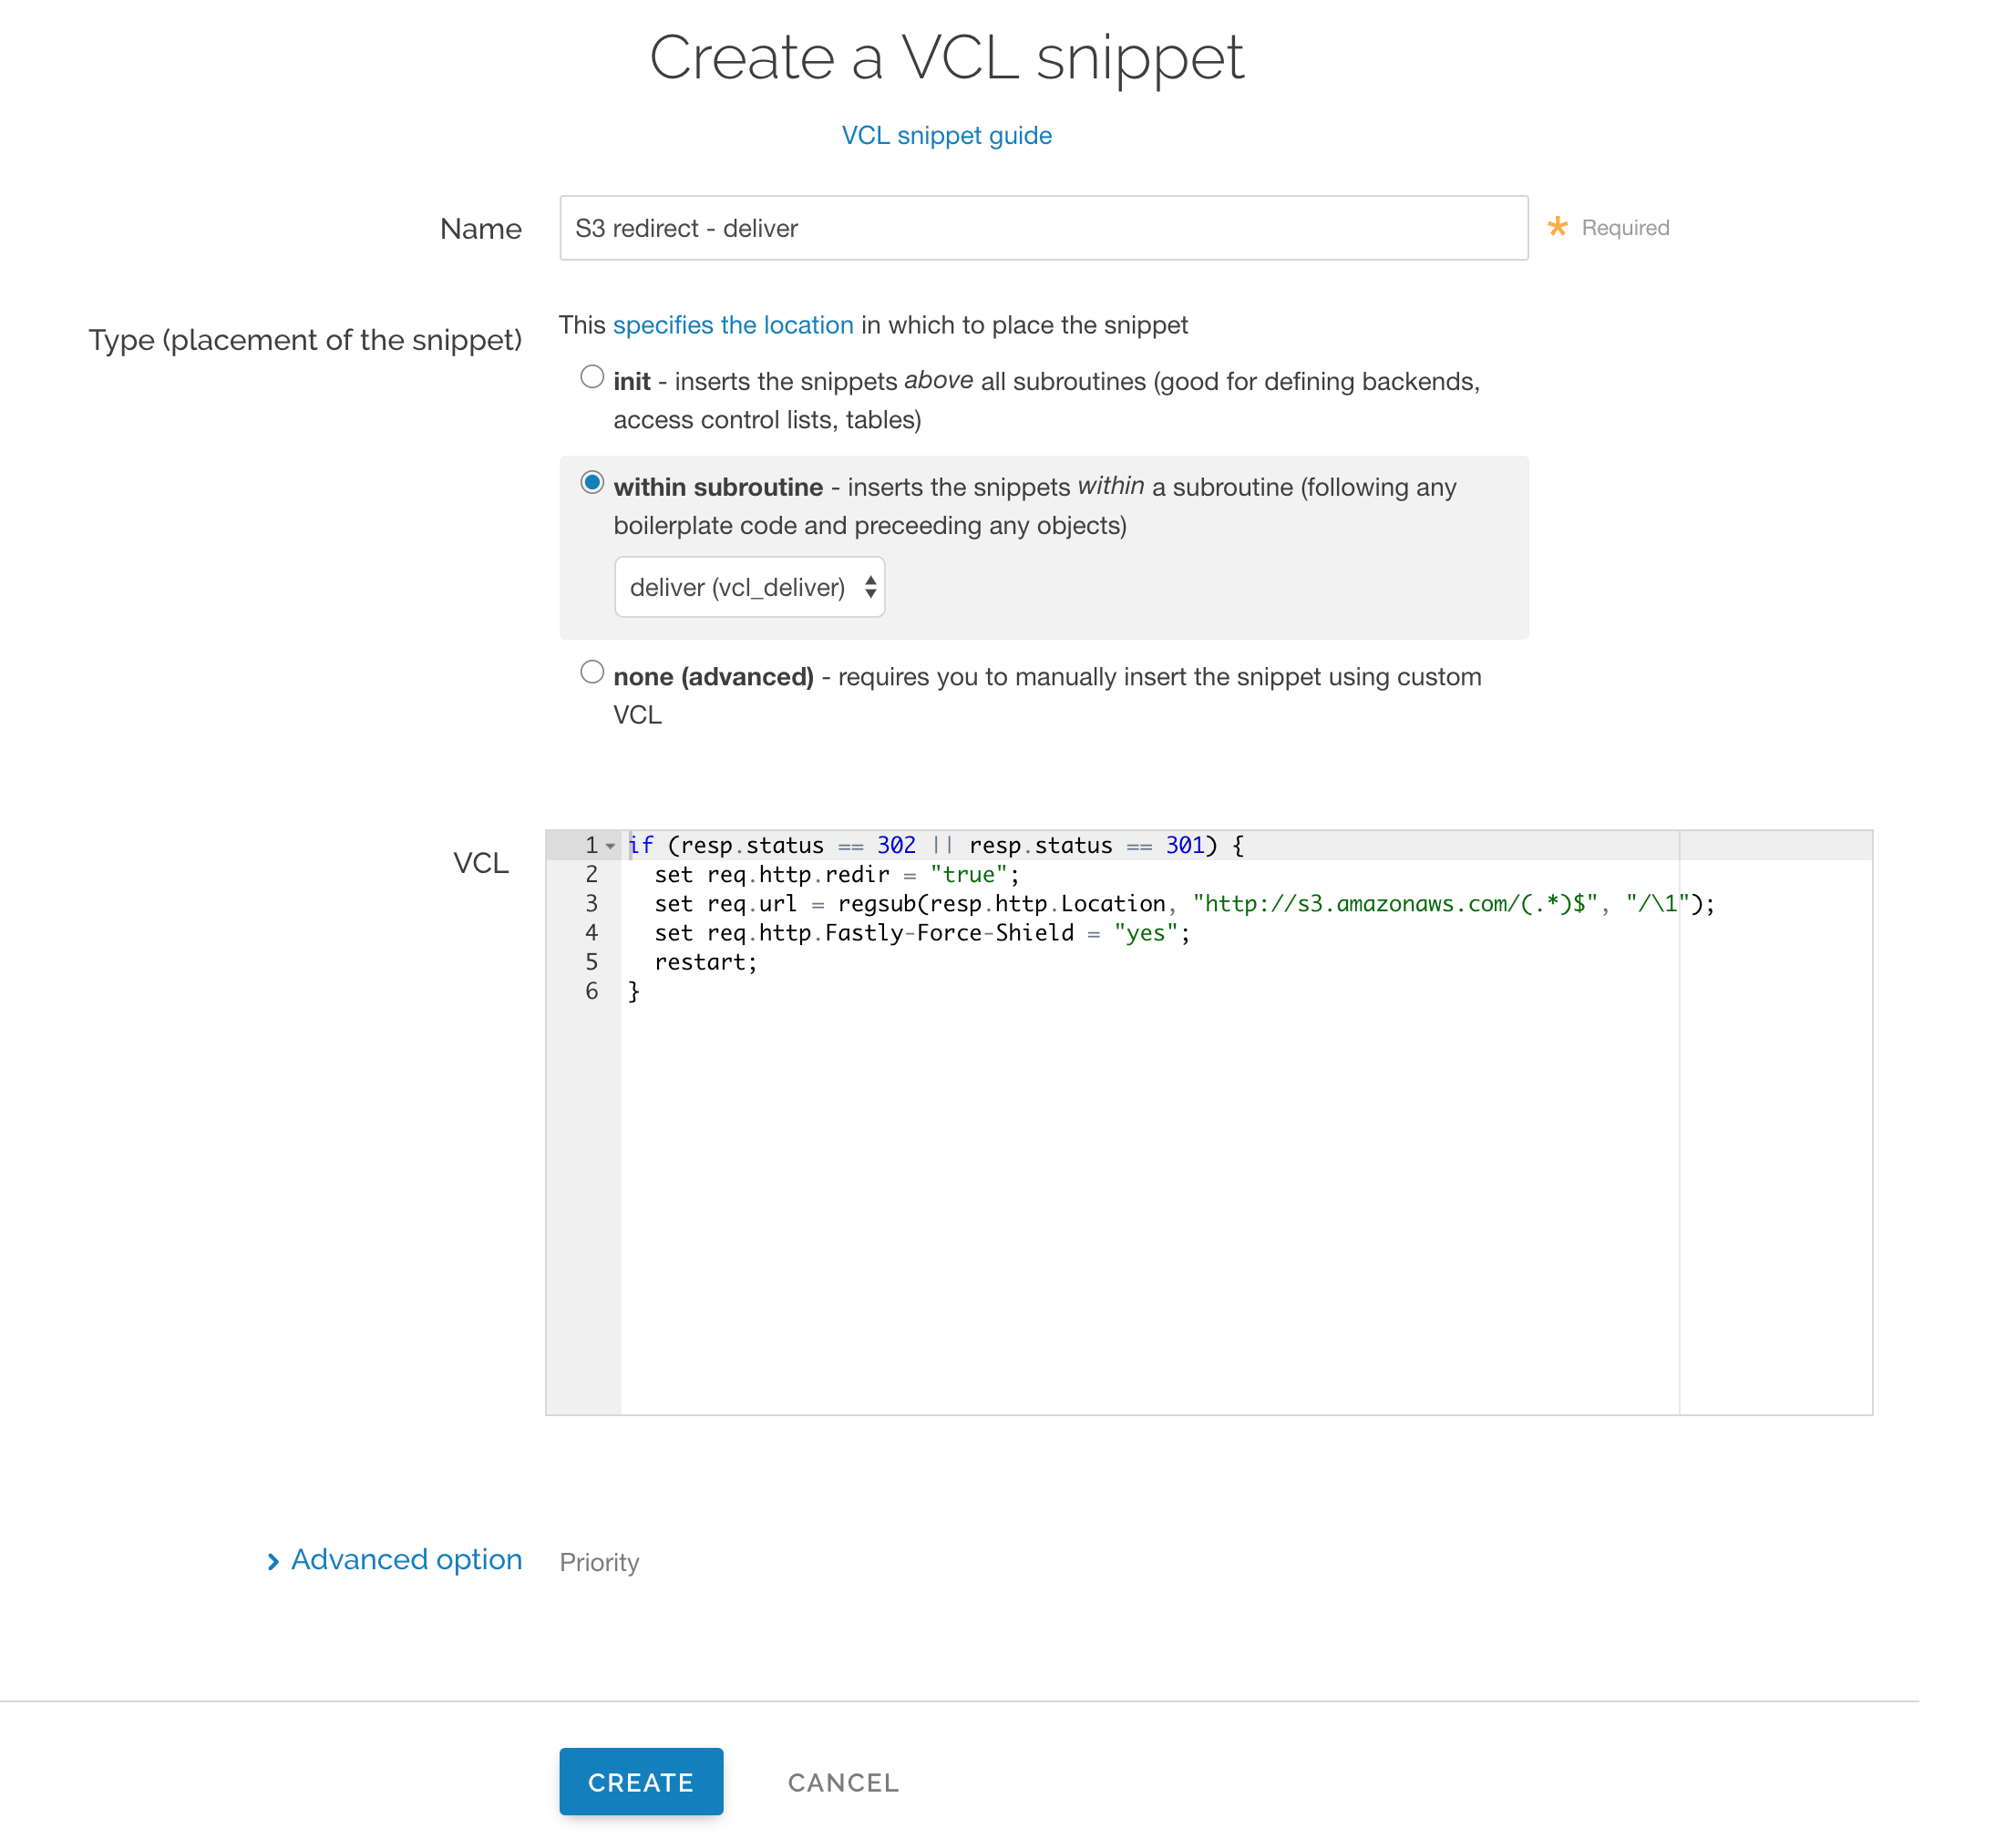
In the Name field, enter an appropriate name (e.g.,
S3 redirect - deliver).From the Type (placement of the snippet) controls, select within subroutine.
From the Select subroutine menu, select deliver (
vcl_deliver).In the VCL field, add the following condition:
123456if (resp.status == 302 || resp.status == 301) {set req.http.redir = "true";set req.url = regsub(resp.http.Location, "http://s3.amazonaws.com/(.*)$", "/\1");set req.http.Fastly-Force-Shield = "yes";restart;}Click Create to create the snippet.
- Click Activate to deploy your configuration changes.
NOTE
This article describes an integration with a service provided by a third party. Read our note on integrations for details.
Do not use this form to send sensitive information. If you need assistance, contact support. This form is protected by reCAPTCHA and the Google Privacy Policy and Terms of Service apply.
