
- English
- 日本語
Oracle Cloud Storage
Last updated 2021-08-12
Oracle Cloud Storage public and private buckets can be used as origins with Fastly.
Before you begin
Before you begin the setup and configuration steps required to use Oracle Cloud as an origin, keep in mind the following:
- You must have a valid Oracle Cloud account. Before you can create a new bucket and upload files to it for Fastly to use, you must first create an Oracle Cloud account at the Oracle website.
- Oracle Cloud implements both its own proprietary API and an S3 Compatible API. Currently, Fastly supports private buckets only via the S3 Compatible API.
Using Oracle Cloud Storage as an origin
To use Oracle Cloud Storage as an origin, follow the steps below.
Creating a new bucket
Data in Oracle Cloud Storage is stored in buckets. Follow these steps to create a new bucket via the Oracle Cloud web interface.
TIP
The Oracle Guide provides more details on how to create a bucket.
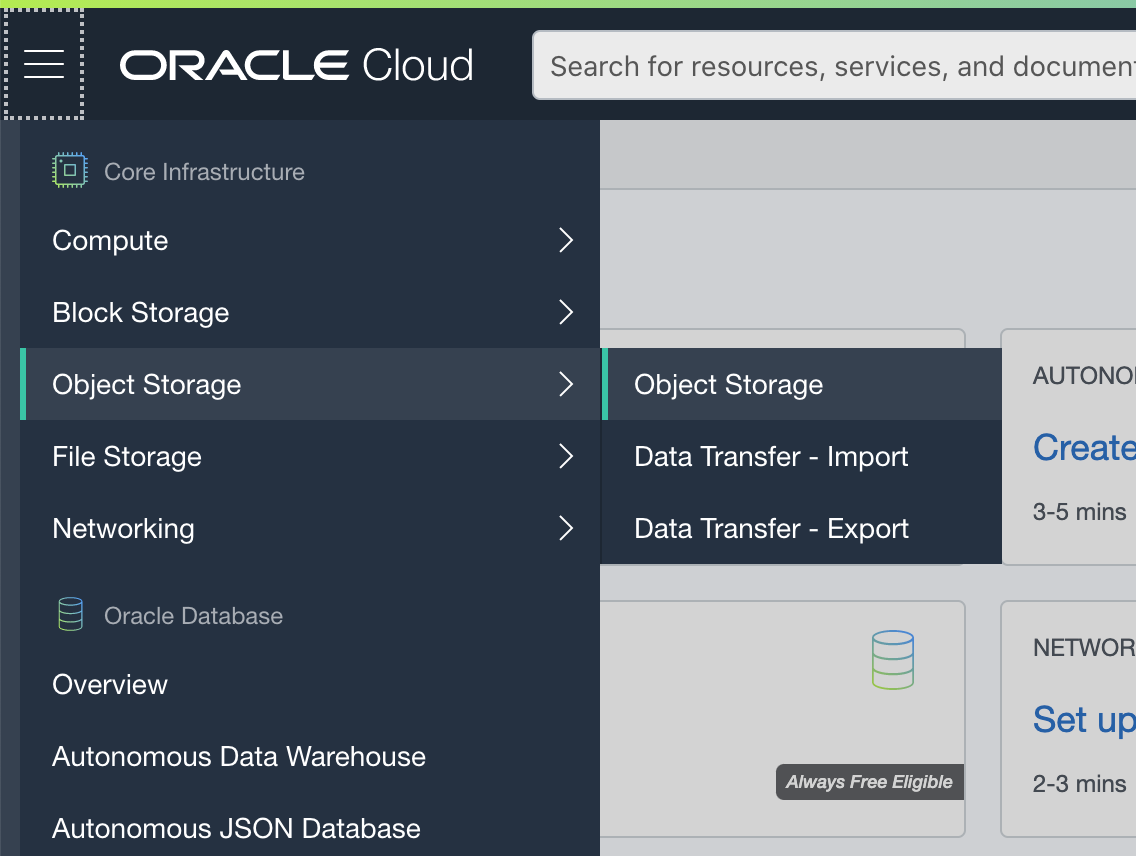
Open the navigation menu in the upper left and navigate to Object Storage, then select Object Storage.
Select a compartment from the Compartment list on the left side of the page.
Click Create a Bucket.
In the Bucket Name field, enter a unique bucket name. Bucket names must be unique within the namespace and cannot be nested. The name can contain letters, numbers, dashes, and periods.
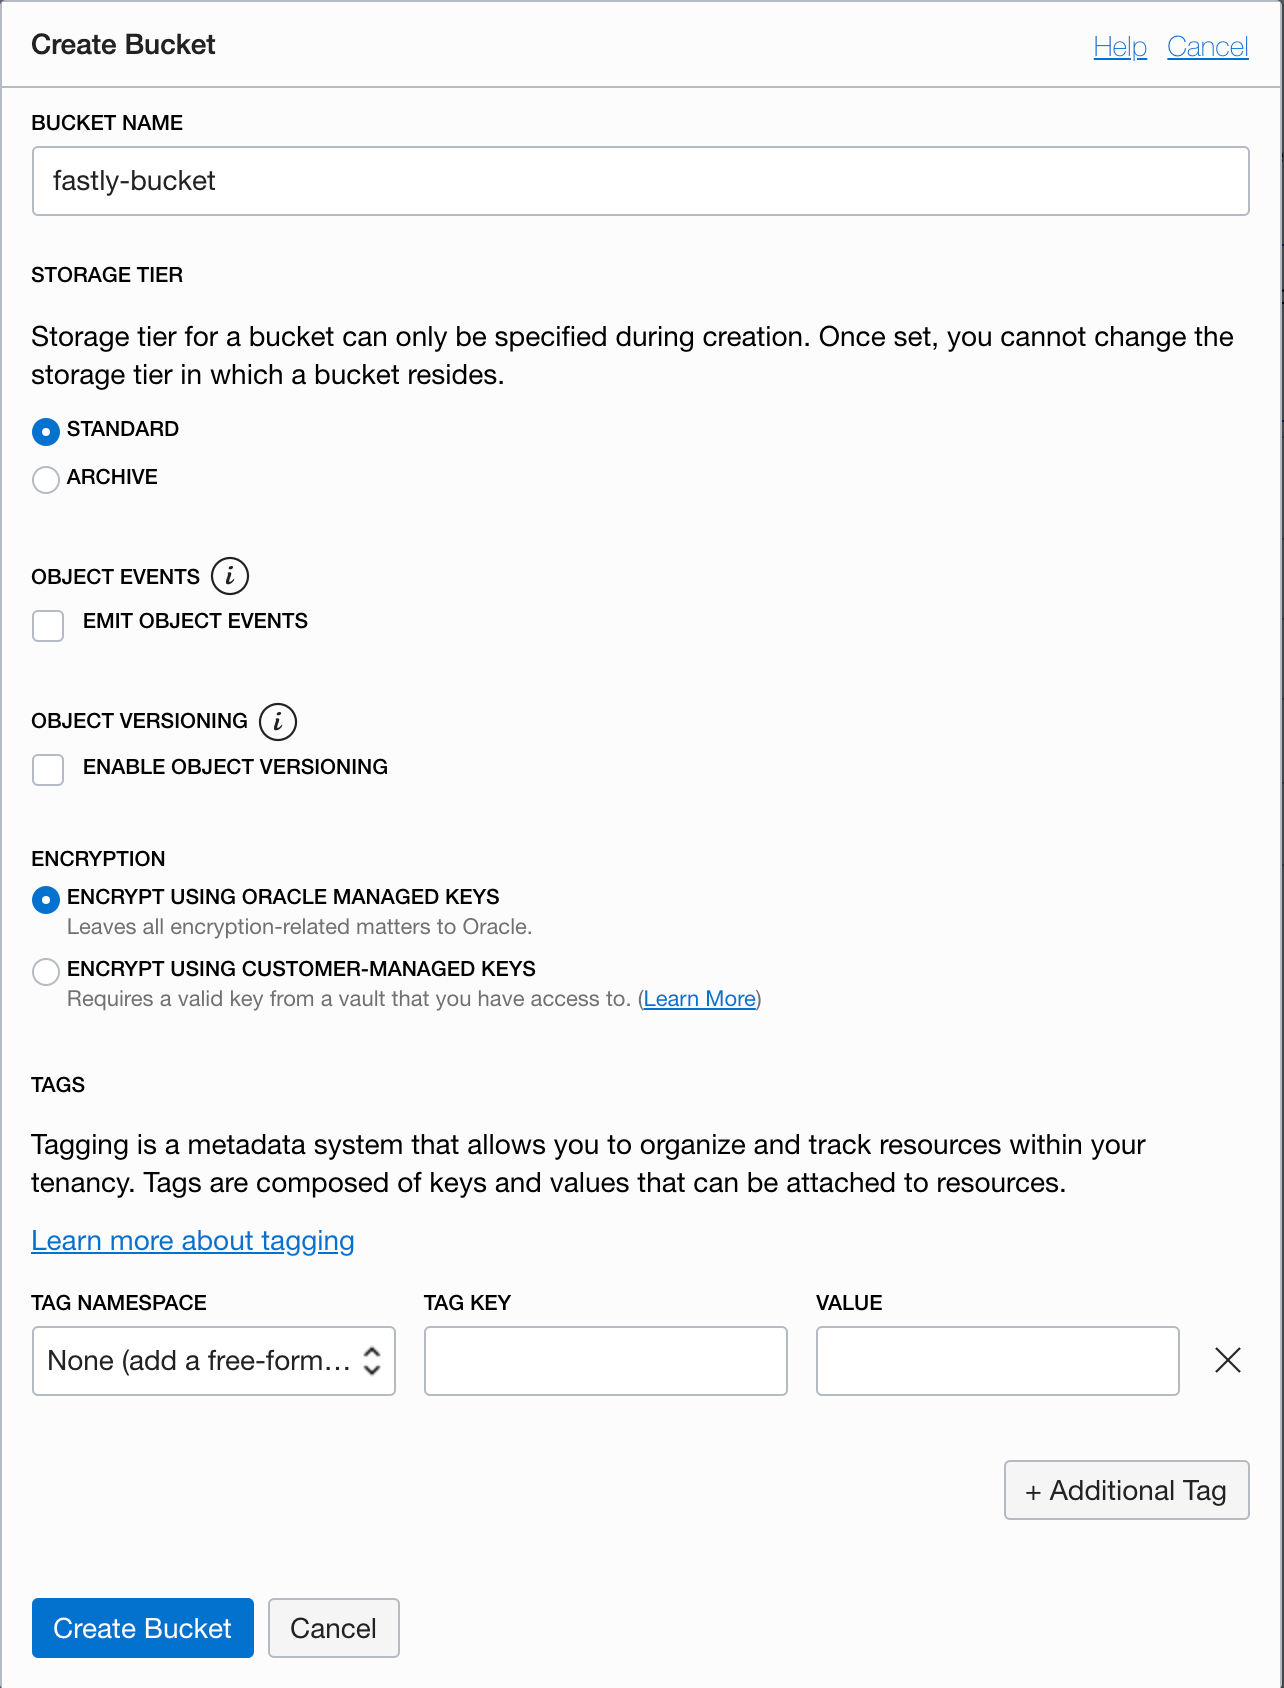
Click Create a Bucket. The new bucket appears in the list of buckets on the Oracle Cloud Storage Buckets page.
By default, new buckets are private. Click on three dots on the right side of the bucket and select Edit Visibility. Change the visibility to Public and deselect the Allow users to list objects from this bucket option.
Upload a file to the new bucket you just created.
Finding your bucket's namespace and hostname
To set up a Fastly service that interacts with your Oracle Cloud Storage, you will need to know the namespace identifier and hostname assigned to the bucket you created and uploaded files to.
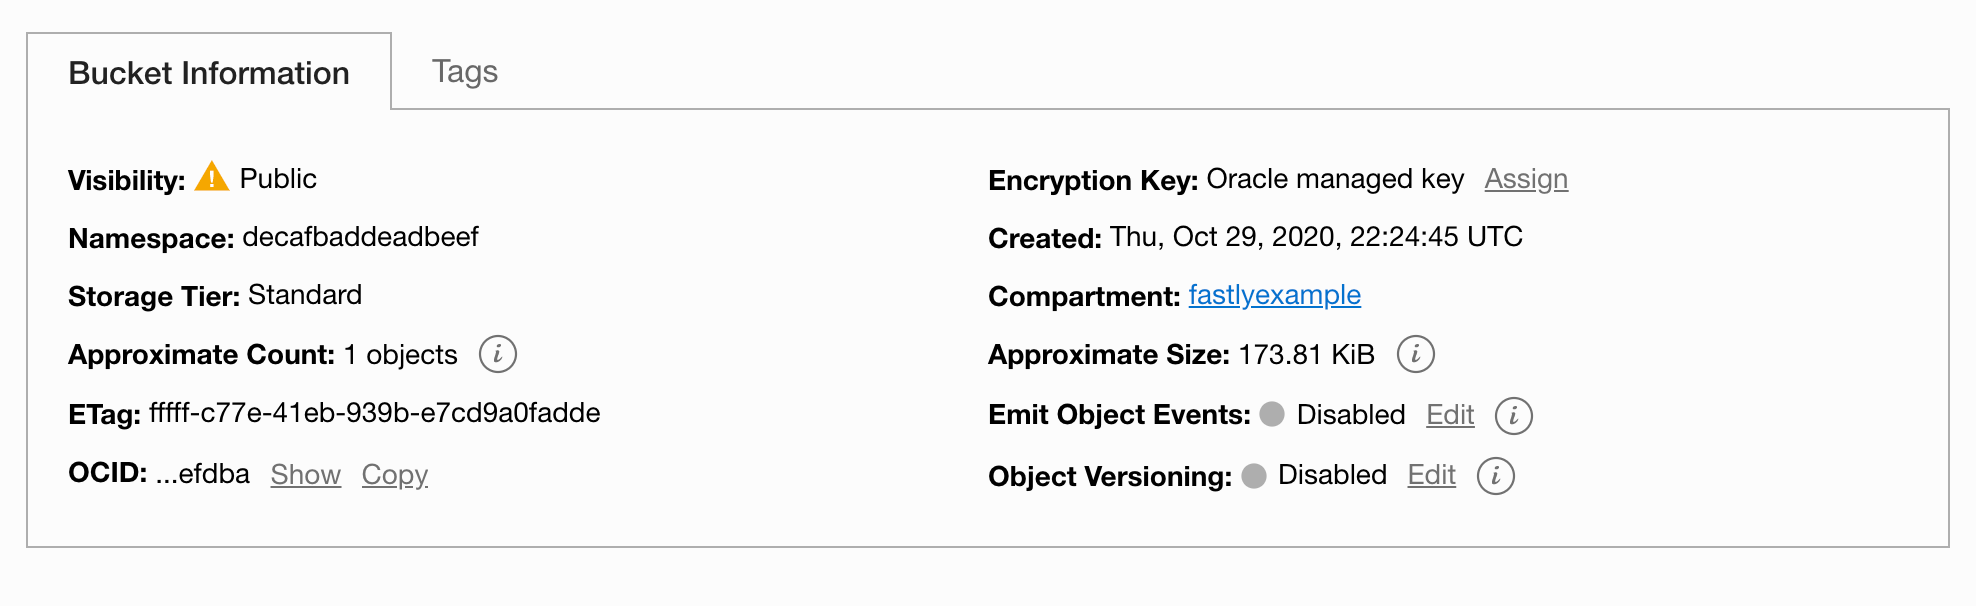
To find your namespace, click on the bucket and examine the Bucket Information tab. In this example the namespace is decafbaddeadbeef.
To determine your bucket's hostname:
- If you're using the native Oracle API then the hostname takes the form of
objectstorage.<region>.oraclecloud.com(e.gobjectstorage.us-ashburn-1.oraclecloud.com). - If you're using the S3 Compatible API then the hostname takes the form of
<namespace id>.compat.objectstorage.<region>.oraclecloud.com(e.gdecafbaddeadbeef.compat.objectstorage.us-ashburn-1.oraclecloud.com).
Creating a new service
To create a new Fastly service, you must first create a new domain and then create a new host and edit it to accept traffic for Oracle Cloud Storage. Instructions to do this appear in our guide to creating a new service. While completing these instructions, keep the following in mind:
- When you create the new host, enter the Oracle bucket's hostname in the Hosts field on the Origins page. See Finding your bucket's namespace and hostname.
- When you edit the host details on the Edit this host page, confirm the Transport Layer Security (TLS) area information for your host. Specifically, make sure you do the following:
- Secure the connection between Fastly and your origin.
- Enter your bucket's hostname in the Certificate hostname field.
- Select the checkbox to match the SNI hostname to the Certificate hostname (it appears under the SNI hostname field).
- (Optional) Enable shielding by choosing the appropriate shielding location from the Shielding menu. When using Oracle Cloud Storage, this means you must choose a shielding location closest to the most appropriate Oracle region.
- Decide whether or not you should specify an override host in the Advanced options area which is the same as your bucket hostname.
Using the Oracle Cloud API with public objects
To use the Oracle Cloud API with public objects, you need to either create a new header, or a VCL Snippet. The purpose of the header or VCL snippet is to rewrite request URLs for your Oracle Cloud Storage instance.
Using a Header object
- On your Fastly service's configuration page, click Create header to create a new header.
- Fill out the Create a header fields as follows:
- In the Name field, enter
Rewrite Oracle Cloud Storage URL. - From the Type menu, select Request, and from the Action menu, select Set.
- In the Destination field, enter
url. - From the Ignore if set menu, select No.
- In the Priority field, enter
20.
- In the Name field, enter
- In the Source field, enter
"/n/<namespace id>/b/<bucket name>/o" req.url(e.g.,"/n/decafbaddeadbeef/b/fastly-bucket/o" req.url). - Click Create.
- Click Add a condition next to the
Rewrite Oracle Cloud Storage URLheader. - Click Create a new request condition.
- Fill out the condition fields as follows:
- In the Name field, enter
Oracle Cloud Storage Shielding. - In the Apply if field, enter
(req.method == "GET" && !req.backend.is_shield) {}.
- In the Name field, enter
- Click Save and apply.
- Click Activate to deploy your configuration changes.
Using a VCL Snippet
Click VCL Snippets on your service's configuration page, then click Create Snippet.
In the Create a VCL Snippet page, enter a name for the snippet.
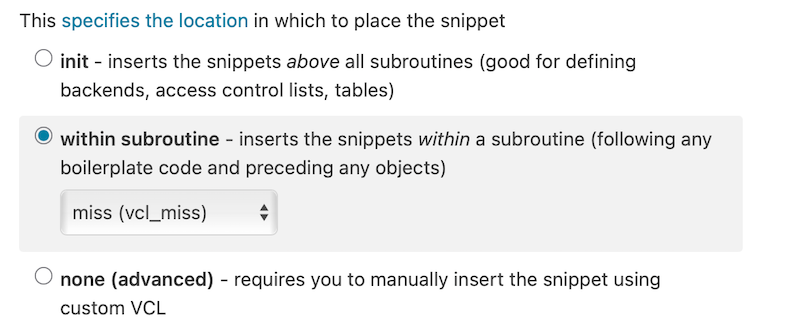
Select within subroutine to specify its placement, and miss as the subroutine type.
Add the following code to the VCL field. Change the values of the
oracleNamespaceandoracleBucketvariables to match your Oracle namespace and bucket.12345678declare local var.oracleNamespace STRING;declare local var.oracleBucket STRING;set var.oracleNamespace = "YOUR_ORACLE_NAMESPACE_ID"; # Change this value to your own dataset var.oracleBucket = "YOUR_ORACLE_BUCKET_NAME"; # Change this value to your own dataif (req.method == "GET" && !req.backend.is_shield) {set bereq.url = "/n/" var.oracleNamespace "/b/" var.oracleBucket "/o/" bereq.url;}
Using the S3 Compatible API with public objects
To use the S3 Compatible API with public objects you must create a new header, as explained below.
- On your Fastly service's configuration page, click Create header to create a new header.
- Fill out the Create a header fields as follows:
- In the Name field, enter
Rewrite Oracle Cloud Storage URL. - From the Type menu, select Request, and from the Action menu, select Set.
- In the Destination field, enter
url. - From the Ignore if set menu, select No.
- In the Priority field, enter
20.
- In the Name field, enter
- In the Source field, enter
"/<bucket name>/" req.url(e.g.,"/fastly-bucket/o" req.url). - Click Create.
- Click Activate to deploy your configuration changes.
Private Buckets
IMPORTANT
Currently, Fastly can only support private objects using the S3 Compatible API.
To use an Oracle Cloud Storage private bucket with Fastly you must implement version 4 of Amazon’s header-based authentication. You can do this using custom VCL. Keep in mind the following:
- You will need an Oracle Customer Secret Key which consists of an Access Key and Secret Key.
- You must use path-based access. Virtual host-style access (for example, accessing a bucket as
<bucketname>.<namespace>.compat.objectstorage.<region>.oraclecloud.com) is not supported.
The following table lists the information you need to obtain from Oracle Cloud Storage before starting.
| Item | Description |
|---|---|
| Namespace | The namespace identifier assigned to your bucket (see Finding your bucket's namespace and hostname. |
| Bucket name | The name of your OCS bucket. When you download items from your bucket, this is the string listed in the URL path or hostname of each object. |
| Region | The OCS region code of the location where your bucket resides (e.g., us-east-1). |
| Access key | The OCS access key string for your account that has at least read permission on the bucket. |
| Secret key | The OCS secret access key paired with the access key above. |
Once you have this information, you can configure your Fastly service to authenticate against your S3 bucket using header authentication by calculating the appropriate header value in VCL.
IMPORTANT
Consider leaving the Override host field for the origin blank in your service settings. This setting will override the host header from the snippets shown here and may invalidate the signature that authenticates the information being sent.
Start by creating a regular VCL snippet. Give it a meaningful name, such as AWS protected origin. When you create the snippet, select within subroutine to specify its placement and choose miss as the subroutine type. Then, populate the VCL field with the following code (be sure to change specific values as noted to ones relevant to your own AWS bucket):
Click VCL Snippets on your service's configuration page, then click Create Snippet.
In the Create a VCL Snippet page give the snippet a meaningful name, such as
AWS protected origin.Select within subroutine to specify snippet placement, and miss as the subroutine type.
Add the following code to the VCL field. Be sure to change the values of the variables (
ocsNamespace,ocsAccessKey, etc.) to match your Oracle environment.1234567891011121314151617181920212223242526272829303132333435363738394041424344454647484950515253545556575859606162636465666768697071declare local var.ocsNamespace STRING;declare local var.ocsAccessKey STRING;declare local var.ocsSecretKey STRING;declare local var.ocsS3Bucket STRING;declare local var.ocsRegion STRING;declare local var.canonicalHeaders STRING;declare local var.signedHeaders STRING;declare local var.canonicalRequest STRING;declare local var.canonicalQuery STRING;declare local var.stringToSign STRING;declare local var.dateStamp STRING;declare local var.signature STRING;declare local var.scope STRING;set var.ocsNamespace = "YOUR_OCS_NAMESPACE"; # Change this value to your own dataset var.ocsAccessKey = "YOUR_OCS_ACCESS_KEY"; # Change this value to your own dataset var.ocsSecretKey = "YOUR_OCS_SECRET_KEY"; # Change this value to your own dataset var.ocsS3Bucket = "YOUR_OCS_BUCKET_NAME"; # Change this value to your own dataset var.ocsRegion = "YOUR_OCS_REGION"; # Change this value to your own dataif (req.method == "GET" && !req.backend.is_shield) {set bereq.http.x-amz-content-sha256 = digest.hash_sha256("");set bereq.http.x-amz-date = strftime({"%Y%m%dT%H%M%SZ"}, now);set bereq.http.host = var.ocsNamespace ".compat.objectstorage." var.ocsRegion ".oraclecloud.com";set bereq.url = querystring.remove(bereq.url);set bereq.url = regsuball(urlencode(urldecode(bereq.url.path)), {"%2F"}, "/");set var.dateStamp = strftime({"%Y%m%d"}, now);set var.canonicalHeaders = """host:" bereq.http.host LF"x-amz-content-sha256:" bereq.http.x-amz-content-sha256 LF"x-amz-date:" bereq.http.x-amz-date LF;set var.canonicalQuery = "";set var.signedHeaders = "host;x-amz-content-sha256;x-amz-date";set var.canonicalRequest = """GET" LFbereq.url.path LFvar.canonicalQuery LFvar.canonicalHeaders LFvar.signedHeaders LFdigest.hash_sha256("");set var.scope = var.dateStamp "/" var.ocsRegion "/s3/aws4_request";set var.stringToSign = """AWS4-HMAC-SHA256" LFbereq.http.x-amz-date LFvar.scope LFregsub(digest.hash_sha256(var.canonicalRequest),"^0x", "");set var.signature = digest.awsv4_hmac(var.ocsSecretKey,var.dateStamp,var.ocsRegion,"s3",var.stringToSign);set bereq.http.Authorization = "AWS4-HMAC-SHA256 ""Credential=" var.ocsAccessKey "/" var.scope ", ""SignedHeaders=" var.signedHeaders ", ""Signature=" + regsub(var.signature,"^0x", "");unset bereq.http.Accept;unset bereq.http.Accept-Language;unset bereq.http.User-Agent;unset bereq.http.Fastly-Client-IP;}
NOTE
This article describes an integration with a service provided by a third party. Read our note on integrations for details.
Do not use this form to send sensitive information. If you need assistance, contact support. This form is protected by reCAPTCHA and the Google Privacy Policy and Terms of Service apply.
