
- English
- 日本語
DigitalOcean Spaces
Last updated 2022-03-01
DigitalOcean Spaces public and private Spaces can be used as origins with Fastly.
Using DigitalOcean Spaces as an origin
To make your DigitalOcean Spaces available through Fastly, follow the steps below.
Creating a new service
Follow the instructions for creating a new service.
- When you create the new domain and the new host:
- In the Domain Name field on the Create a domain page, enter the hostname you want to use as the URL (e.g.,
cdn.example.com). - In the Hosts field on the Origins page, enter the appropriate address for your Host using the format
<SPACE>.<REGION>.digitaloceanspaces.com. For example, if your space name istest123and your region isnyc3, your hostname would betest123.nyc3.digitaloceanspaces.com.
- In the Domain Name field on the Create a domain page, enter the hostname you want to use as the URL (e.g.,
- When you edit the host details on the Edit this host page:
- In the Name field, enter any descriptive name for your service if you haven't already done so.
- In the Address field, ensure you've entered the appropriate address for your Host (e.g.,
test123.nyc3.digitaloceanspaces.com). You entered this information during Host creation.
- When you edit the Transport Layer Security (TLS) area information for your host:
- Leave the Enable TLS? default set to Yes to secure the connection between Fastly and your origin.
- In the Certificate hostname field, enter the same address that appears in the Address field (e.g.,
test123.nyc3.digitaloceanspaces.com). - Under the SNI hostname field, select the checkbox to Match the SNI hostname to the Certificate hostname. The address you entered during Host creation appears.
- In the Override host field, enter an appropriate address for your Host (e.g.,
test123.nyc3.digitaloceanspaces.com). You entered this information during Host creation.
Testing your results
By default, we create DNS mapping called yourdomain.global.prod.fastly.net. In the example above, it would be cdn.example.com.global.prod.fastly.net. Create a DNS alias for the domain name you specified (e.g., CNAME cdn.example.com to global-nossl.fastly.net).
Fastly will cache any content without an explicit Cache-Control header for 1 hour. You can verify whether you are sending any cache headers using curl. For example:
$ curl -I opscode-full-stack.nyc3.digitaloceanspaces.com
HTTP/1.1 200 OKx-amz-id-2: ZpzRp7IWc6MJ8NtDEFGH12QBdk2CM1+RzVOngQbhMp2f2ZyalkFsZd4qPaLMkSlhx-amz-request-id: ABV5032583242618Date: Fri, 18 Mar 2012 17:15:38 GMTContent-Type: application/xmlTransfer-Encoding: chunked
In this example, no Cache-Control headers are set so default TTL will be applied.
Enhanced cache control
If you need more control over how different types of assets are cached (e.g., JavaScript files, images), refer to our cache freshness documentation.
Using private DigitalOcean Spaces
To use a private DigitalOcean Space with Fastly, follow the instructions below.
Before you begin
Be sure you've already made your Spaces data available to Fastly by pointing to the right Space and setting your origin to port 443. This needs to be done before authenticating.
Be sure you've got the access key, secret key, and Space name on hand. The DigitalOcean Spaces Authorization header takes the following form:
Authorization: AWS `AWSAccessKeyId`:`Signature`From the DigitalOcean website you will need the following information:
- the access key and secret key
- your Space name
Setting up Fastly to use a private DigitalOcean Space
In order to use a private DigitalOcean Space with Fastly, create two headers, a Date header (for use with the authorization Signature) and an Authorization header.
Create a Date header
- Log in to the Fastly control panel.
- From the Home page, select the appropriate service. You can use the search box to search by ID, name, or domain.
- Click Edit configuration and then select the option to clone the active version.
- Click Content.
Click Create header.
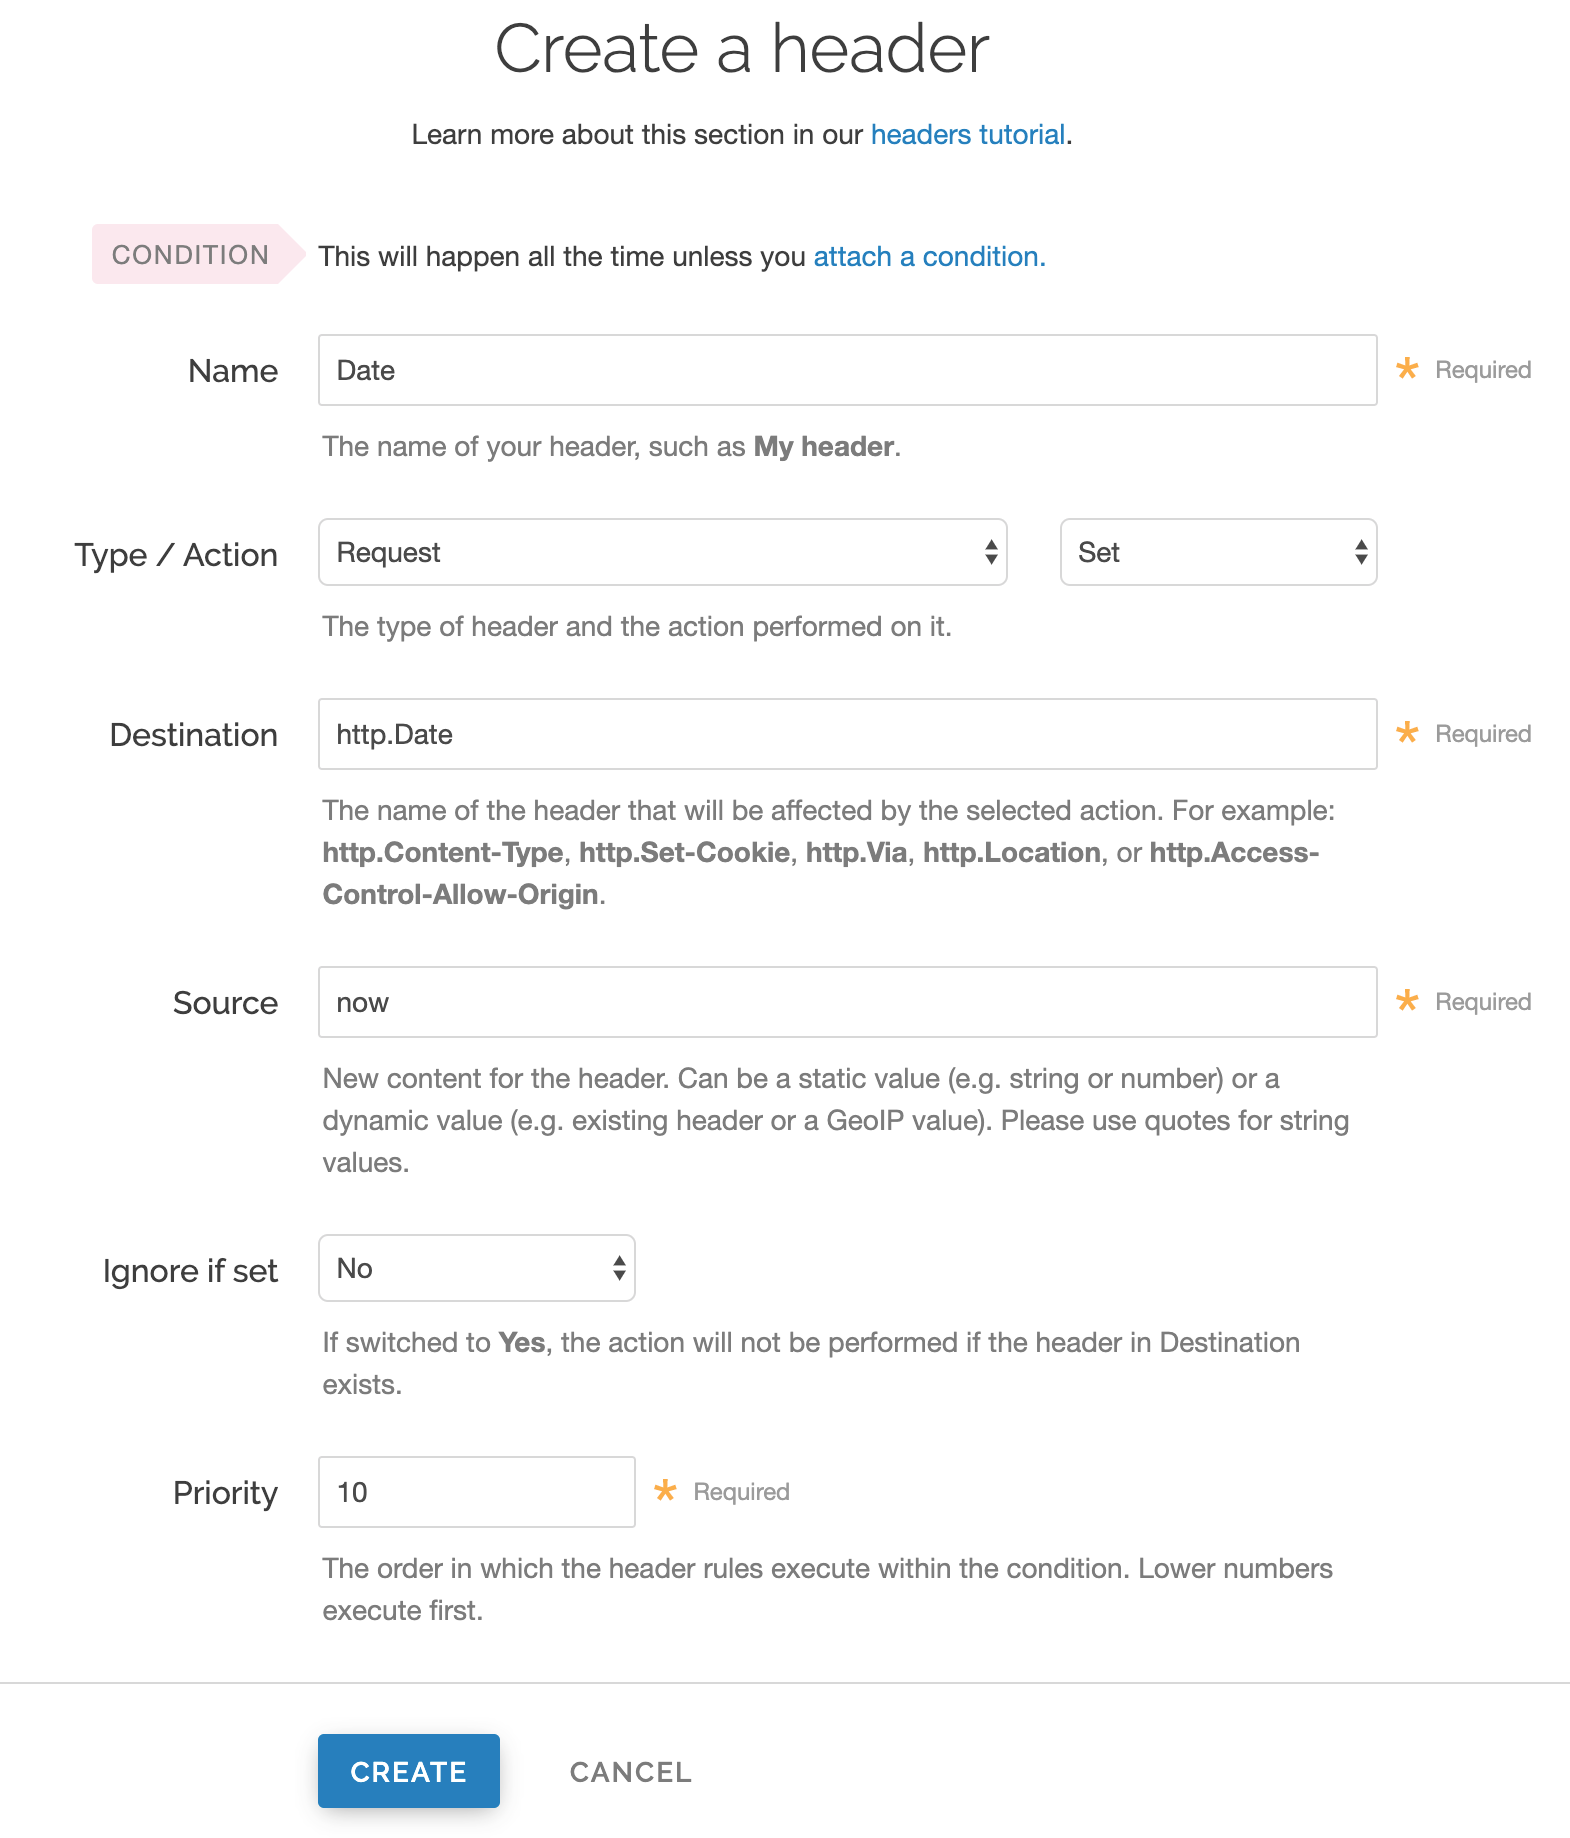
Fill out the Create a header fields as follows:
- In the Name field, enter
Date. - From the Type menu, select Request, and from the Action menu, select Set.
- In the Destination field, enter
http.Date. - In the Source field, enter
now. - From the Ignore if set menu, select No.
- In the Priority field, enter
10.
- In the Name field, enter
Click Create. A new Date header appears on the Content page. You will use this later within the Signature of the Authorization header.
Create an Authorization header
Next, create the Authorization header with the specifications listed below.
Click Create header again to create another new header.
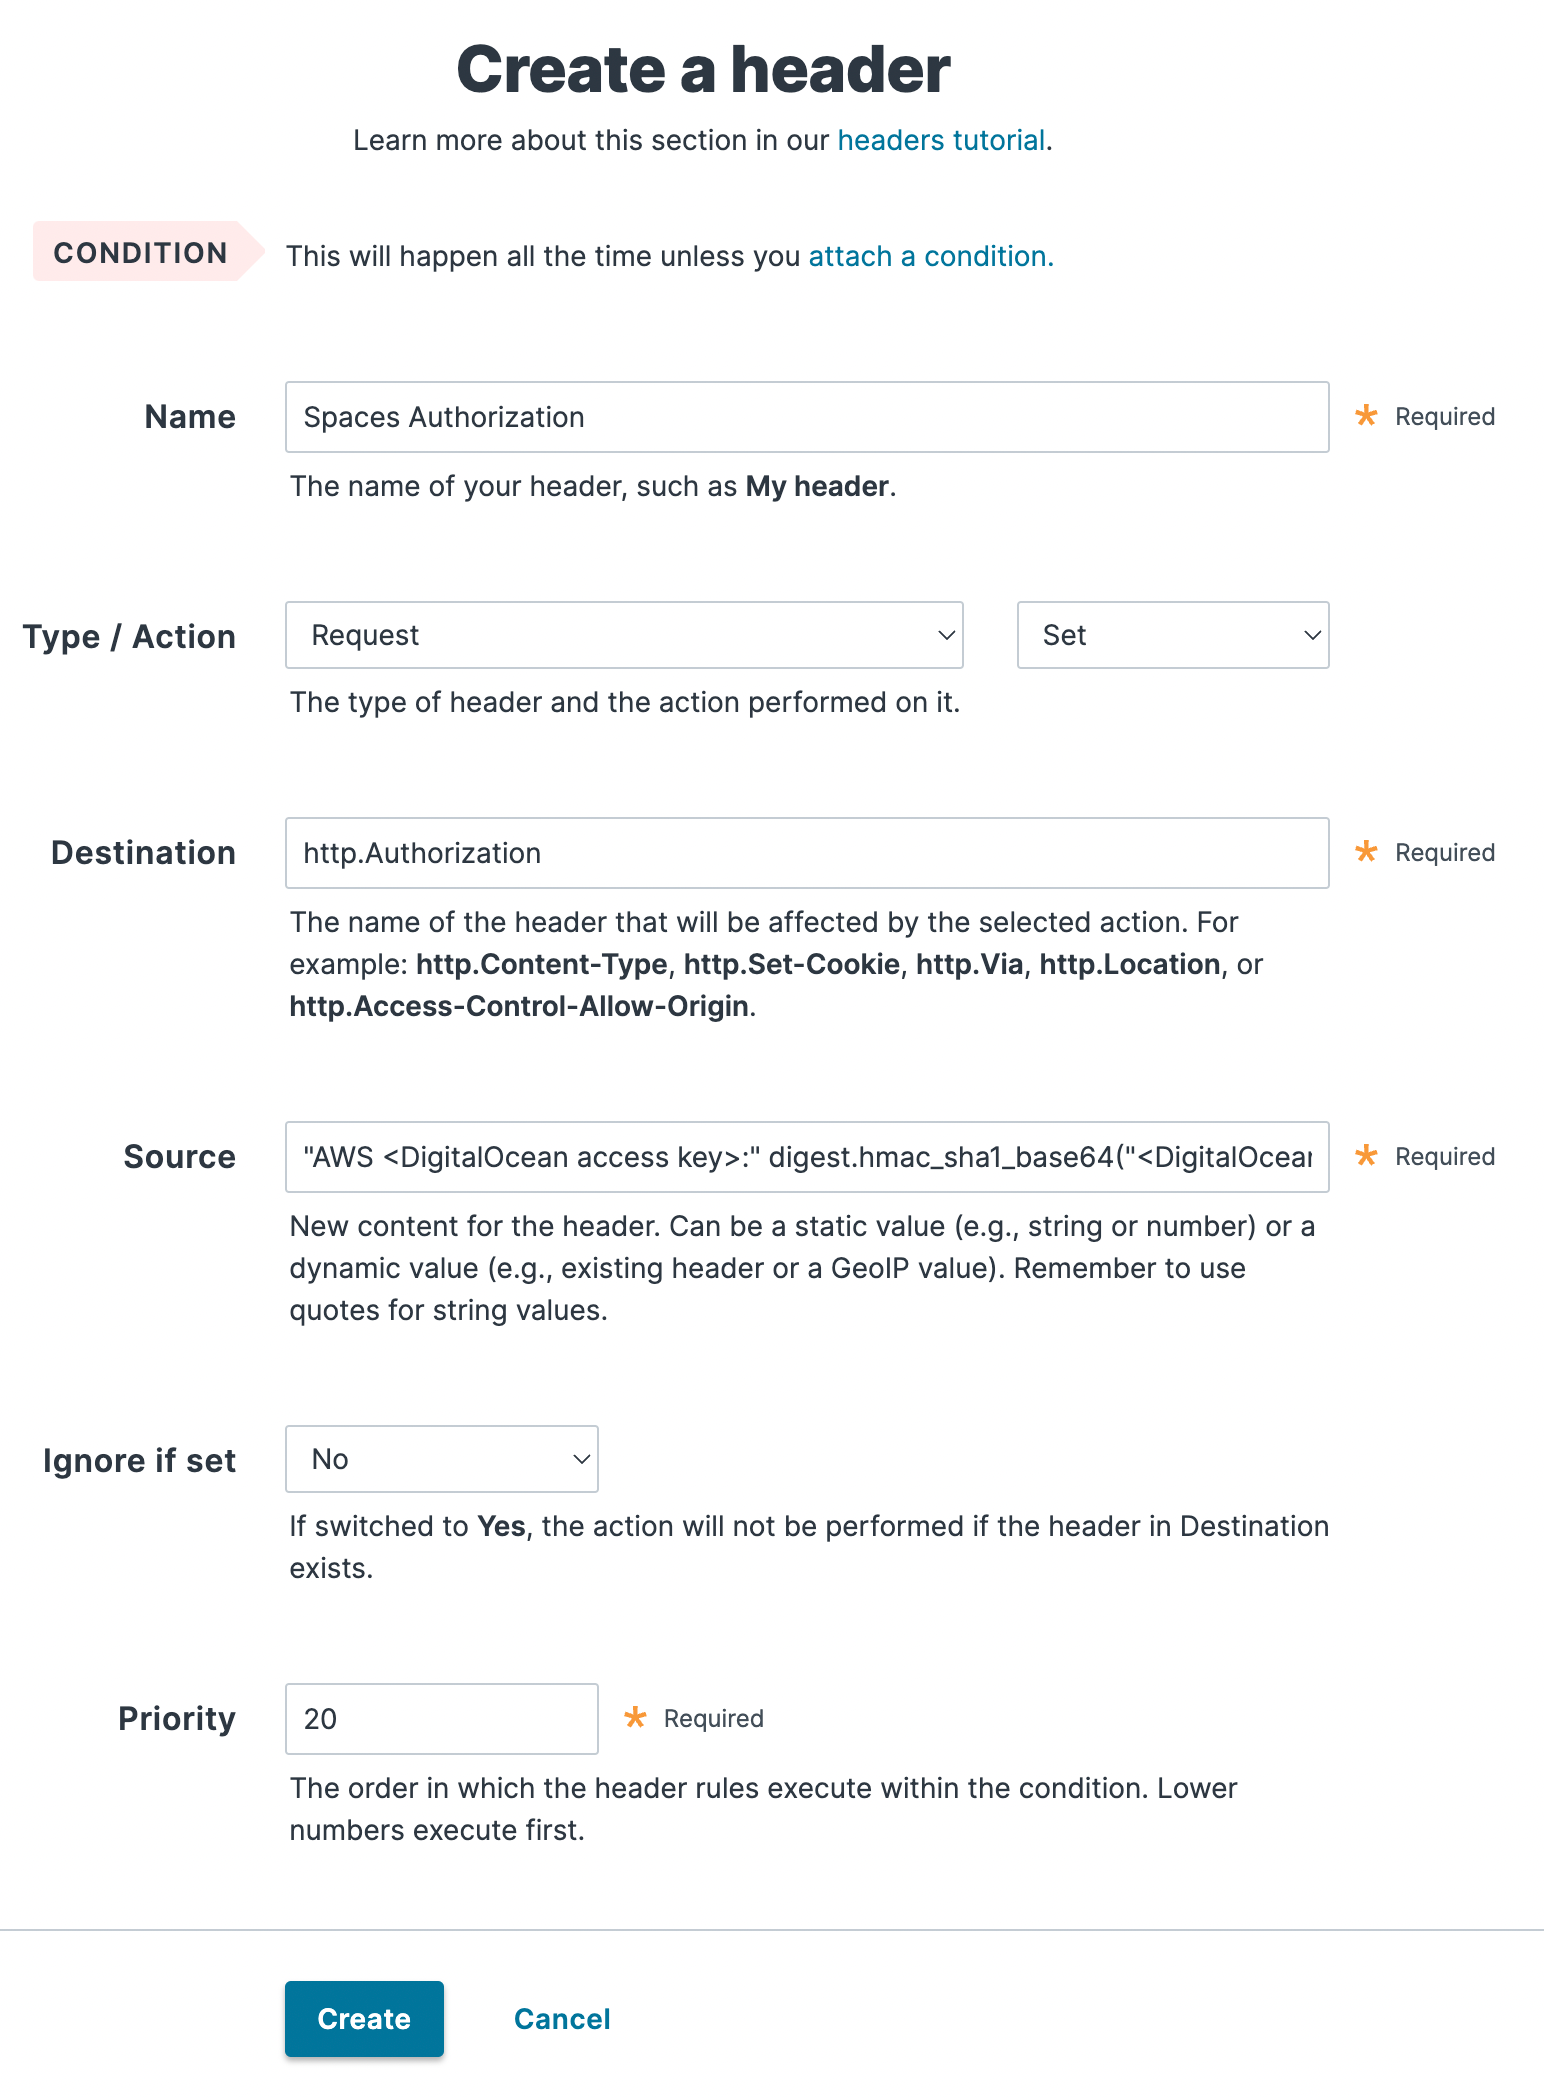
Fill out the Create a header fields as follows:
- In the Name field, enter
Spaces Authorization. - From the Type menu, select Request, and from the Action menu, select Set.
- In the Destination field, enter
http.Authorization. - From the Ignore if set menu, select No.
- In the Priority field, enter
20.
- In the Name field, enter
In the Source field, enter the header authorization information using the following format:
"AWS <DigitalOcean access key>:" digest.hmac_sha1_base64("<DigitalOcean secret key>", if(req.method == "HEAD", "GET", req.method) LF LF LF req.http.Date LF "/<Space name>" req.url.path)replacing
<DigitalOcean access key>,<DigitalOcean secret key ID>, and<Space name>with the information you gathered before you began. For example:"AWS JKCAUEFV2ONFFOFMSSLA:" digest.hmac_sha1_base64("P2WPSu68Bfl89j72vT+bXYZB7SjlOwhT4whqt27", if(req.method == "HEAD", "GET", req.method) LF LF LF req.http.Date LF "/test123" req.url.path)Click Create. The new Authorization header appears on the Content page.
A detailed look at the Source field
So what's going on in the Source field of the Authorization header? Here's the basic format:
AWS<Access Key><Signature Function><key><message>
It tells us the following:
| Element | Description |
|---|---|
AWS | A constant placed before the access key. It's always AWS. |
access key | The access key from your DigitalOcean account. We used JKCAUEFV2ONFFOFMSSLA in this example. |
signature function | The algorithm used to validate the key and message of the signature. We used digest.hmac_sha1_base64(<key>, <message>) in this example. |
key | The secret key from your DigitalOcean account. We used P2WPSu68BfI89j72vT+bXYZB7SjIOwhT4whqt27 in this example. |
message | The UTF-8 encoding of the StringToSign. Check out the table below for a break down of each portion of the message. |
The message that's part of the Source field in the Authorization header takes on this basic format:
<HTTP-verb></n><Content-MD5>/n<Content-Type></n><Date></n><CanonicalizedAmzHeader></n><CanonicalizedResource>
It tells us the following:
| Element | Description |
|---|---|
HTTP-verb | The REST verb. We use req.method in this example. We rewrite HEAD to GET because Varnish does this internally before sending requests to origin. |
/n | A newline indicator constant. It's always /n. |
Content-MD5 | The content-md5 header value, used as a message integrity check. It's often left blank. We use LF (line feed) in this example. |
Content-Type | The content-type header value, used to specify the MIME-type. It's often left blank. We use LFin this example. |
Date | The date and time stamp. We use req.http.Date (which we created first as a separate header in the steps above). |
CanonicalizedAmzHeader | The x-amz headers, which customize your Spaces implementation. It's often left blank. We use LF in this example. |
CanonicalizedResource | Your DigitalOcean Space name. We use "/test123" in this example. |
Following redirects to Spaces objects and caching Spaces responses
With custom VCL, Fastly can follow redirects to Spaces objects and cache the Spaces response as well as the 301 or 302 response separately.
Be sure to read our instructions about mixing and matching Fastly VCL with custom VCL. It's important to include the entire VCL boilerplate if you do not intend to override the Fastly default settings.
To configure Fastly to follow redirects to Spaces objects, insert the following VCL in your custom VCL:
Within vcl_recv
123456789101112131415161718sub vcl_recv {
if (req.http.redir != "true") { set req.backend = Main_Origin; } else { set req.backend = spaces_backend; set req.http.host = "nyc3.digitaloceanspaces.com"; }
#FASTLY recv
if (req.method != "HEAD" && req.method != "GET" && req.method != "FASTLYPURGE") { return(pass); }
return(lookup);
}Within vcl_deliver
12345678910111213sub vcl_deliver {
if (resp.status == 302 || resp.status == 301) { set req.http.redir = "true"; set req.url = regsub(resp.http.Location, "http://nyc3.digitaloceanspaces.com/(.*)$", "/\1"); set req.http.Fastly-Force-Shield = "yes"; restart; }
#FASTLY deliver
return(deliver);}Be sure to set the Main_Origin and spaces_backend to the actual name of your backends in the service to which you're applying these redirects. You can find the exact names by reviewing your VCL. Simply click on the VCL button at the top of the page while viewing the service.
Once you added these VCL snippets to your custom VCL, upload the VCL file and then activate the new version of your service to apply the changes.
NOTE
This article describes an integration with a service provided by a third party. Read our note on integrations for details.
Do not use this form to send sensitive information. If you need assistance, contact support. This form is protected by reCAPTCHA and the Google Privacy Policy and Terms of Service apply.
