
- English
- 日本語
Microsoft Azure Blob Storage
Last updated 2021-05-13
Microsoft Azure Blob Storage public and private containers can be used as origins with Fastly.
TIP
With properly configured services in place, shared Fastly and Microsoft customers will benefit from Fastly’s integration with Azure’s ExpressRoute Direct Local, which results in Fastly including your outbound data transfer costs from Azure in your standard Fastly pricing. See our guide to outbound data transfers from Azure for more details.
Using Azure Blob Storage as an origin
When using Azure Blob Storage as an origin, we recommend using the most recent version of Azure storage services. Certain incompatibilities may occur if using too old a version or if the version is not specified by the request header. To enforce a version to use when not specified by the header, set the DefaultServiceVersion in your Blob storage service.
Alternatively, place a VCL snippet to vcl_miss and vcl_pass to set or enforce the version. For example, if the version is 2020-06-12, the VCL snippet would look like the following:
123{{if (req.backend.is_origin) { }}{{ set bereq.http.x-ms-version = "2020-06-12"; }}}Once you've configured your Azure Blob Storage stores are ready to make them available through Fastly, follow the steps below.
Creating a new service
Follow the instructions for creating a new service. You'll add specific details about your origin when you fill out the Create a new service fields:
- In the Name field, enter any descriptive name for your service.
- In the Domain field, enter the hostname you want to use as the URL (e.g.,
cdn.example.com). - In the Address field, enter
<storage account name>.blob.core.windows.net. - In the Transport Layer Security (TLS) area, leave the Enable TLS? default set to Yes to secure the connection between Fastly and your origin.
- In the Transport Layer Security (TLS) area, enter
<storage account name>.blob.core.windows.netin the Certificate hostname field.
Setting the default Host and correct path
Once the new service is created, set the default Host to azure and then add your container path to the URL by following the steps below:
- From the Home page, select the appropriate service. You can use the search box to search by ID, name, or domain.
- Click Edit configuration and then select the option to clone the active version.
- Click Settings.
Click the Override host switch.
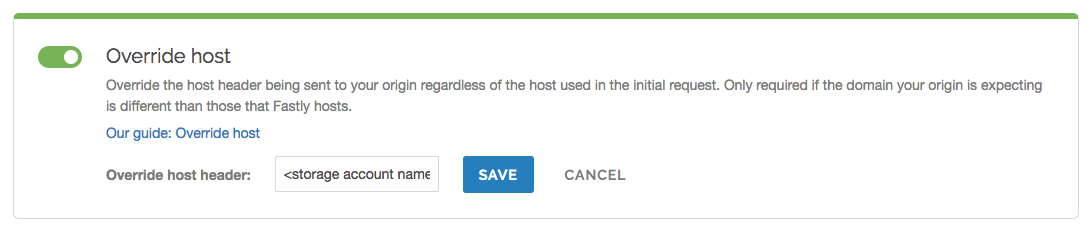
Enter the hostname of your Azure Blob Storage account. For example,
<storage account name>.blob.core.windows.net.Click Save.
- Click Content.
Click Create header.
Fill out the Create a header fields as follows:
- In the Name field, enter
Modify URL. - From the Type menu, select Request, and from the Action menu, select Set.
- In the Destination field, enter
url. - In the Source field, enter
"/<your container name>" req.url. - From the Ignore if set menu, select No.
- In the Priority field, enter
10.
- In the Name field, enter
Click Create.
- Click Activate to deploy your configuration changes.
Testing your results
By default, we create DNS mapping called yourdomain.global.prod.fastly.net. In the example above, it would be cdn.example.com.global.prod.fastly.net. Create a DNS alias for the domain name you specified (e.g., CNAME cdn.example.com to global-nossl.fastly.net).
Fastly will cache any content without an explicit Cache-Control header for 1 hour. You can verify whether you are sending any cache headers using curl. For example:
$ curl -I opscode-full-stack.blob.core.windows.net
HTTP/1.1 200 OKDate: Fri, 04 May 2018 21:23:07 GMTContent-Type: application/xmlTransfer-Encoding: chunkedServer: Blob Service Version 1.0 Microsoft-HTTPAPI/2.0
In this example, no Cache-Control headers are set so the default TTL will be applied.
Using an Azure Blob Storage private container
To use an Azure Blob Storage private container with Fastly, follow the instructions below.
Before you begin
Be sure you've already made your Azure Blob Storage containers available to Fastly by pointing to the right container and setting your origin to port 443. This needs to be done before authenticating.
To complete the setup, you'll also need your Azure Storage Account shared key and storage account name to construct the Azure Blob Storage Authorization header, which takes the following form:
Authorization: SharedKey `Account name`:`Signature`Finally, you'll also need to know your Blob Storage container name.
Setting up Fastly to use an Azure Blob Storage private container with a Shared Key
WARNING
Your account's Shared Key does not have detailed access control. Anyone with access to your Shared Key can read and write to your container. Consider using a Shared Access Signature (SAS) instead.
To access an Azure Blob Storage private container with Fastly using a Shared Key, first familiarize yourself with Microsoft's documentation on authorizing with Shared Key. Then, create two headers: a Date header (for use with the authorization Signature) and an Authorization header.
Create a Date header
Create the Date header using the steps below.
- Log in to the Fastly control panel.
- From the Home page, select the appropriate service. You can use the search box to search by ID, name, or domain.
- Click Edit configuration and then select the option to clone the active version.
- Click Content.
Click Create header.
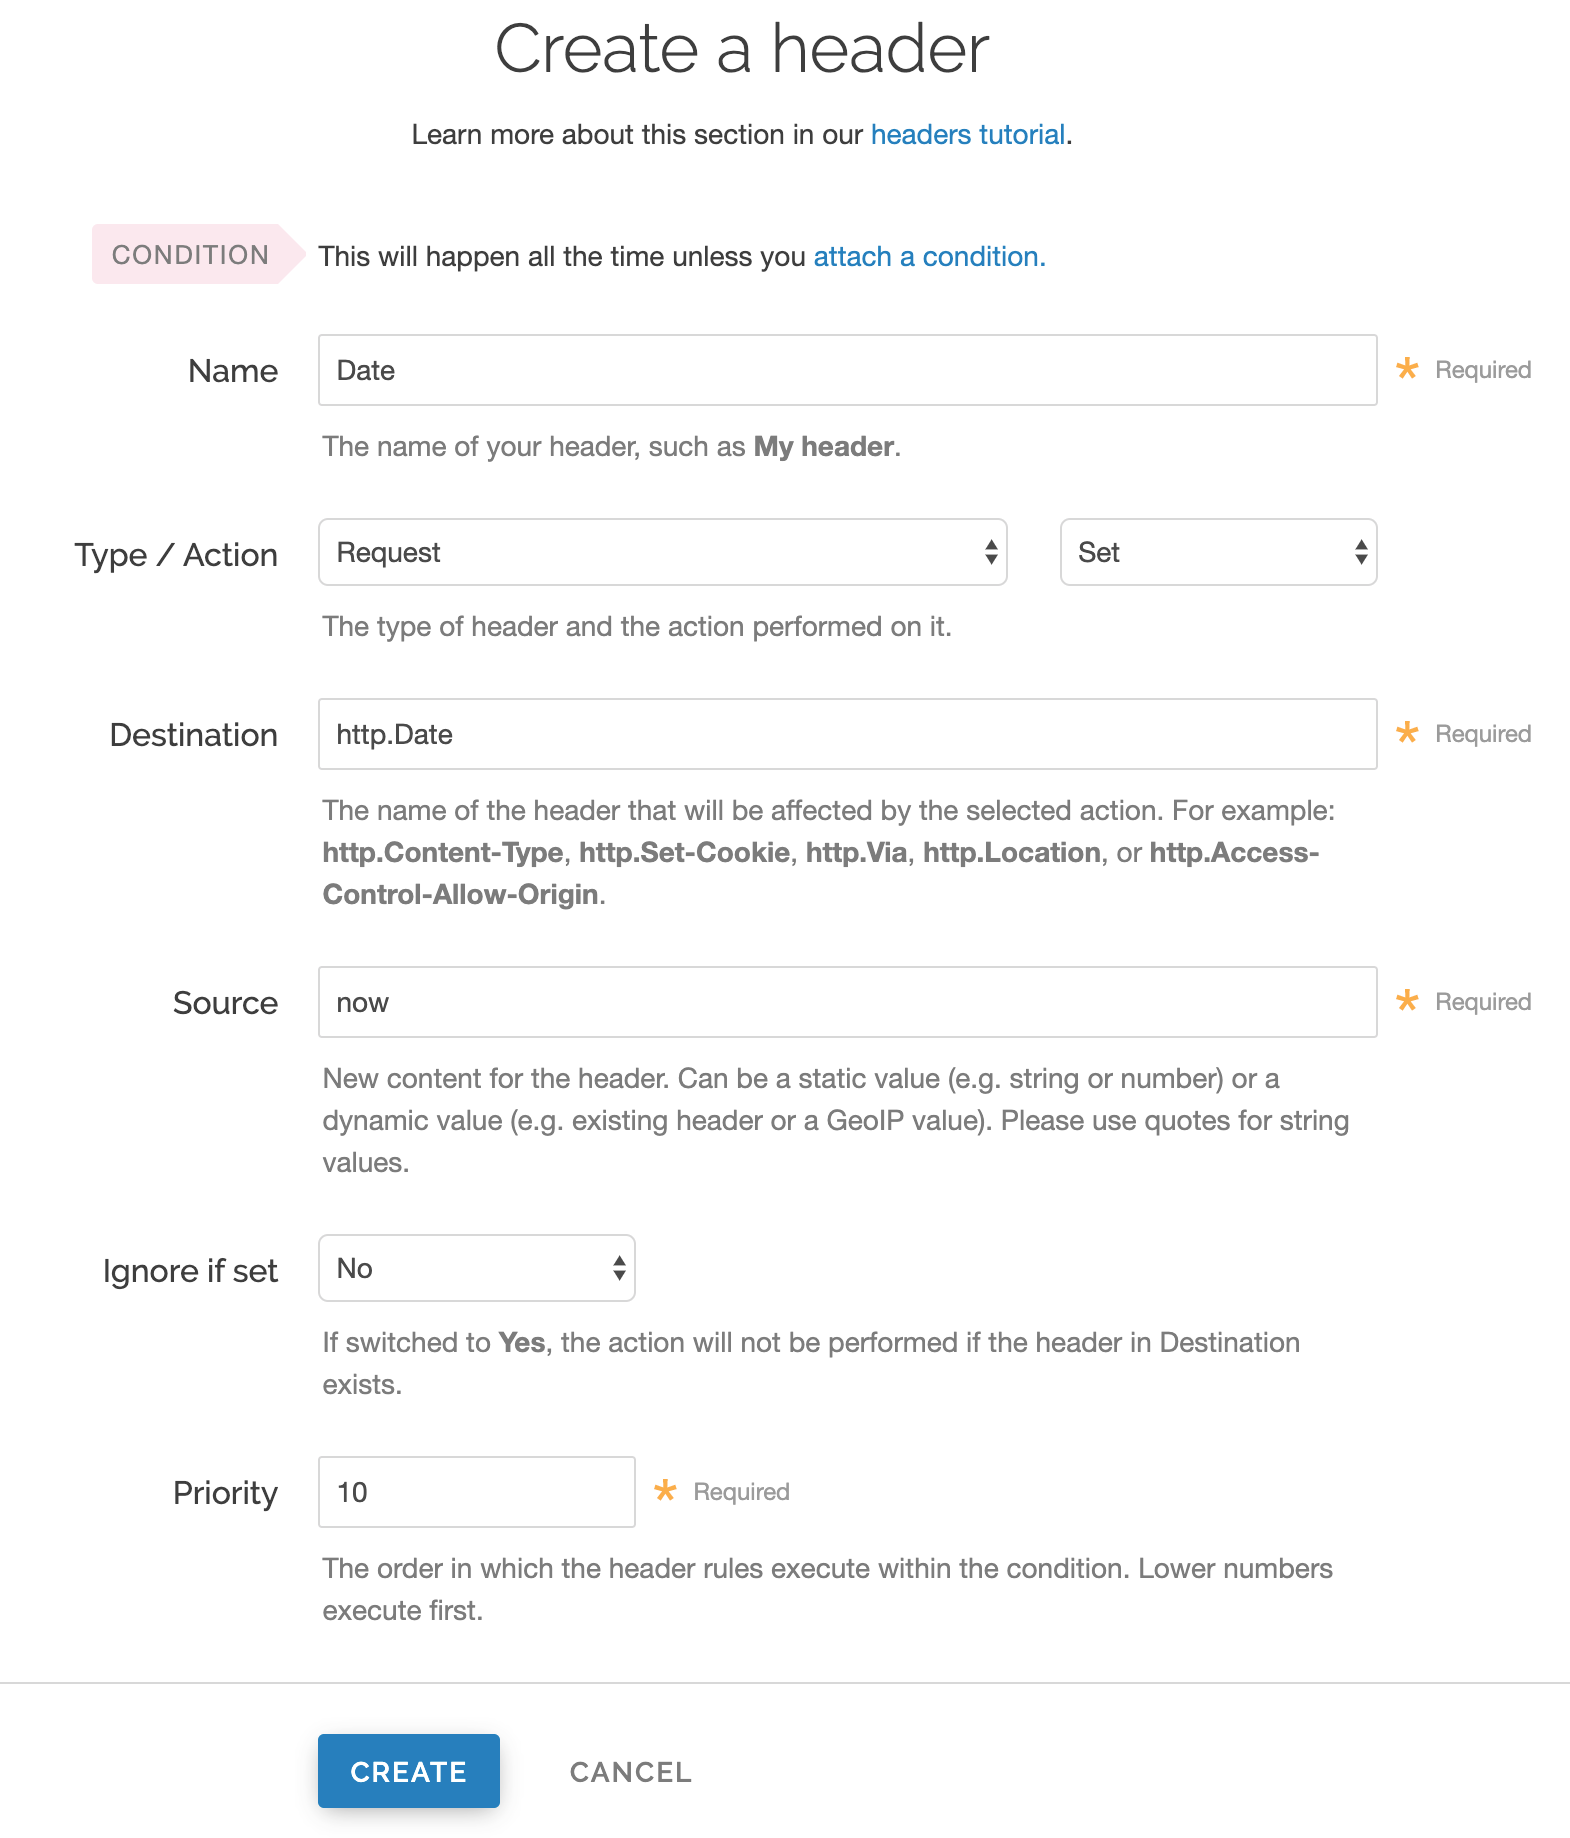
Fill out the Create a header fields as follows:
- In the Name field, enter
Date. - From the Type menu, select Request, and from the Action menu, select Set.
- In the Destination field, enter
http.Date. - In the Source field, enter
now. - From the Ignore if set menu, select No.
- In the Priority field, enter
10.
- In the Name field, enter
Click Create. A new Date header appears on the Content page. You will use this later within the Signature of the Authorization header.
Create an Authorization header
Next, create the Authorization header with the specifications listed below.
Click Create header again to create another new header.
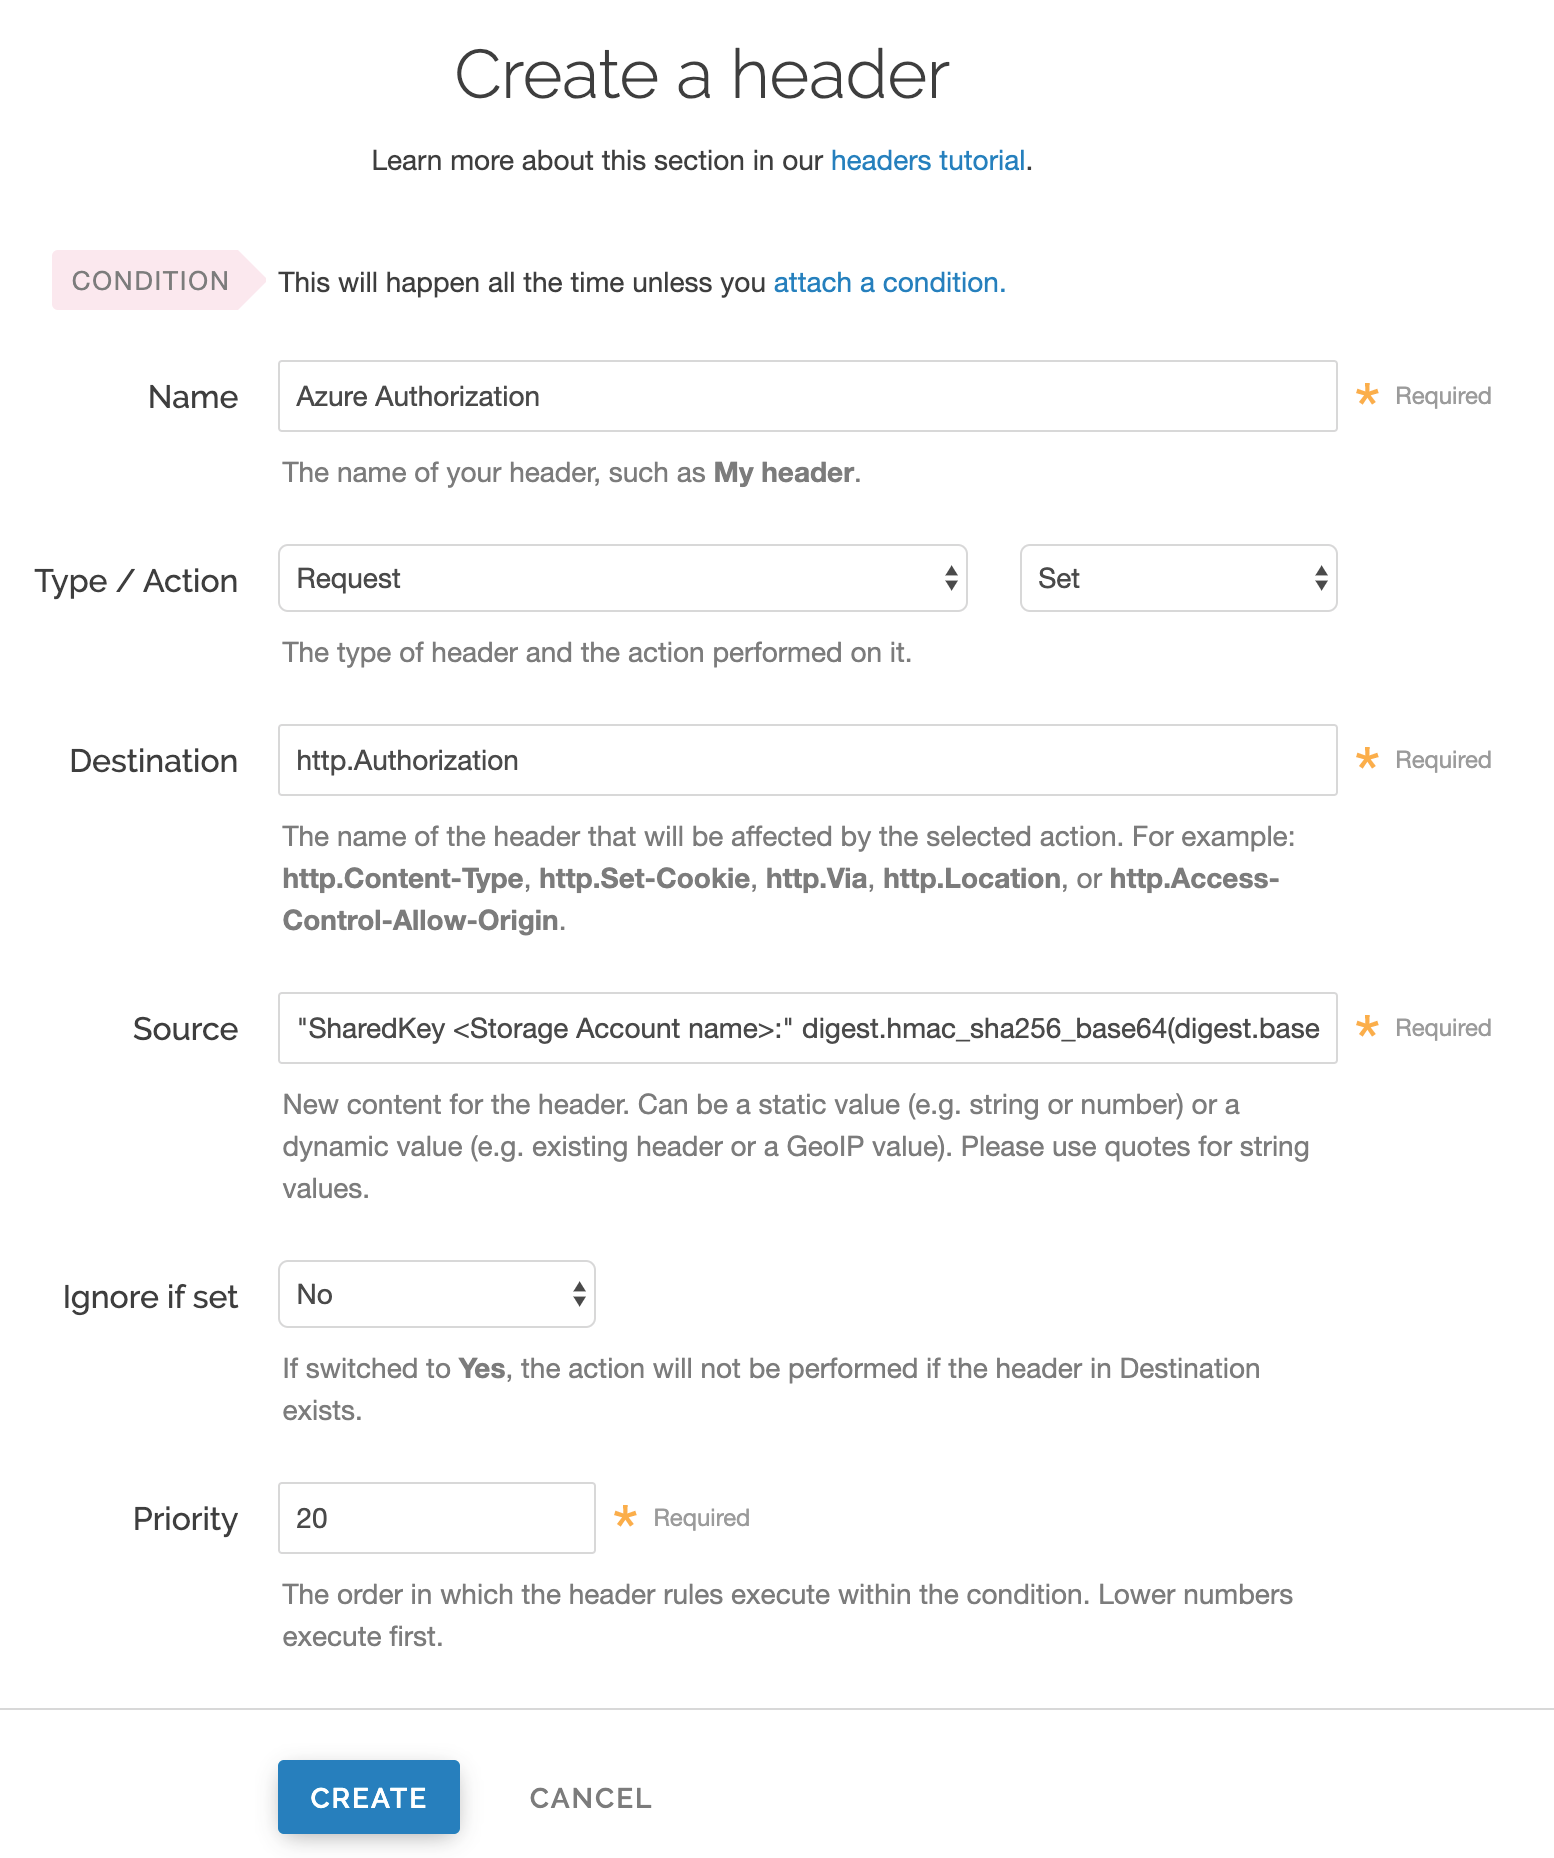
Fill out the Create a header fields as follows:
- In the Name field, enter
Azure Authorization. - From the Type menu, select Request, and from the Action menu, select Set.
- In the Destination field, enter
http.Authorization. - From the Ignore if set menu, select No.
- In the Priority field, enter
20.
- In the Name field, enter
In the Source field, enter the header authorization information using the following format:
"SharedKey <Storage Account name>:" digest.hmac_sha256_base64(digest.base64_decode("<Azure Storage Account shared key>"), if(req.method == "HEAD", "GET", req.method) LF LF LF req.http.Date LF "/<Storage Account name>" req.url.path)replacing
<Storage Account name>and<Azure Storage Account shared key>with the information you gathered before you began. For example:"SharedKey test123:" digest.hmac_sha256_base64(digest.base64_decode("UDJXUFN1NjhCZmw4OWo3MnZUK2JYWVpCN1NqbE93aFQ0d2hxdDI3"), if(req.method == "HEAD", "GET", req.method) LF LF LF req.http.Date LF "/test123" req.url.path)We provide a detailed look at the Source field parameters below.
Click Create. The new Authorization header appears on the Content page.
- Click Activate to deploy your configuration changes.
A detailed look at the Source field
So what's going on in the Source field of the Authorization header? Here's the basic format:
SharedKey<storage account name><Signature Function><key><message>
It tells us the following:
| Element | Description |
|---|---|
SharedKey | A constant placed before the storage account name. It's always SharedKey. |
storage account name | The name of your Azure Storage Account. We used test123 in this example. |
signature function | The algorithm used to validate the key and message of the signature. We used digest.hmac_sha256_base64(<key>, <message>) in this example. |
key | The Azure Storage Account shared key from your Azure Storage developer's account. We used UDJXUFN1NjhCZmw4OWo3MnZUK2JYWVpCN1NqbE93aFQ0d2hxdDI3 in this example. It must be Base64 decoded. |
message | The UTF-8 encoding of the StringToSign. See the table below for a break down of each portion of the message. |
The message that's part of the Source field in the Authorization header takes on this basic format:
<HTTP-verb></n><Content-MD5>/n<Content-Type></n><Date></n><CanonicalizedAmzHeader></n><CanonicalizedResource>
It tells us the following:
| Element | Description |
|---|---|
HTTP-verb | The REST verb. We use req.method in this example. We rewrite HEAD to GET because Varnish does this internally before sending requests to origin. |
\n | A newline indicator constant. It's always \n. |
Content-MD5 | The content-md5 header value, used as a message integrity check. It's often left blank. We use LF (line feed) in this example. |
Content-Type | The content-type header value, used to specify the MIME-type. It's often left blank. We use LFin this example. |
Date | The date and time stamp. We use req.http.Date (which we created first as a separate header in the steps above). |
CanonicalizedHeaders | The x-ms headers, which customize your Azure Blob Storage implementation. It's often left blank. We use LF in this example. |
CanonicalizedResource | Your Storage Account Name. We use "/test123" in this example. |
Setting up Fastly to use an Azure Blob Storage private container with a Shared Access Signature (SAS)
To access an Azure Blob Storage private container with Fastly using a Service Shared Access Signature (SAS), read Microsoft's Delegate access with a shared access signature page. Then, obtain the SAS and sign the access URL.
TIP
Using a Service Shared Access Signature gives you more detailed control over:
- The interval during which the SAS is valid, including the start time and the expiry time.
- The permissions granted by the SAS. For example, a SAS for a blob might grant read and write permissions to that blob, but not delete permissions.
- An optional IP address or range of IP addresses from which Azure Storage will accept the SAS. For example, you might specify a range of IP addresses belonging to your organization.
- The protocol over which Azure Storage will accept the SAS. You can use this optional parameter to restrict access to clients using HTTPS.
Obtaining the Shared Access Signature
Obtain the SAS using the steps below.
In the Azure portal, navigate to your storage account
Under settings navigate to Shared access signature.
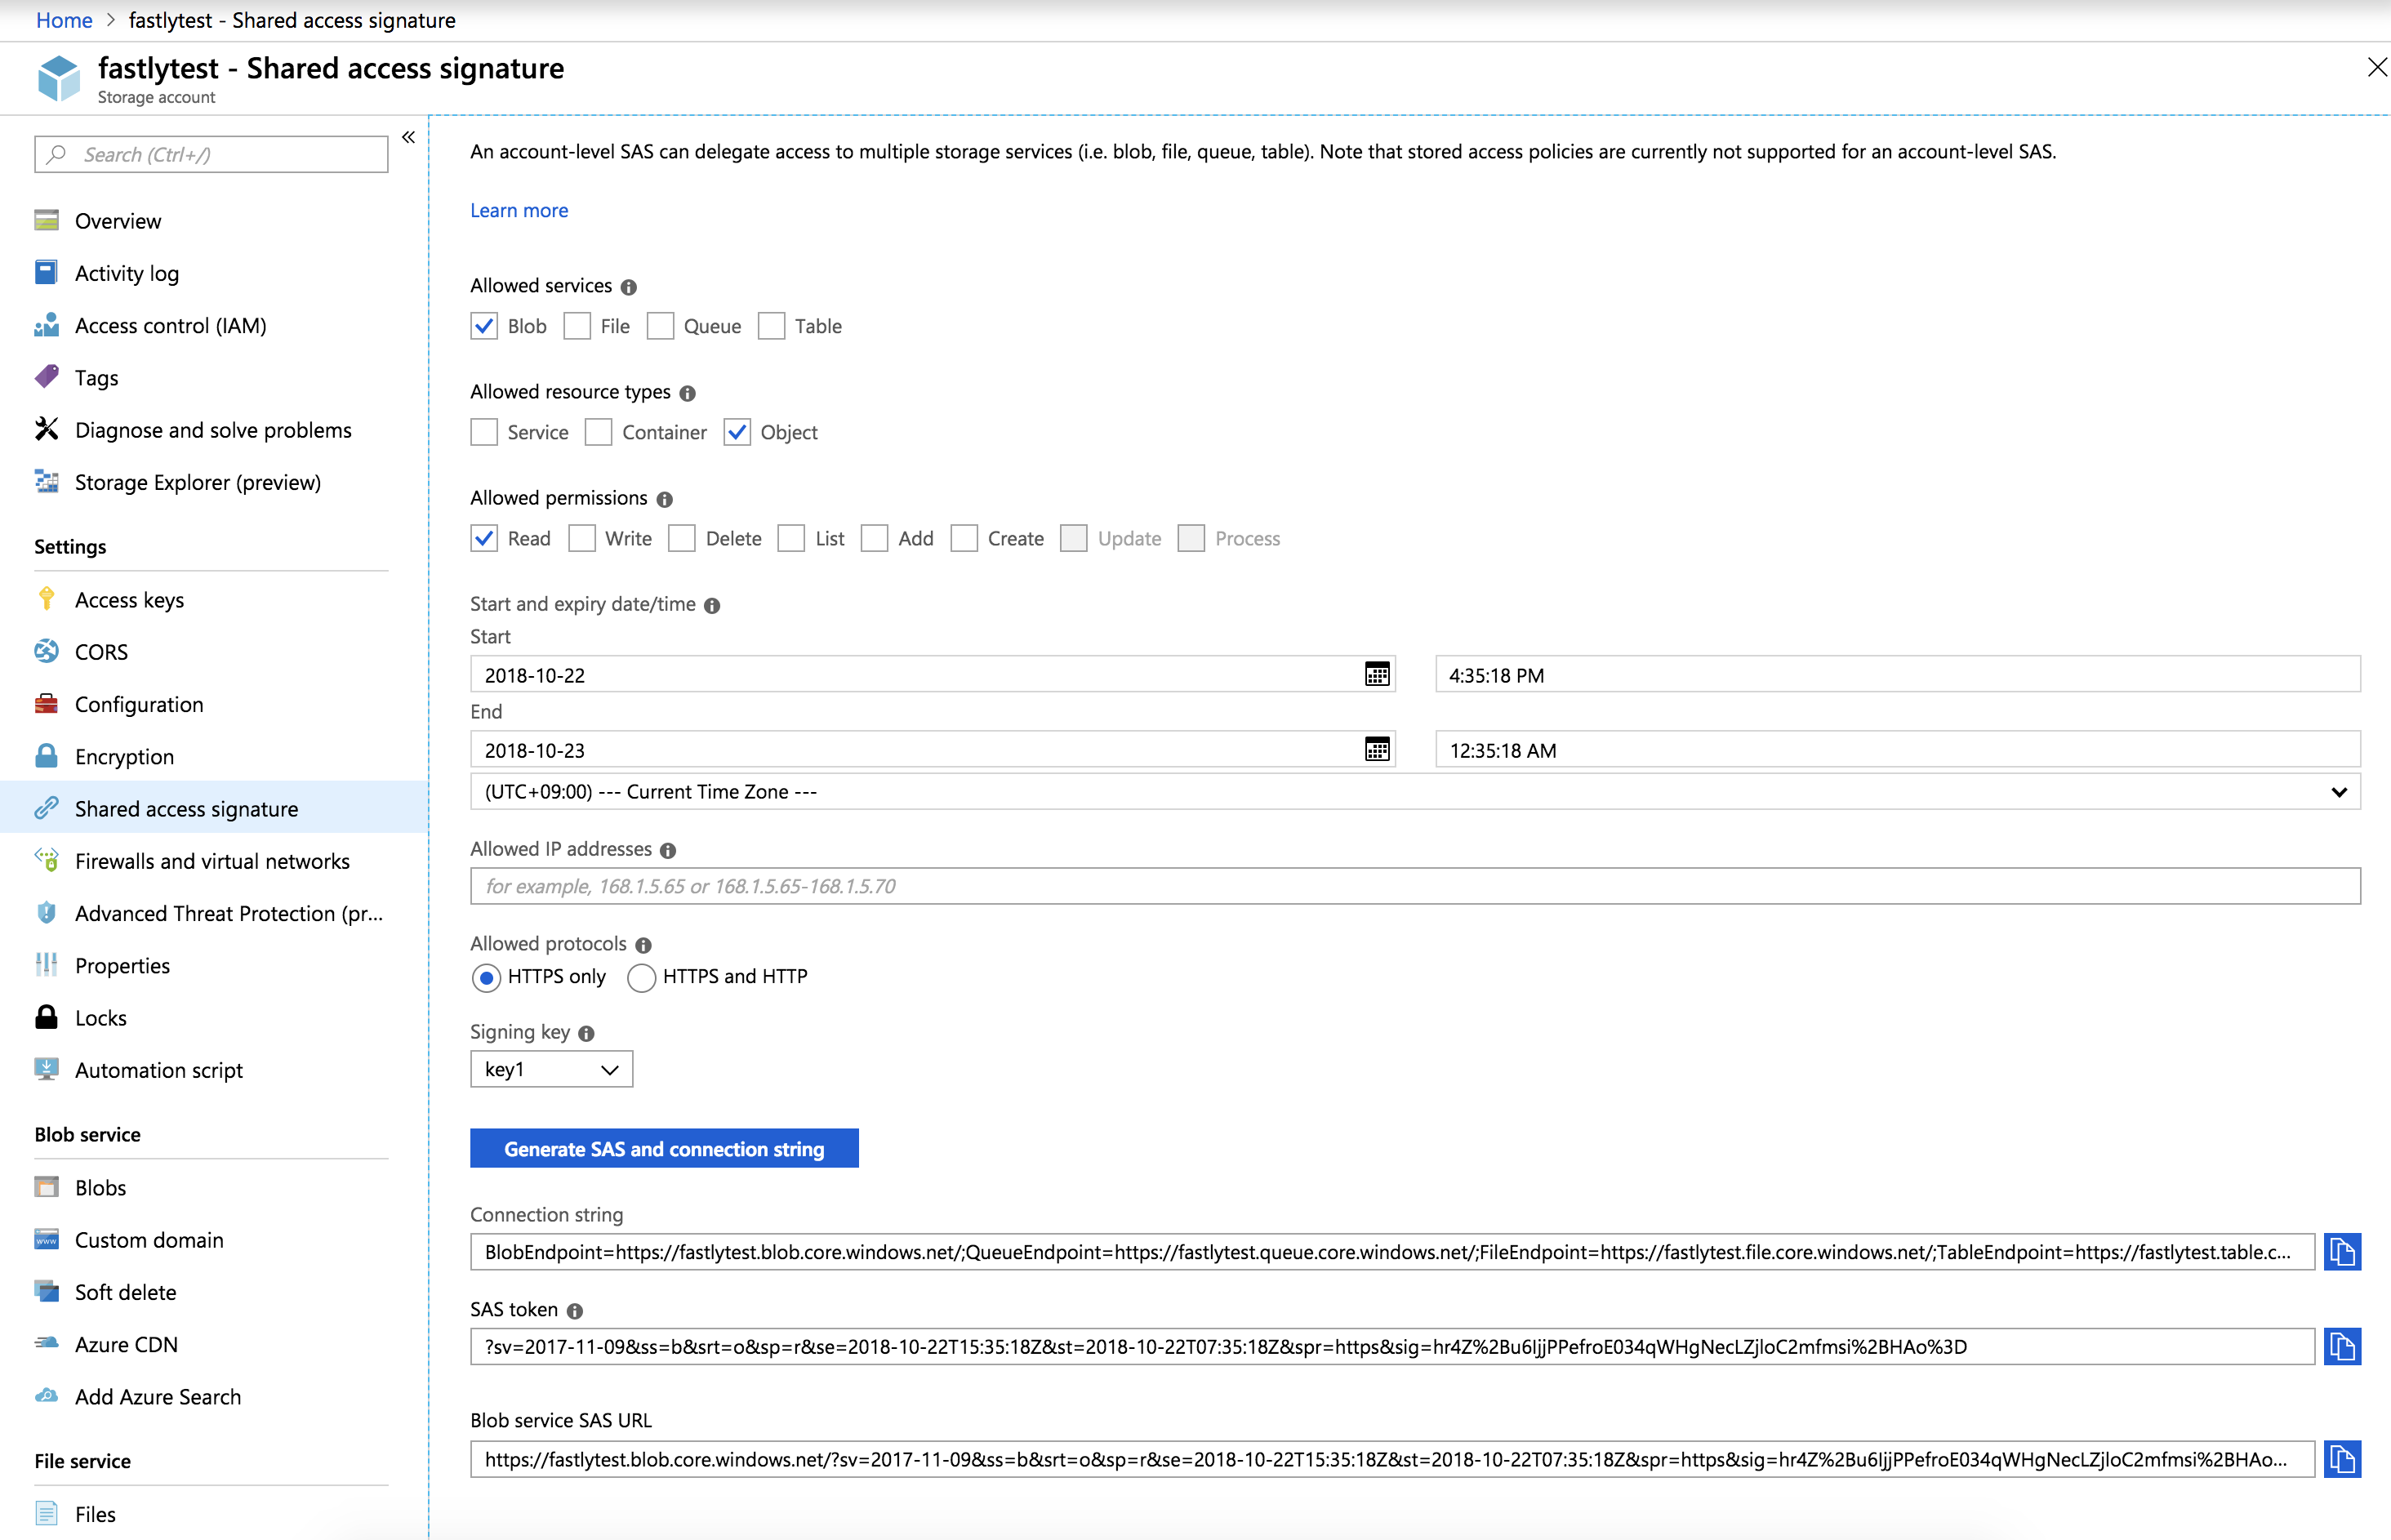
From the Allowed services controls, select Blob.
From the Allowed resource types controls, select Object.
From the Allowed permissions controls, select Read.
Leave the Start time set to the current date and time.
Set the End time as far in the future as you are comfortable (see note below).
Ensure the Allowed protocols remain set to HTTPS only.
Click Generate SAS and connection string. The generated information appears.
Copy and save the contents of the SAS token field. It will look something like:
?sv=2017-11-09&ss=b&srt=o&sp=r&se=2019-10-22T15:41:23Z&st=2018-10-22T07:41:23Z&spr=https&sig=decafbaddeadbeefWe provide a detailed look at the Shared Access Signature parameters below.
Signing the URL
Next, sign the access URL by creating an authorization header following the steps below.
- Log in to the Fastly control panel.
- From the Home page, select the appropriate service. You can use the search box to search by ID, name, or domain.
- Click Edit configuration and then select the option to clone the active version.
- Click Content.
Click Create header.

Fill out the Create a header fields as follows:
- In the Name field, enter a meaningful name such as
Set Azure private SAS Authorization URL. - From the Type menu, select Request, and from the Action menu, select Set.
- In the Destination field, enter
url. - In the Source field, enter
req.url.path {"<SAS TOKEN>"}replacing{"<SAS TOKEN>"}with the token you obtained from the Azure Portal. - From the Ignore if set menu, select No.
- In the Priority field, enter
10.
- In the Name field, enter a meaningful name such as
Click Create.
- Click Activate to deploy your configuration changes.
A detailed look at the Shared Access Signature parameters
Microsoft's Create a service SAS page provides more details on shared access signatures and how they are constructed.
| Element | Description |
|---|---|
sv | The signedversion field. This is required and should be whatever the Azure portal provided. |
ss | The signedservice field. This is required and should be b for "blob storage." |
srt | The signedresourcetype field. This is required and should be o for "object." |
sp | The signedpermissions field. This is required and should be r for "read only." |
st | The signedstart field. This is optional and specifies, in a UTC format compatible with ISO 8601, the time at which the shared access signature becomes valid. If omitted, the start time for this call is assumed to be the time when the storage service receives the request. |
se | The signedexpiry field. This is required and specifies, in a UTC format compatible with ISO 8601, the time at which the shared access signature becomes invalid. |
spr | The signedprotocol field. This is optional and specifies which HTTP protocol (http or https) the container should use for access. We recommend https. |
sig | The signature field. This is required and should be whatever the Azure portal provided. |
WARNING
Always keep track of the se expiry date. After it has passed, Fastly will not be able to access your private container.
TCP connection settings for improved performance
By default, Fastly keeps established TCP connections opened to your origin to improve performance. Azure’s default behavior, however, closes idle connections. Specifically, the Azure Load Balancer’s default behavior silently drops flows when the default idle timeout of a flow reaches four minutes. To ensure successful integration, we suggest tuning Azure in two ways:
- increase the Azure Load Balancer’s TCP idle timeout setting
- configure Azure to send a bidirectional TCP Reset (RST packet) on idle timeout
NOTE
This article describes an integration with a service provided by a third party. Read our note on integrations for details.
Do not use this form to send sensitive information. If you need assistance, contact support. This form is protected by reCAPTCHA and the Google Privacy Policy and Terms of Service apply.
