
- English
- 日本語
Setting up single sign-on (SSO)
Last updated 2025-04-14
This guide explains how to set up and enable single sign-on (SSO) when using an identity provider (IdP) for authentication.
SSO allows users to access multiple applications with a single set of credentials. An IdP manages authentication requests, enforces security policies, and reduces the need for separate passwords across different systems. By centralizing identity management, you can simplify access control and ensure consistent authentication policies across your organization.
You can also enforce security measures such as multi-factor authentication (MFA) and role-based access control (RBAC) to protect sensitive information. Once configured, SSO provides a seamless login experience while maintaining strong security across all connected applications.
TIP
You can set up SSO for Signal Sciences accounts too. Check out our enablement guide for details.
Prerequisites
To enable SSO or require that it be applied to all of your organization’s users when they log in to the Fastly control panel, you must:
- be assigned the role of superuser for your Fastly account
- have access to your IdP’s administration console
In addition, your IdP must support:
- Security Assertion Markup Language 2.0 (SAML 2.0)
- Service Provider (SP) or IdP-initiated SSO for login purposes
You should also review this feature's limitations before enabling SSO.
Enabling SSO
Start by selecting an IdP and configuring that provider’s settings keeping in mind the prerequisites.
TIP
Save time by leaving both your Fastly control panel and your Okta windows open while you're enabling SSO. You'll be copying information back and forth between them while you set things up.
- Okta
- Other IdPs
Start by selecting Okta as the IdP in the Fastly control panel:
- Log in to the Fastly control panel.
- Go to Account > Single sign-on.
- From the Identity provider menu, select Okta.
Next, set up the Okta SSO settings:
- Log in to the Okta app.
- Go to Applications > Applications and select the Fastly app you're the administrator for.
- Click Sign On from the application tabs.
- From the SAML 2.0 area, copy the Metadata URL.
Then, save the metadata file:
- In the address field of a new browser window, paste the Metadata URL you just copied to display the IdP metadata.
- Right click in your browser window and select Save As from the menu that appears to save this metadata file to a location locally. You'll need this file to complete the setup in the Fastly control panel.
Next, go back to the Fastly control panel window and upload the metadata file to Fastly:
- Click Upload XML IdP metadata file to upload the metadata file you just saved.
- From the SSO token field, copy the SSO token.
Go back to the Okta window to edit your remaining Okta settings:
- On the Sign On tab in the Settings area, click Edit.
- In the SAML 2.0 area, deselect Disable Force Authentication.
- In the SSO token field of the Advanced Sign-on Settings area, paste the authentication token you just copied from the Fastly control panel.
- From the Application username format menu in the Credentials Area, select Email.
- Click Save.
Then return to the Fastly control panel and click Save and enable SSO to complete the setup.
Requiring SSO for your organization
To require SSO for everyone in your organization except superusers, follow these instructions.
- Log in to the Fastly control panel.
Go to Account > Single sign-on.
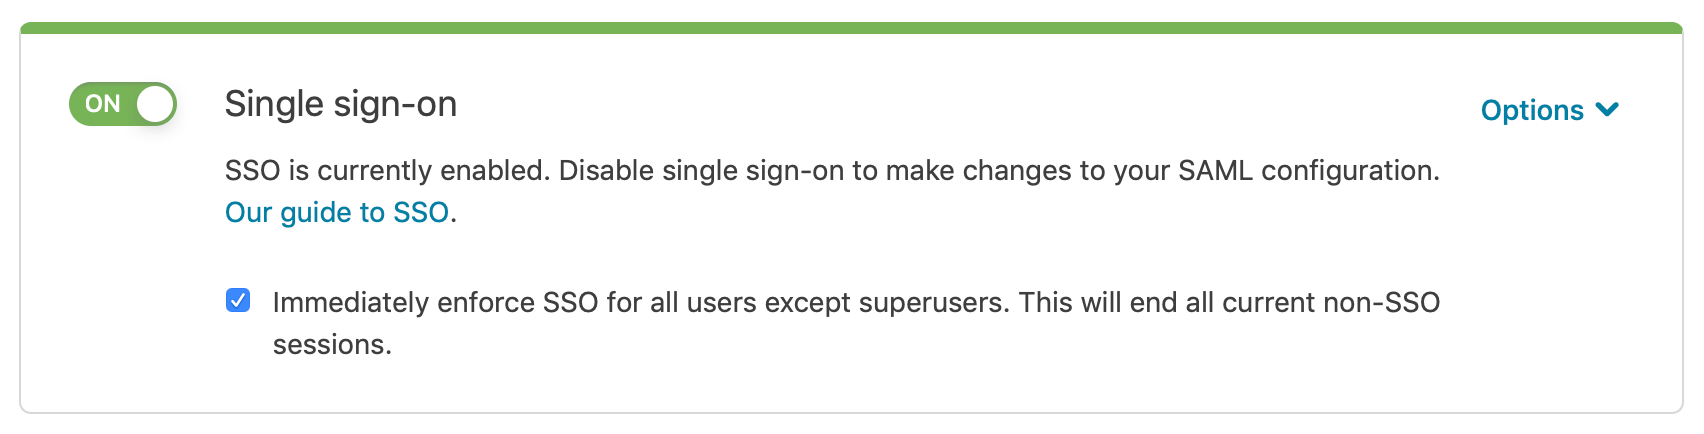
Select the Immediately enforce SSO checkbox that appears below the SAML configuration switch.
In the confirmation window, click Start enforcing SSO. Currently open non-SSO sessions for users assigned the role of user, billing, or engineer will be logged out and they will need to re-authenticate using SSO via your IdP.
NOTE
Users who have been assigned the role of superuser can always log in with their email address and password, whether or not Single sign-on is enabled.
Performing account tasks differently with SSO enabled
If your organization has enabled SSO, you may notice different feature availability in the Fastly control panel. This section describes the differences.
Changing your email address and password. Because SSO requires user email addresses in Fastly to match those in the IdP, you won't be able to change your email address while logged in using SSO. You also won't be able to modify your password or enable two-factor authentication.
Creating an API token. To create an API token while logged in to the Fastly control panel using SSO, you'll need to reauthenticate with your IdP. Follow the instructions for creating an API token and click the Re-Authenticate button on the Create a Token page.
NOTE
You can't create API tokens when using G Suite for authentication.
Managing sessions. Sessions created by logging in to the Fastly control panel using SSO or with a username and password expire after 3 hours.
Changing SSO providers
To change SSO providers, follow these instructions.
WARNING
Disabling the SSO feature for your organization will expire all active SSO sessions, including your own. Users will automatically be logged out of the Fastly control panel.
- Log in to the Fastly control panel.
- Go to Account > Single sign-on.
- From the Options menu, select Upload new SAML configuration.
- In the confirmation window, click Continue to delete your existing SAML confirmation.
- Follow the instructions in the enabling SSO section.
Disabling SSO
To disable SSO for your organization, either permanently or temporarily (e.g., your SSO provider is experiencing an outage), follow these instructions. Disabling SSO won't delete your SSO settings and you can re-enable SSO at any point using the same IdP configuration metadata you uploaded when you first enabled SSO.
WARNING
Disabling the SSO feature for your organization, even temporarily, will expire all active SSO sessions, including your own, and will automatically log users out of the Fastly control panel.
- Log in to the Fastly control panel.
Go to Account > Single sign-on.
Click the Single sign-on switch to disable SSO for your organization.
In the confirmation window, click Disable SSO. SSO will be disabled and will not be required for your organization's users. All active SSO sessions will expire, including your own, and users will automatically be logged out of the Fastly control panel.
Bypassing single sign-on for selected users
If your organization has single sign-on enabled for everyone, any superuser can enable another superuser to bypass SSO for their account. This allows them to log in to the Fastly control panel via their username and password, without needing to authenticate through your SSO provider. To do this, be sure to select Bypass SSO when adding them to your account or editing their roles and access permissions.
Limitations and considerations
Fastly's SSO feature has the following limitations:
- Users cannot create API tokens from the Fastly control panel when using G Suite SSO for a session's authentication.
- Fastly does not support automatic provisioning and de-provisioning of users using SCIM for Fastly accounts. To enable SCIM for your Signal Sciences account, check out our guide to automating user management.
Also, keep in mind that the SHA-1 cryptographic algorithm has been retired by the National Institute of Standards and Technology (NIST) and they recommend upgrading to more advanced and secure replacements such as those from the SHA-2 family of hash functions, like SHA-256. Consider using or upgrading to these more advanced algorithms for SAML certificate signing for SSO setup in advance of the NIST recommended phase out deadline.
Do not use this form to send sensitive information. If you need assistance, contact support. This form is protected by reCAPTCHA and the Google Privacy Policy and Terms of Service apply.
