
- English
- 日本語
Log streaming: Google BigQuery
Last updated 2025-03-10
Fastly's Real-Time Log Streaming feature can send log files to BigQuery, Google's managed enterprise data warehouse.
NOTE
Fastly does not provide direct support for third-party services. Read Fastly's Terms of Service for more information.
Prerequisites
Before adding BigQuery as a logging endpoint for Fastly services you will need to:
- Register for a Google Cloud Platform (GCP) account.
- Create a service account on Google's website.
- Use Google IAM service account impersonation or key-based access to configure the access method that Fastly uses to send logs.
- Enable the BigQuery API.
- Create a BigQuery dataset.
- Add a BigQuery table.
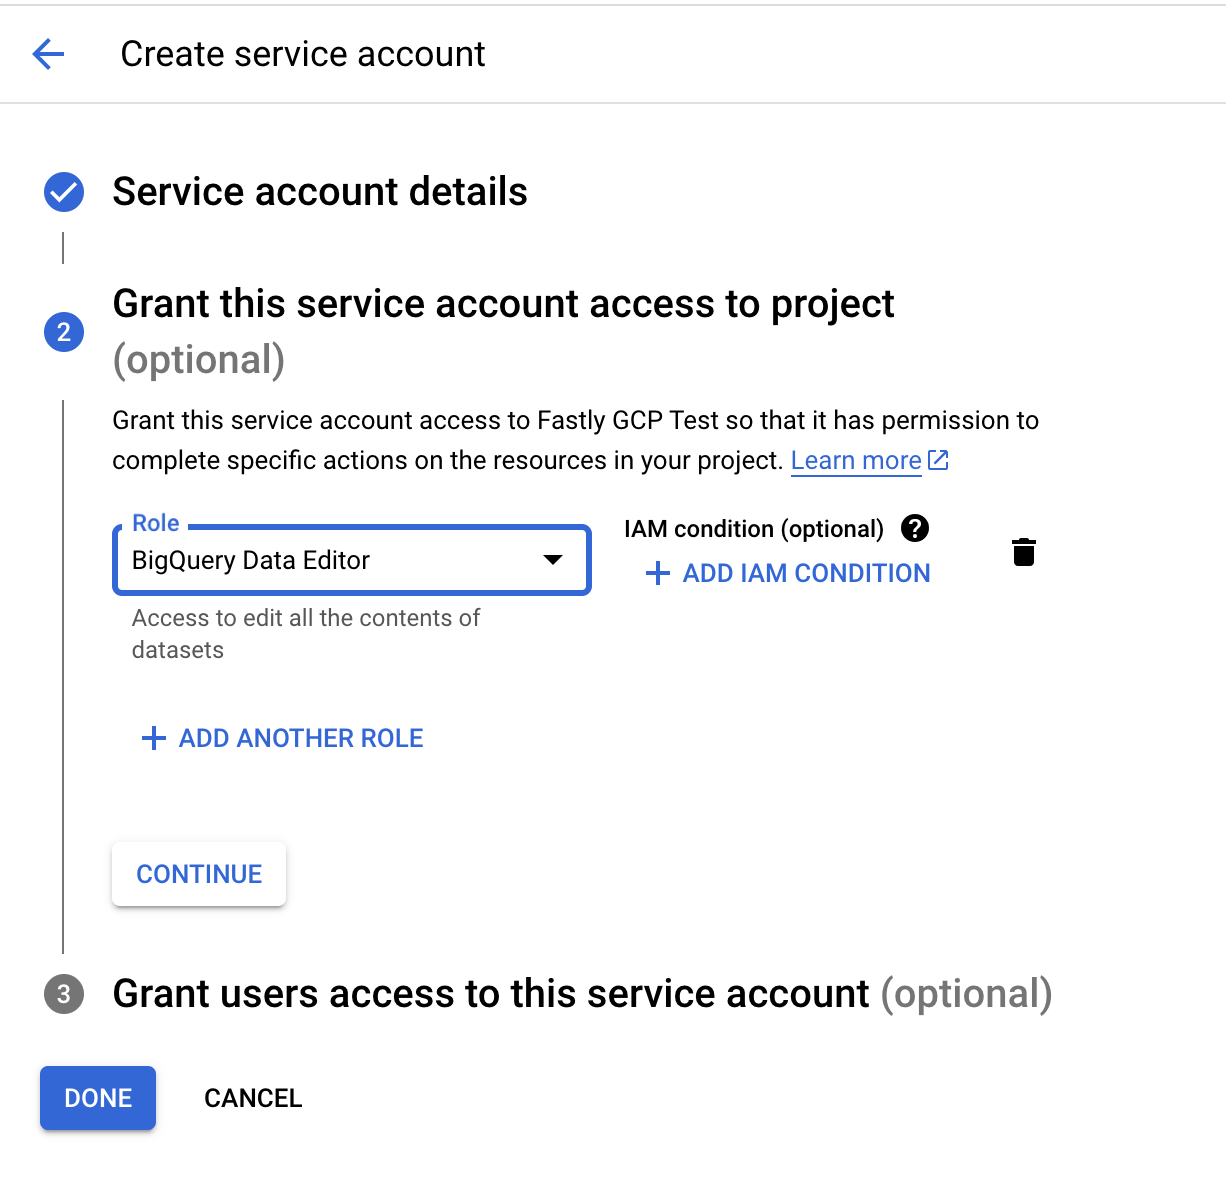
Creating a service account
Google Cloud Platform (GCP) uses service accounts for third-party application authentication and role-based access to Google Cloud resources. To create a new service account, follow the instructions in the Google Cloud documentation.
NOTE
When creating the service account for logging to BigQuery, the service account must be assigned the Big Query Data Editor role to write to the table you use for Fastly logging. You can assign the Big Query Data Editor role to the entire project using Google Console or apply the roles/bigquery.dataEditor to the project using Google Terraform - IAM Project.
Configure access for the service account
Fastly requires access to write logs to your BigQuery table. You can use either Google IAM service account impersonation or key-based access to allow Fastly to send logs to BigQuery.
Configuring Google IAM service account impersonation
If you elect to use Google IAM service account impersonation to avoid storing keys with Fastly, you'll need to specify a service account name and a project ID when adding GCS as your logging endpoint. The service account ID comes before the @ in the service account email and the project ID immediately after. For example, if your service account email is my-name@projectid.iam.gserviceaccount.com, the service account ID is my-name and the project ID is projectid. Our guide to creating an Google IAM role provides specific details on configuring this feature.
Configuring key-based access
If you elect to use key-based access, refer to Google's guide on generating a service account credential.
When configuring key-based access, you must select the JSON format. Upon saving the configuration, a JSON file will be downloaded to your computer, containing the credentials for the GCS service account you just created. Open the file with a text editor and make a note of the private_key and client_email.
Enabling the BigQuery API
To send your Fastly logs to your BigQuery table, you'll need to enable the BigQuery API in the Google Cloud Platform API Manager.
Creating the BigQuery dataset
After you've enabled the BigQuery API, follow these instructions to create a BigQuery dataset:
- Open the BigQuery page in the Cloud Console.
- In the Explorer panel, select the project where you want to create the dataset.
- In the details panel, click Create dataset.
- In the Dataset ID field, enter a name for the dataset (e.g.,
fastly_bigquery). - Click Create dataset.
Adding a BigQuery table
After you've created the BigQuery dataset, you'll need to add a BigQuery table. There are four ways of creating the schema for the table:
- Edit the schema using the BigQuery web interface.
- Edit the schema using the text field in the BigQuery web interface.
- Use an existing table.
- Set the table to automatically detect the schema.
NOTE
Setting the table to automatically detect the schema may give unpredictable results.
Follow these instructions to add a BigQuery table:
Open the BigQuery page in the Cloud Console.
In the Explorer panel, expand your project and select the BigQuery dataset you created previously.
In the Source section, select Empty Table from the Create table from: menu.
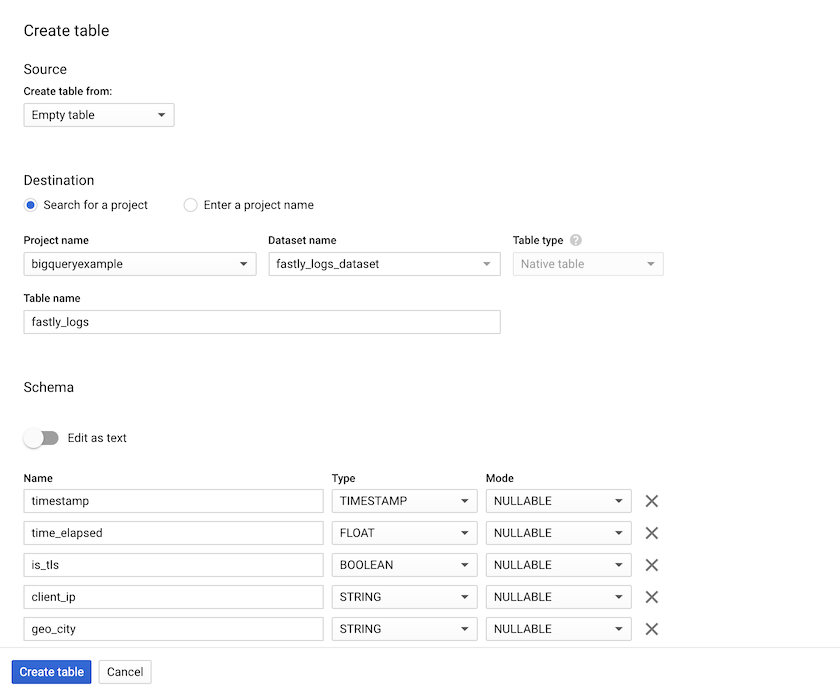
In the Table name field, enter a name for the table (e.g.,
logs).In the Schema section of the BigQuery website, use the interface to add fields and complete the schema. Check out the example schema section for details.
Click Create Table.
Adding BigQuery as a logging endpoint
Follow these instructions to add BigQuery as a logging endpoint. As part of configuration, you can elect to configure Google IAM role-based service account impersonation to avoid storing secrets. Read our guide on creating a Google IAM role for more information on this feature.
- Deliver services
- Compute services
- Review the information in our guide to setting up remote log streaming.
- In the Google BigQuery area, click Create endpoint.
- Fill out the Create a BigQuery endpoint fields as follows:
- In the Name field, enter a human-readable name for the endpoint.
- In the Placement area, select where the logging call should be placed in the generated VCL. Valid values are Format Version Default,
waf_debug (waf_debug_log), and None. Read our guide on changing log placement for more information. - In the Log format field, enter the data to send to BigQuery. Check out the example format section for details.
- In the Access Method area, select how Fastly will access Google resources for purposes of log delivery. Select either User Credentials or IAM Role.
- If you selected User Credentials, fill out the following fields:
- In the Email field, enter the
client_emailaddress associated with the BigQuery service account. - In the Secret key field, enter the value of the
private_keyassociated with your BigQuery service account. - In the Project ID field, enter the ID of your Google Cloud Platform project.
- In the Dataset field, enter the name of your BigQuery dataset.
- In the Table field, enter the name of your BigQuery table.
- (Optional) In the Template field, enter an
strftimecompatible string to use as the template suffix for your table.
- In the Email field, enter the
- If you selected IAM Role, fill out the following fields:
- In the Service Account Name field, enter the name of the service account email address you selected when configuring Google IAM service account impersonation.
- In the Project ID field, enter the ID of your Google Cloud Platform project.
- In the Dataset field, enter the name of your BigQuery dataset.
- In the Table field, enter the name of your BigQuery table.
- (Optional) In the Template field, enter an
strftimecompatible string to use as the template suffix for your table.
- Click Create to create the new logging endpoint.
- Click Activate to deploy your configuration changes.
Example format
Data sent to BigQuery must be serialized as a JSON object, and every field in the JSON object must map to a string in your table's schema. The JSON can have nested data in it (e.g., the value of a key in your object can be another object). Here's an example format string for sending data to BigQuery:
123456789101112131415161718{ "timestamp": "%{strftime(\{"%Y-%m-%dT%H:%M:%S"\}, time.start)}V", "client_ip": "%{req.http.Fastly-Client-IP}V", "geo_country": "%{client.geo.country_name}V", "geo_city": "%{client.geo.city}V", "host": "%{if(req.http.Fastly-Orig-Host, req.http.Fastly-Orig-Host, req.http.Host)}V", "url": "%{json.escape(req.url)}V", "request_method": "%{json.escape(req.method)}V", "request_protocol": "%{json.escape(req.proto)}V", "request_referer": "%{json.escape(req.http.referer)}V", "request_user_agent": "%{json.escape(req.http.User-Agent)}V", "response_state": "%{json.escape(fastly_info.state)}V", "response_status": %{resp.status}V, "response_reason": %{if(resp.response, "%22"+json.escape(resp.response)+"%22", "null")}V, "response_body_size": %{resp.body_bytes_written}V, "fastly_server": "%{json.escape(server.identity)}V", "fastly_is_edge": %{if(fastly.ff.visits_this_service == 0, "true", "false")}V}Example schema
The BigQuery schema for the example format shown above would look something like this:
timestamp:TIMESTAMP,client_ip:STRING,geo_country:STRING,geo_city:STRING,host:STRING,url:STRING,request_method:STRING,request_protocol:STRING,request_referer:STRING,request_user_agent:STRING,response_state:STRING,response_status:STRING,response_reason:STRING,response_body_size:STRING,fastly_server:STRING,fastly_is_edge:BOOLEANDo not use this form to send sensitive information. If you need assistance, contact support. This form is protected by reCAPTCHA and the Google Privacy Policy and Terms of Service apply.
